7 - Fault Finding
140
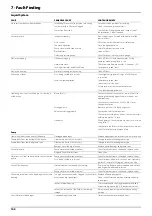
Liquid System
FAULT
PROBABLE CAUSE
CONTROL/REMEDY
No spray from boom when turned on.
SmartValve/Pressure valve positions are wrong.
Set correct valve positions for spraying.
Suction/pressure filters are clogged.
Clean suction and pressure filters.
No suction from tank.
See if suction fitting in main tank sump is free of
sedimentation. Clean if needed.
Lack of pressure.
Incorrect assembly.
Boost valve is open (located at the bottom of the
pressure filter).
Air in system.
Fill suction hose with water for initial priming.
Too much agitation.
Close the agitation valve.
Pump valves are blocked or worn.
Check for obstructions and wear.
Blocked filters.
Clean all filters.
Defective pressure gauge.
Check for dirt at inlet of pressure gauge.
Pressure dropping.
Filters are clogging.
Clean all filters. Fill with cleaner water. If using
powders, make sure agitation is on.
Nozzles are worn.
Check flow rate. Replace nozzles, if it exceeds 10%.
Sucking air towards end of tank load.
Lower pump speed (rpm).
Pressure increasing.
Pressure filters beginning to clog.
Clean all filters.
Formation of foam.
Air is being sucked into system.
Check tightness/gaskets/O-rings of all fittings on
suction side.
Excessive liquid agitation.
Lower pump speed (rpm).
Check safety valve is tight.
Ensure returns inside the tank are present.
Use a foam damping additive.
Operating unit is not functioning, or it is having a
malfunction.
Blown fuse(s).
Check mechanical function of micro switches. Use
cleaning/lubricating agent if the switch does not
operate freely.
Check motor current, max. 450-500 mA. If over,
change the motor.
Wrong polarity.
Brown to positive (+). Blue to negative (-).
Valves not closing properly.
Check valve seals for obstructions.
Check micro switch plate position. Loosen the screws
holding the plate a 1/2 turn.
No power.
Wrong polarity. Check that brown is positive (+), blue
is negative (-).
Check print plate for dry solders or loose connections.
Check fuse holder is tight around fuse.
Pump
Liquid leaks from the bottom of the pump.
Damaged diaphragm.
Replace diaphragm. See relevant section in this book.
Grease leaks from the bottom of the pump.
Grease used has too low viscosity.
Change to recommended grease type.
Grease leaks from the shaft grease seals.
Grease used has too low viscosity.
Change to recommended grease type.
Bearings worn/too high friction.
Replace pump bearings and grease seals.
Lack of pressure.
Pump valves are blocked or defect.
Check for obstructions or, if needed, replace valves.
Plugged filters in fluid system.
Clean filters.
Vibrations in system and unpleasant noise from the
pump.
Pump valves are blocked or defect.
Check for obstructions or, if needed, replace valves.
Air is being sucked into system.
Check for leaks, pinholes in suction hoses, tightness/
gaskets/O-rings of all fittings on the suction side.
Lack of flow/capacity.
Internal wear on conrod and conrod ring.
Poor greasing. Replace parts as needed and observe
proper grease quality and intervals.
Pump valves are blocked or defect.
Check for obstructions or, if needed, replace valves.
Extreme internal erosion on diaphragm covers and
housing.
Too high vacuum caused by clogged suction filter or
excessive pump speed (rpm).
Replace affected pump parts.
Clean suction filter and observe maximum pump
speed (rpm).
Lack of internal cleaning.
Use recommended cleaning procedures and add
extra cleaning agents (e.g. AllClearExtra or similar).
Lack of conservation of the fluid system during
storage.
Always use a proper mixture of antifreeze during
storage.
Short lifetime for diaphragm.
Overspeeding of the pump.
Observe maximum pump speed (rpm).
Summary of Contents for RANGER PRO VH
Page 4: ...1 EU Declaration 4 ...
Page 10: ...Table of Contents 6 ...
Page 108: ...5 Operation 104 ...
Page 111: ...6 Maintenance 107 Boom Lubrication Oiling Plan Lubrication Oiling Plan Trailer Paralift ...
Page 142: ...6 Maintenance 138 ...
Page 164: ...Index 160 ...
Page 166: ...HARDI INTERNATIONAL A S Herthadalvej 10 DK 4840 Nørre Alslev DENMARK ...


