Mounting
The Wall Mount Cabinet has four key shaped eyelets on the back to hang it in your work area.
Mount it to a solid wood surface with four wood screws (not included). Make certain that the
mounting surface is solid, and capable of supporting the weight of the Wall Mount Cabinet, in addition
to the weight of the tools and accessories that will be put into the Cabinet. Set the Cabinet in place
on the wall. Mark off all four (4) eyelets. Make sure that there are no electrical cables or cords in
the drilling path. Drill a small entry hole for each screw. Thread the screws in part way. Place the
Wall Mount Cabinet eyelets onto the wood screws so that it hangs properly. Finish inserting the
screws making certain that they are fully inserted and that the Wall Cabinet is secure.
Unpacking
When unpacking your Wall Mount Cabinet with Shelf, check to make sure the following parts are
included. If any parts are missing or broken, please call HARBOR FREIGHT TOOLS
at 1-800-444-3353.
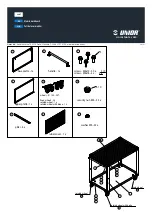
Parts List
Part #
Description
Quantity
Part #
Description Quantity
1
Side
2
5
Spring 1
2
Shelf
3
6
Tool Tray 1
3
Large Washer
2
7
Nut and Bolt 2
4
Not Used
–
8
Tube 1
Note: Some parts are listed and shown for illustration purposes only and are not available
individually as replacement parts.
PLEASE READ THE FOLLOWING CAREFULLY
THE MANUFACTURER AND/OR DISTRIBUTOR HAS PROVIDED THE PARTS DIAGRAM IN THIS MANUAL AS A REFERENCE
TOOL ONLY. NEITHER THE MANUFACTURER NOR DISTRIBUTOR MAKES ANY REPRESENTATION OR WARRANTY OF ANY
KIND TO THE BUYER THAT HE OR SHE IS QUALIFIED TO MAKE ANY REPAIRS TO THE PRODUCT OR THAT HE OR SHE IS
QUALIFIED TO REPLACE ANY PARTS OF THE PRODUCT. IN FACT, THE MANUFACTURER AND/OR DISTRIBUTOR EXPRESSLY
STATES THAT ALL REPAIRS AND PARTS REPLACEMENTS SHOULD BE UNDERTAKEN BY CERTIFIED AND LICENSED
TECHNICIANS AND NOT BY THE BUYER. THE BUYER ASSUMES ALL RISK AND LIABILITY ARISING OUT OF HIS OR HER
REPAIRS TO THE ORIGINAL PRODUCT OR REPLACEMENT PARTS THERETO, OR ARISING OUT OF HIS OR HER
INSTALLATION OF REPLACEMENT PARTS THERETO.
Assembly/Parts Diagram
SKU 90928
Page 4
2
6
8
1
3
5
7
REV 07/04
For technical questions, please call 1-800-444-3353.