Warning:
The warnings, cautions, and instructions discussed in this instruction manual cannot
cover all possible conditions and situations that may occur. It must be understood by
the operator that common sense and caution are factors which cannot be built into
this product, but must be supplied by the operator.
Assembly/ Operation
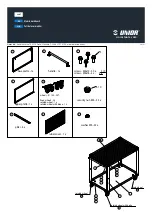
Your Wall Mount Cabinet will require complete assembly prior to use. It is important that you read
the entire manual to become familiar with the product BEFORE you use the Wall Mount Cabinet.
Before assembling the Cabinet, be sure that you have all parts described in the Parts List and
Assembly Diagram located on the last pages of this manual.
1.
Place the extensions located on one side of the Shelf (2) into the key shaped holes in the
Side (1). Slide the extensions down into the narrow part of the key shaped hole to secure
them in place. Repeat for the remaining two Shelves (2)-see Figure 1.
SKU 90928
Page 3
REV 07/04
2.
Take the second Side (1) and set it so that the key shaped holes slide onto the extensions
on the Shelf (2). Slide Side (1) down to secure Side (1) to Shelf (2).
3.
Place the Tool Tray (6) so that the holes in the lower edge of the Tool Tray (6) line up with the
holes in the Side (1) below the lowest shelf. Secure the Tool Tray (6) in place with Nut and
Bolt (7)-see Figure 2. The Tool Tray (6) will fold out and also will neatly fold up into the
cabinet.
4.
Hold the pin on the side of the Tube (8) down flush with the side of the Tube. Onto the Tube
(8) slide a Large Washer (3), then the Spring (5) and then another Large Washer (3). Slide
the Tube (8) so that each end of the Tube (8) fits through the holes located in the Tray (6)-see
Figure 3. You will need to hold down the pins on the side of the tube while this is done. When
you are finished, make sure that the pins move back in place to secure the Tube (8) in place.
The Tube (8) is ideal for holding 2 rolls of paper towels for cleanup.
Tube (8)
Washer (3)
Spring (5)
Figure 3
front view
Folded up view
extension into key
shaped hole
Figure 1
Side (1)
Nut and Bolt (7)
Tool Tray (6)
Figure 2
Shelf (2) side
For technical questions, please call 1-800-444-3353.