15
4.
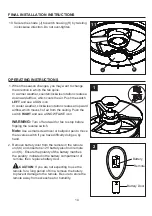
OPTIONAL:
A wall bracket for the remote is included
with remote unit (K) . Use the screws provided in the
remote unit (K) to attach the wall bracket to the desired
installation site. Once secure, store the remote inside
the wall bracket.
4
Screw
Remote
3. The buttons on the remote from the remote unit (K)
control the fan speed and light as follows:
Note:
This receiver has a preset memory function; when the switch is turned OFF, the control will
remember the light intensity and fan speed. When the switch is turned back ON, the light and fan
will resume operation as they were prior to the switch being turned OFF.
3
Low speed
Medium speed
High speed
Turn the fan off
Turns both uplight and downlight on/off.
Press and hold to achieve desired dimming setting for
uplight.
Press and hold to achieve desired dimming setting for
downlight.
Remote
Wall
bracket
CARE AND MAINTENANCE
Important:
Shut off main power supply before beginning any maintenance. Do not use water or a
damp cloth to clean the ceiling fan.
. At least twice each year, tighten all screws and lower canopy to check mounting plate screws.
. Clean fan housing with only a soft brush or lint-free cloth to avoid scratching the finish. Clean blades
with a lint-free cloth. You may occasionally apply a light coat of furniture polish to wood blades for
added protection.
Summary of Contents for HTE22025
Page 5: ...5 WARNING CAUTION PREPARATION Estimated Assembly Time...
Page 20: ......


