


FINAL INSTALLATION
Lowes.com/harborbreeze
Lowes.com/harborbreeze
18
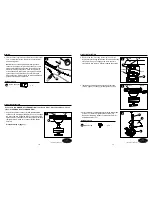
18. Attach switch housing (I) to switch housing cover (H).
Align switch housing (I) holes with switch housing cover
(H) holes. Install the previously removed screws
(Step 6, page 12) and tighten securely. Add fan pull
chain extension (BB) to corresponding chain.
Note
: The wider gap in the edge of the switch housing
cover (H) should align with reverse switch on the switch
housing (H).)
BB
I
OPERATION INSTRUCTIONS
1. PULL CHAINS:
• The fan pull chain is for motor speed control: High, Medium, Low and Off. Pull the
chain once for each position.
• The light pull chain controls the light fixture either ON or OFF with each pull the chain.
2. REVERSE SWITCH:
When the season changes, you may want to change the direction
the fan spins. To switch between clockwise and counterclockwise
rotation, flip the fan reversal switch.
Note
: Wait for fan to stop before reversing switch.
• In warmer weather, counterclockwise rotation creates a
downward air flow, which cools the air. Push the switch
LEFT and see a Sun icon.
• In cooler weather, clockwise rotation creates an upward air
flow, which moves hot air from the ceiling into the room.
Push the switch RIGHT and see a Snowflake icon.
16
17
17. Connect male plug from motor housing
assembly (G) to female plug from switch
housing (I).
17
I
Male plug
Female plug
G
H
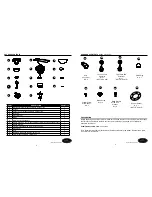
Hardware Used
Fan Pull Chain Extension
x 1
BB
Reverse
switch
Sun icon
Snowflake icon
Sun icon
Snowflake icon


