Harbor Breeze 00892 User Manual Download Page 10

WARRANTY

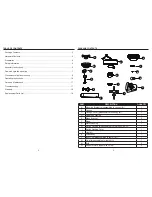
REPLACEMENT PARTS LIST

Printed in China

For replacement parts, call our customer service department at 1-800-643-0067, 

8 a.m. - 6 p.m., EST, Monday - Thursday, 8 a.m. - 5 p.m., EST, Friday. 

18

The manufacturer warrants this fan to be free from defects in workmanship and material present at 

time of shipment from the factory for lifetime limited from the date of purchase. This warranty applies 

only to the original purchaser. The manufacturer agrees to correct such defect at no charge or at our 

option replace the ceiling fan with a comparable or superior model.
To obtain warranty service, present a copy of your sales receipt as proof of purchase. All cost of 

removal and reinstallation are the expressed responsibility of the purchaser. Any damage to the 

ceiling fan by accident, misuse, or improper installation, or by affixing accessories not produced by 

the manufacturer of the fan, are at the purchaser’s own responsibility. The manufacturer assumes 

no responsibility whatsoever for fan installation during the lifetime limited warranty. Any service 

performed by an unauthorized person will render the warranty invalid.
Due to varying climatic conditions, this warranty does not cover changes in brass finish, rusting, 

pitting, tarnishing, corroding, or peeling. Brass finish fans maintain their beauty when protected from 

varying weather conditions. Any glass provided with this fan is not covered by this warranty. Any 

replacement of defective parts for the ceiling fan must be reported within the first year from the date 

of purchase. For the balance of the warranty, call our customer service department at 1-800-643-

0067 for return authorization and shipping instructions so that we may repair or replace the ceiling 

fan. Any fan or parts returned improperly packaged is the sole responsibility of the purchaser. There 

is no further expressed warranty. The manufacturer disclaims any and all implied warranties.
The duration of any implied warranty which can not be disclaimed is limited to the lifetime limited 

period as specified in our warranty. The manufacturer shall not be liable for incidental, consequential 

or special damages arising at or in connection with product use or performance except as may 

otherwise be accorded by law. This warranty gives you specific legal rights an you also have other 

rights which may vary from state to state. This warranty supersedes all prior warranties.

Note

: A small amount of “wobble” is normal and should not be considered a defect.
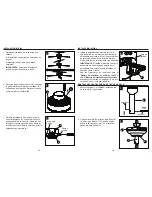
PART

DESCRIPTION

PART #

E

Blade Bracket

104000-0411ZW

F

Blade

108001-6082AO

I

Switch housing cover

105500-0043ZW

J

Light Kit

105000-0906ZW

E

F

I

J

Summary of Contents for 00892

Page 1: ...Harbor Breeze is a registered trademark of LF LLC All Rights Reserved Questions problems missing parts Before returning to your retailer call our customer service department at 1 800 643 0067 8 a m 6...

Page 2: ...t 18 3 2 PACKAGE CONTENTS PART DESCRIPTION QUANTITY A Mounting Bracket preassembled to canopy B 1 B Canopy 1 C Canopy Cover preassembled to canopy B 1 D Downrod Assembly 1 E Blade Bracket 5 F Blade 5...

Page 3: ...er or fuse box before beginning installation PERSONAL INJURY HAZARD To reduce the risk of personal injury do not bend the blade brackets when installing the brackets balancing the blades or cleaning t...

Page 4: ...ounting bracket A 7 6 4 Install the mounting bracket A to the outlet box not included sliding the mounting bracket A over the two outlet box screws not included Securely tighten the two outlet box scr...

Page 5: ...ning the tab to the slot If not fully engaged there is a possibility of fan falling which may result in serious injury or death CLOSEMOUNT STYLE FAN MOUNTING CLOSEMOUNT STYLE FAN MOUNTING 2 Remove thr...

Page 6: ...clockwise to lock in place Immediately tighten the two screws firmly Install the two screws that were removed in previous step and tighten securely 4 Attach a blade F to a blade bracket E using the b...

Page 7: ...e wires from the light kit J through the center hole in the switch housing cover I Hold wires taut while installing switch housing cover I to prevent the wire from twisting Tighten the light kit J ont...

Page 8: ...h the center hole of the glass bowl K Place rubber washer and hex nut removed in Step 14 onto the pipe and tighten securely Pass the fan pull chain through the side hole of the bowl cap L Then place t...

Page 9: ...speed control 1 Tighten all blade screws 2 Replace blades call customer service 3 Replace with an approved speed control device Excessive wobbling 1 The blades are loose 2 Blade brackets incorrectly...

Page 10: ...usting pitting tarnishing corroding or peeling Brass finish fans maintain their beauty when protected from varying weather conditions Any glass provided with this fan is not covered by this warranty A...

Page 11: ...trada de LF LLC Todos los derechos reservados Preguntas problemas piezas faltantes Antes de volver a la tienda llame a nuestro Departamento de Servicio al Cliente al 1 800 643 0067 de lunes a jueves d...

Page 12: ...ESCRIPTION QUANTITY A Abrazadera de montaje preensamblado a la base B 1 B Base 1 C Cubierta de la base preensamblado a la base B 1 D Ensamble de la varilla 1 E Abrazadera de aspa 5 F Aspa 5 G Carcasa...

Page 13: ...GO DE LESI N PERSONAL Para reducir el riesgo de lesiones personales no doble las abrazaderas de las aspas al instalar las abrazaderas equilibrar las aspas o limpiar el ventilador No introduzca objetos...

Page 14: ...lizando la abrazadera de montaje A por los dos tornillos de la caja de salida no se incluyen Apriete firmemente los dos tornillos de la caja de salida IMPORTANTE Si realiza el montaje en ngulo aseg re...

Page 15: ...D ranura leng eta 4 B C 1 ADVERTENCIA Tenga cuidado al alinear la leng eta con la ranura Si no calza bien es posible que el ventilador se caiga lo que podr a provocar lesiones graves o la muerte MONTA...

Page 16: ...mismos colores que se mencionaron det ngase de inmediato Se recomienda que un electricista profesional determine el cableado adecuado verde de puesta a tierra negro blanco verde de puesta a tierra neg...

Page 17: ...t de iluminaci n J por el agujero central de la cubierta de la carcasa del interruptor I Sostenga tensos los conductores mientras instala la cubierta de la carcasa del interruptor I para impedir que e...

Page 18: ...ral de la pantalla de vidrio K Coloque en el tubo la arandela de goma y la tuerca hexagonal que retir en el paso 14 y aj stelas firmemente Pase la cadena de tiro del ventilador por el agujero lateral...

Page 19: ...te todos los tornillos de las aspas 2 Reemplace las aspas llame al Servicio al Cliente 3 Reemplace por un dispositivo de control de velocidad autorizado Hay un tambaleo excesivo 1 Las aspas est n suel...

Page 20: ...t n xido picaduras deslustre corrosi n o descascarado Los ventiladores con acabado de lat n mantienen su belleza cuando se les protege de las cambiantes condiciones clim ticas La garant a no cubre los...

Reviews: