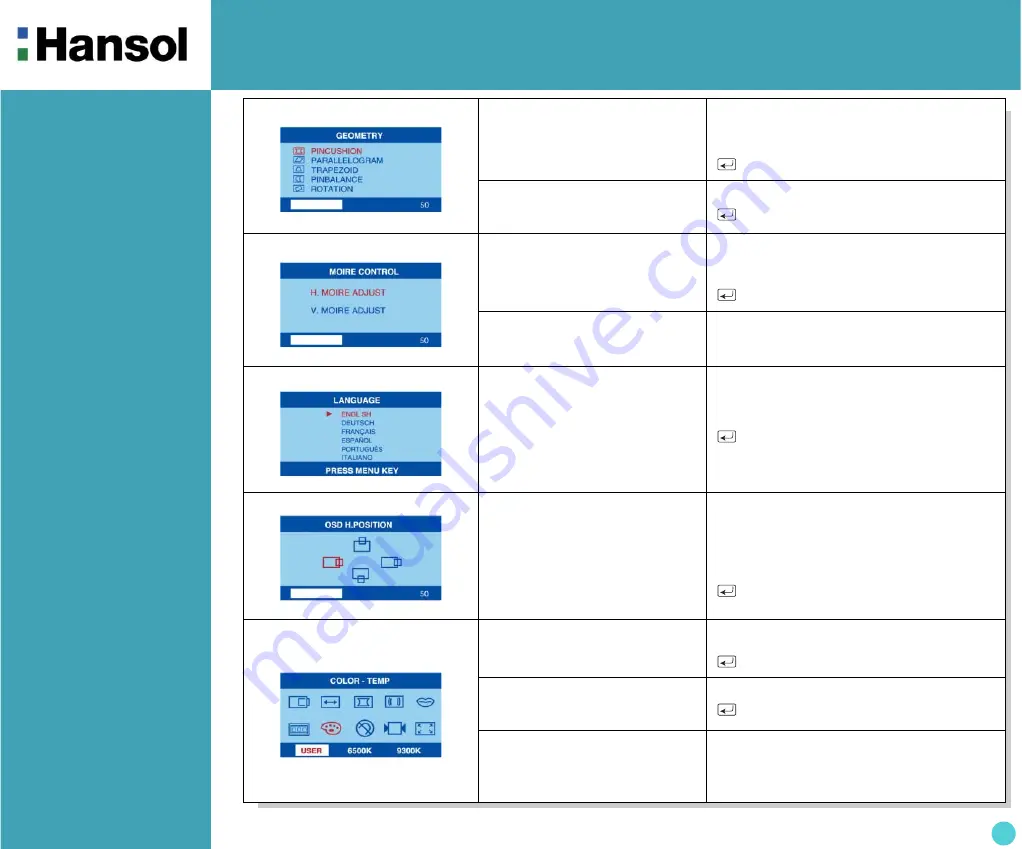
Hansol 730D User Manual Download Page 6

Color Monitor 

6

7. GEOMETRY

Odd press
: Selects and blinks the function
  with RED ICON.

 +    Controls the amount of the Selected 

  function. (Refer to Geometry 
  controls menu in detail)

    Exit to No.2

Even press 

: Stops blinking and ready to

  move function you want.

 +    Moves to function you want.

    Exit to No.2

8. MOIRE

Odd press

: Selects and blinks the 

 function with RED ICON.

 +    Controls the amount of the seleccted

    function

Please control these key          

  in order the image not to shiver.

    Exit to No.2

Even press

: Stops blinking and ready to

  move function you want.

 +    Moves to function you want.

9. LANGUAGE 

Selects the languages with
RED ICON and Exit to No.2.

 +    Moves to language you want.

    Exit to No.2

10. OSD POSITION 

Toggles OSD position
horizontally or vertically.

      Moves the OSD menu left or down in

         the selected function.
+


  Moves the OSD menu right or up 

        in the selected function.

    Exit to No.2

11. COLOR MODE

Odd press

: Blinks the RED ICON 

  - color menu ICON.

 +    Moves to color mode you want and    

 the selected “color mode” will blink.

    Exit to No.1

Even press

: Stops blinking and ready to

  move function you want.

 +    Moves to function you want.

    Exit to No.1

When the color mode ICON

is blinking in user mode, press,

then go to color adjust mode

No.12.

Summary of Contents for 730D

Page 1: ...egulatory Information 2 Introduction Features 3 Controls OSD Controls 4 OSD Menus 5 Power Management Feature 8 Standard Signal Table 8 Specifications 9 Pin assignment table D Sub Mini 15pin connector...

Page 2: ...B digital device pursuant to Part 15 of the FCC Rules These limits are designed to provide reasonable protection against harmful interference in a residential installation This equipment can generates...

Page 3: ...endly Power management circuit conforming to VESA DPMS standards controls energy consumption when monitor is not in use you save energy All plastic parts are recyclable All materials are strictly sele...

Page 4: ...s displayed Selects function with RED ICON Additional front controls Power Switch Turns the monitor power on or off When the power is on the LED is on LED Power indicator Light Located left side of th...

Page 5: ...S Moves to No 2 Decreases the brightness Increases the brightness Exit to No 1 4 CONTRAST Moves to No 2 Decreases the contrast Increases the contrast Exit to No 1 5 H V POSITION Toggles horizontal or...

Page 6: ...and ready to move function you want Moves to function you want 9 LANGUAGE Selects the languages with RED ICON and Exit to No 2 Moves to language you want Exit to No 2 10 OSD POSITION Toggles OSD posi...

Page 7: ...ecall ICON Degauss Eliminates the build up of stray magnetic fields which alter the correct scan of the electron beams and affect the purity of the screen colors focus and convergence When pressed you...

Page 8: ...480 43 269 85 008 36 000 VGA 720 x 400 37 927 85 039 35 500 SVGA 800 x 600 46 875 75 000 49 500 SVGA 800 x 600 53 674 85 061 56 250 XGA 1024 x 768 60 023 75 029 78 750 XGA 1024 x 768 68 677 84 997 94...

Page 9: ...imum Resolution 1600Dots x 1200Lines Non interlace Pixel Clock Max 157 8 MHz Display Size Standard Horizontal 306mm Vertical 230mm Power Consumption Max 100 Watts Power Supply AC 100 240Volt 60 50Hz 3...

Page 10: ...b connector male of the signal cable IBM Systems 1 5 6 10 11 15 15 Pin D Sub Pin No Assignment 1 Red Video 2 Green Video 3 Blue Video 4 Frame Ground 5 Ground 6 Red Video Ground 7 Green Video Ground 8...

Page 11: ...at the video card is securely seated in the PC Picture is fuzzy Adjust the Contrast and Brightness Controls Push the Degauss Button once Picture bounces or a waving pattern is present in the picture M...

Reviews: