background image

16

Engli

sh

2

Setting up your TV

2.1 Basic Connections

2.1.1

Power Connection

1

Connect the power cord to the AC IN input jack on the rear of the TV.

2

Insert the plug at the other end of the power cord into a power outlet.
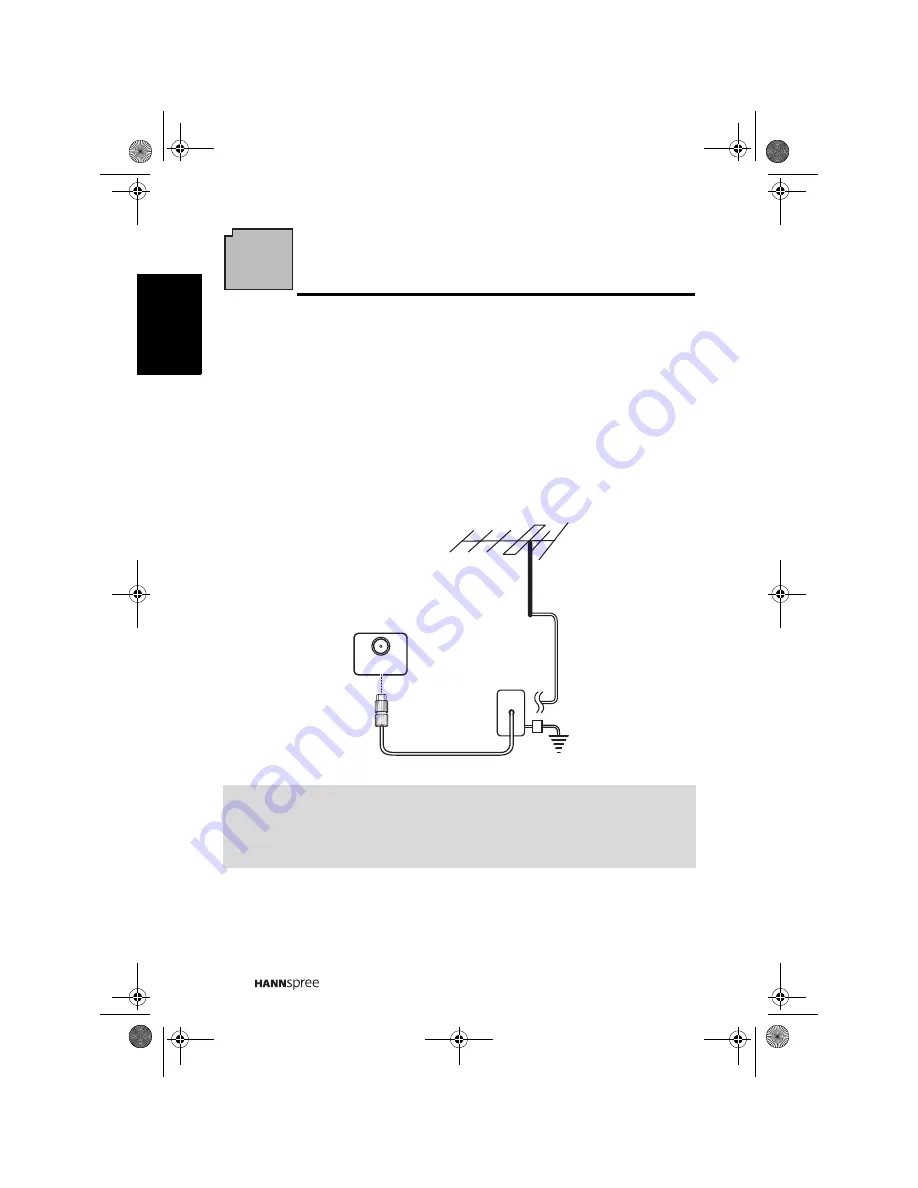
2.1.2

Connecting an Antenna or Cable TV

Connect one end of the VHF/UHF (Antenna) or CATV cable to TV/DTV jack on the 
rear of the TV.

Note:

Images are for illustration only and may vary by model or region.

If you cannot receive channels after connecting to an antenna or cable TV 

line, try scanning for channels.

CABLE/ANTENNA

TV


/


DTV

Ground Clamp

Ground 

Antenna 

Coaxial Cable

19EU.book  Page 16  Thursday, April 10, 2008  5:31 PM

Summary of Contents for 19EU

Page 1: ...al Display Television Fernsehers mit Fl ssigkristallanzeige T l viseur cran Cristaux Liquides TV de Pantalla de Cristal L quido Questo televisore LCD LCD vloeibaar kristalscherm TV Televisor com Ecr d...

Page 2: ...onnecting External Earphones 17 2 2 2 Connecting to AV Devices 18 2 2 3 Connecting a VCR STB DVD Player Using Component Video 19 2 2 4 Connecting a VCR STB DVD Player Using Composite Video 19 2 2 5 Co...

Page 3: ...Settings Analog TV 25 3 5 Adjusting DTV Settings Digital TV 27 3 6 Adjusting PC Setup Settings 29 3 7 Adjusting Setup Settings 29 4 Troubleshooting 31 5 Specifications 32 5 1 PC Mode Support Timing 3...

Page 4: ...ltage limits Hannspree cannot accept responsibility for any failure to satisfy the requirements resulting from a non recommended modification of the device Description of Warning Symbols CAUTION RISK...

Page 5: ...nd no objects filled with liquids such as vases shall be placed on the apparatus CAUTION These servicing instructions are for use by qualified service personnel only To reduce the risk of electric sho...

Page 6: ...e technician 5 If any fluid is sprayed or dropped into the TV contact an authorized service technician 6 The screen of the TV is made of glass Avoid hitting or scraping it If the screen is broken do n...

Page 7: ...signed to assist you in setting up and using the TV The information in this manual has been carefully checked for accuracy however no guarantee is given to the correctness of the contents The informat...

Page 8: ...or reproduced in any manner without the prior written authorization of Hannspree or of other third parties The Hannspree logos presented herein are trademarks of Hannspree All other product names trad...

Page 9: ...ediately if anything is missing or damaged TV User s manual Quick start guide Warranty card Power cord Remote control and batteries According to WEEE regulation this TV can t be handled as normal tras...

Page 10: ...system The built in stereo speakers provide full rich sound and a convenient audio output port lets you connect to an external audio system or earphones 1 2 1 Features Built in TV tuner Audio Video su...

Page 11: ...SD menu Program select P T Press to decrease the program number or move downward to the next item on the OSD menu Volume adjust VOL Press to increase the volume or move to the right on the OSD menu Vo...

Page 12: ...a VCR STB or a DVD player Component Video Inputs Connect to an external device such as a VCR STB or a DVD player SCART Input Output Connect to an external device such as a VCR STB or a DVD player with...

Page 13: ...ss to display the features contained For DTV only Last Press to return to the last channel selected Information INFO Press to display current channel program information Menu MENU Press to turn the on...

Page 14: ...S to increase the program number Press PT to decrease the program number Index INDEX Press to display a table of the available teletext subjects Mix MIX Press to display the text over the program on t...

Page 15: ...t User mode Sleep timer SLEEP Press repeatedly to set the sleep timer 15 30 45 or 60 minutes A countdown timer is displayed on the middle of the screen during the last minute to alert the user Cancel...

Page 16: ...ger of explosion if battery is incorrectly replaced Replace only with the same or equivalent type recommended by the equipment manufacturer Discard used batteries according to manufacturer s instructi...

Page 17: ...t 2 1 2 Connecting an Antenna or Cable TV Connect one end of the VHF UHF Antenna or CATV cable to TV DTV jack on the rear of the TV Note Images are for illustration only and may vary by model or regio...

Page 18: ...TV 2 2 1 Connecting External Earphones Note External speakers or headphones are not included with the TV The internal TV speakers will not output sound when earphones are plugged in Use external speak...

Page 19: ...Component B SCART C and Composite D ports or or or or HDMI A B C D AUDIO Y PB L R PR SCART IN OUT PR R L HDMI Y PB R L V SCART V AUDIO L R VCR STB DVD Audio Cable Video Cable Video Game Console HDMI C...

Page 20: ...video inputs 2 2 4 Connecting a VCR STB DVD Player Using Composite Video Connect the TV to a VCR STB DVD player using the composite video input AUDIO Y PB L R PR VCR STB DVD Video Cable Audio Cable Op...

Page 21: ...r decoder or player 2 2 6 Connecting a PC Connect the TV to your PC to use it as the monitor using the VGA port as shown 1 Connect the VGA port of the TV to the VGA output of the PC 2 Connect the line...

Page 22: ...n Multimedia Interface assures that the best video signal is always sent form source to the TV Refer to the following illustration to connect an HDMI device to the TV HDMI DVD Player HDMI Cable Option...

Page 23: ...g the TV to view programs you need to activate the automatic channel search first 1 Press MENU on the control panel or remote control then select to enter the Channel or DTV menu 2 Select an appropria...

Page 24: ...nu MENU MENU Up P S Arrow Down P T Arrow Select Increase VOL Arrow Select Decrease VOL Arrow Return MENU MENU Main Menu Picture Picture Mode Brightness Contrast Sharpness Colour Hue Backlight Colour T...

Page 25: ...t an item 5 Press or to change the mode setting or scales 6 Press MENU to select the changed setting and return to the Picture Menu 7 Press MENU to exit the Picture menu 8 The Picture menu can be used...

Page 26: ...OSD may vary depending on the input signal source 1 Press MENU to enter the OSD Main Menu screen 2 Press to select Channel 3 Press to enter the Channel Menu 4 Press to select an item 5 Press or to ch...

Page 27: ...g Channel Name Fine Tune and Skip of each channel Notes If the desired area is not shown on the list the suggested default is Germany The Channel settings are available when the signal is set to TV so...

Page 28: ...elete TV Radio channels The area can be set to England Italy France Spain Netherlands Portugal Turkey Poland Russia and Germany default Select Auto Search to activate the automatic TV Radio channel se...

Page 29: ...available when the signal is set to DTV source Manual Search Quality Signal 0 0 Channel Name Freq KHz BandWidth 5 6 7 8 9 10 5 177500 7M Parental Lock Enter Old Password Enter New Password Confirm Ne...

Page 30: ...ote The PC Setup settings are available when the signal is set to PC source 1 Press MENU to enter the OSD Main Menu screen 2 Press to select Setup 3 Press to enter the Setup Menu 4 Press to select an...

Page 31: ...ussian Arabic and Farsi The SCART sockets selection can be set to AUTO CVBS RGB or S VIDEO When connecting to an HDMI device the TV will be automatically set to display at the full screen size The Asp...

Page 32: ...e TV channels using cable TV Use the Auto Search function in the OSD menu Want to reset TV settings Use the Reset function in the Setup OSD menu Cannot operate menus If OSD items are colored in gray t...

Page 33: ...T RGB CVBS S Video HDMI HDTV YPBPR PC VGA Audio System AV HDTV RCA x 2 R L in SCART R L In R L Out HDMI HDMI PC Audio In Phone jack Green Audio out Earphone jack Pink Built in Stereo Amplifier Output...

Page 34: ...0i 480p 576i 576p 720p 1080i 1080p Mode Resolution Horizontal Frequency kHz Vertical Frequency Hz Pixel Frequency MHz VGA 60 640x480 60 31 469 59 941 25 175 SVGA 60 800x600 60 37 879 60 317 40 000 XGA...

Page 35: ...MEMO...

Reviews: