background image


18 

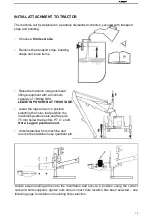
TRACTOR ATTACHMENT 

– Linkage Mounted Machines 


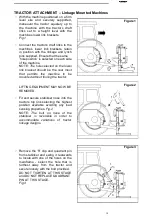
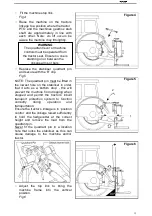
  With the machine positioned on a firm 

level  site  and  securely  supported, 
maneuver  the  tractor  squarely  up  to 
the  machine  with  the  tractor’s  draft 
links  set  to  a  height  level  with  the 
machines lower link brackets.

Fig.1 


Connect the  tractor’s draft links to the 
machine’s  lower  link  brackets,  retain 
in  position  with  the  linkage  and  lynch 
pins supplied. Ensure that the same

‘hole position’ is selected on each side 
of the machine. 
NOTE: 

The hole selected on the lower


link  bracket  should  be  the  rear  most 
that  permits  the  machine  to  be 
mounted without fouling the tractor. 

LIFTING EQUIPMENT MAY NOW BE 

REMOVED. 

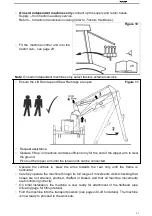
  Fit and secure stabiliser nose into the 

tractors  top  link  selecting  the  highest 
position  available  avoiding  any  load 
sensing properties. 

Fig.2

NOTE: 

The  bolt  on  nose  of  the


stabiliser  is  reversible  in  order  to 
accommodate  variations  of  tractor 
linkage designs. 


Figure 1 


Figure 2 


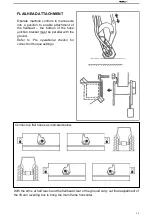
Remove  the ‘R’ clip and quadrant pin 
from stabiliser  and swing it rearwards 
to locate with  one of the holes  on the 
mainframe 

-

  select  the  hole  that  is 

furthest  away  from  the  tractor  and 
secure loosely with the bolt provided.

DO  NOT  TIGHTEN  AT  THIS  STAGE 
and DO NOT REPLACE QUADRANT 

PIN AT THIS STAGE. 

Fig.3 


Figure 3 


Summary of Contents for AM60

Page 1: ...1 Operate Parts Manual Hedge cutter AM60 AM80 AM100...

Page 2: ...N GUARD Page 28 MACHINE CONTROLS Page 28 BREAKAWAY Page 29 MOVING INTO THE TRANSPORT POSITION Page 31 MOVING FROM TRANSPORT TO WORK Page 32 ROTOR OPERATING SPEED Page 33 HIGH VOLTAGE CABLES Page 34 OV...

Page 3: ...save hours and pounds later When ordering spare parts always quote The Machine Type The Machine Serial Number The Part Number Factory re built service exchange units of the major hydraulic components...

Page 4: ...gures assume that the machine is fitted to a tractor with a quiet cab with the windows closed in a generally open environment We recommend that the windows are kept closed With the cab rear window ope...

Page 5: ...cedure technique etc which can result in the damage of either machine or equipment if not observed carefully NOTE An operating procedure technique etc which is considered essential to emphasise LEFT A...

Page 6: ...6 SAFETY INFORMATION 4...

Page 7: ...ct with or flashover from Being hit by cutting heads or machine arms as they move Becoming trapped between tractor and machine when hitching or unhitching Tractor overbalancing when machine arm is ext...

Page 8: ...work at a safe speed taking account of the conditions i e terrain highway proximity and obstacles around and above the machine Extra special attention should be applied to Overhead Power Lines Some of...

Page 9: ...onds after being stopped Never attempt to use a machine on materials in excess of its capability Never use a machine to perform a task it has not been designed to do Never operate the tractor or machi...

Page 10: ...SWL LEAVE IN POSITION AT THIS STAGE Lower the legs and pin in position selecting the holes that position the machines gearbox stub shaft approx 75 mm below the tractors P T O shaft Note Leg pin positi...

Page 11: ...low the instructions exactly as they are specific to your particular make and model of tractor Replace assister ram s if fitted Hook the catch assemblies onto the rear of the axle plates push firmly a...

Page 12: ...to obtain measurement X Measure dimension C Select mounting holes which position the mounting bars in the end of the latch arms so that dimension D equals dimension C minus measurement X and also when...

Page 13: ...to obtain measurement X Measure dimension C Select mounting holes which position the mounting bars in the end of the latch arms so that dimension D equals dimension C minus measurement X and also whe...

Page 14: ...bar to fully engage in the axle catch WARNING The quadrant lever or machine controls must only be operated from the tractor seat Ensure no one is standing close to or within the linkage arms or bars N...

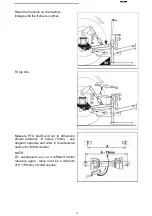
Page 15: ...al Fit top link Measure PTO shaft and cut to dimension shown distance A minus 75mm see diagram opposite and refer to maintenance section for further details NOTE For subsequent use on a different trac...

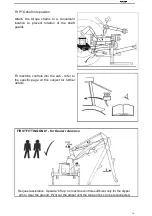
Page 16: ...uards Fit machine controls into the cab refer to the specific page on this subject for further details FIRST FITTING ONLY for Dealer reference Request assistance Operate Lift up on machine controls su...

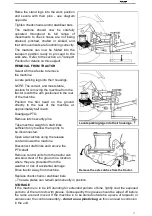
Page 17: ...ine at approximately half reach Disengage PTO Remove latch security pins Take machine weight on draft links sufficient only to allow the top link to be disconnected Open axle catches using the release...

Page 18: ...ould be the rear most that permits the machine to be mounted without fouling the tractor LIFTING EQUIPMENT MAY NOW BE REMOVED Fit and secure stabiliser nose into the tractors top link selecting the hi...

Page 19: ...pin must be fitted in the lowest hole on the stabiliser in order that it acts as a bottom stop this will prevent the machine from dropping when stopped and permit the tractor s inbuilt transport prote...

Page 20: ...5mm 3 less than the measured distance A between tractor shaft and gearbox stub shaft to enable fitting Fig 8 NOTE For subsequent use with different tractors measure again there must be a minimum shaft...

Page 21: ...ent only for the end of the dipper arm to clear the ground Pivot out the dipper arm until the tension link can be connected Operate the controls to slew the arms towards the rear only until the frame...

Page 22: ...of the hose junction bracket must be parallel with the ground Refer to Pre operational checks for correct bolt torque settings Connect up flail hoses as indicated below With the arms at half reach and...

Page 23: ...and secure in their lowest position Raise the machine on the tractor linkage until the weight is taken off the stabiliser Remove the lower stabiliser pins Unscrew the lift ram tap Lower the machine t...

Page 24: ...nect Stabiliser into tractors top hitch position used previously Raise the machine on the tractor linkage until the Stabiliser contacts the eccentric stops Fit Stabiliser lower pins Mount controls in...

Page 25: ...actice operating the machine in an open space without the rotor running until you are fully familiar with the controls and operation of the machine CAUTION Care must be taken when working with the fla...

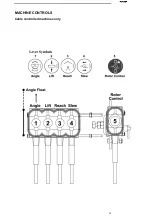
Page 26: ...26 MACHINE CONTROLS Cable controlled machines only...

Page 27: ...l cause the head to initially move outwards in addition to rearwards Therefore be aware that the breakaway action will be impeded if the outer end of the head is working against a steep bank In this c...

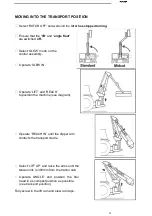
Page 28: ...assembly Operate SLEW IN Operate LIFT and REACH to position the machine see diagram Operate REACH IN until the dipper arm contacts the transport cradle Select LIFT UP and raise the arms until the ten...

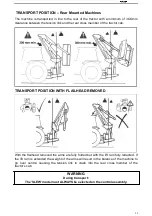
Page 29: ...RANSPORT POSITION WITH FLAILHEAD REMOVED With the flailhead removed the arms are fully folded but with the lift ram fully retracted If the lift ram is extended the weight of the arms will result in th...

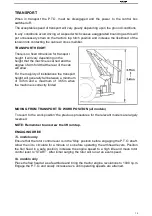
Page 30: ...t will generally fall between a minimum of 3 45m and a maximum of 3 65m when the machine is correctly folded MOVING FROM TRANSPORT TO WORK POSITION all models To revert to the work position the previo...

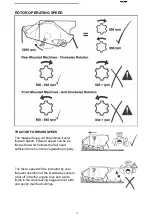
Page 31: ...speed can be as fast as that which allows the flail head sufficient time to cut the vegetation properly Too fast a speed will be indicated by over frequent operation of the breakaway system a fall of...

Page 32: ...ation on this subject ALWAYS MAINTAIN A MINIMUM CLEARANCE DISTANCE OF 1 5 M WHEN OPERATING NEAR HIGH VOLTAGE CABLES It is advisable that you consult your Local Power Company to obtain information rega...

Page 33: ...side first This leaves the maximum thickness of hedge on the road side to prevent the possibility of any debris being thrown through the hedge into the path of oncoming vehicles 2 Cut the side and bo...

Page 34: ...SE SLOPES When working high with the reach fully in it is possible for the main arm balance to go over centre and take the weight off the lift ram A restrictor in the gland connection of the lift ram...

Page 35: ...guards for damage and ensure the anti rotation chains are in place and that their anchor points are in good condition Lubricate the points shown on the diagram below at the intervals indicated using g...

Page 36: ...ean Using clean containers when replenishing the system Regular servicing of the filtration system FILTRATION MAINTENANCE The machine is protected by a 125 micron suction strainer and a low pressure 1...

Page 37: ...eaking both seals Do not use jointing compound on the threads Avoid twisting the hose Adjust the hose line to ensure freedom from rubbing or trapping before tightening hose end connections Before chan...

Page 38: ...2770015 AM60 01 114 Upper cover 4 9 702770010 AM60 01 109 Flange bush 8 10 702770216 AM60 01 118A Pull rod 2 1 11 702770213 AM60 01 111A Pull rod 1 3 12 702770022 AM60 01 122 Check ring 6 13 702770011...

Page 39: ...er 4 29 505011393 505011391 GB70 1 M5X25 GB70 1 M5X16 hexagon socket cap screw hexagon socket cap screw ON VALVE 8 8 30 702770215 AM60 01 123A Lower cover 4 31 505011389 GB70 1 M5X12 hexagon socket ca...

Page 40: ...6 1 702770033 AM60 02 110 Head board 1 6 2 702780002 AM80 02 110 Head board 1 6 3 706830001 AM100 02 110 Head board 1 7 501011099 GB5783 M8X20 Screw bolt 3 8 506010055 GB97 1 8 Plain washer 6 9 503010...

Page 41: ...FB oil seal 2 32 509010007 GB1152 M6 Oil cup 4 33 501011113 GB5783 M10X30 Screw bolt 8 34 802770317 AM60 02 011B Main bearing seat 1 35 501010758 GB5782 M12X60 half thread bolt 12 36 702770029 AM60 0...

Page 42: ...0920105 EF100 00 117 End cover 3 6 703190209 1G 150 01 142 Middle R pin 4 7 800920101 EF100 00 111A D square cotter 3 8 802770128 AM60 03 018 Support leg 2 2 9 501011198 GB5783 M20X55 Screw bolt 4 10...

Page 43: ...36 GB93 10 Spring washer 4 27 501014700 GB5782 M12X130 Half screwed bolt 3 28 702770066 AM60 03 102 gear box fixed plate 1 29 702770065 AM60 03 101 Spacer bush 3 30 802770080 AM60 03 010 Support leg 1...

Page 44: ...85 M16 hexagon locking thin nut 7 10 501014220 GB27 M14X120 Articulation bolt 1 11 506010058 GB97 1 14 Plain washer 1 12 503010764 DIN985 M14 hexagon locking thin nut 1 13 702770067 AM60 03 103 Swing...

Page 45: ...60 03 104 buffering limited block 1 26 802770108 AM60 03 015 big support arm 1 27 702770072 AM60 03 108 oil tube long cover 1 28 702770160 AM60 04 023 Smaller arm cylinder 1 29 702770152 AM60 04 015 b...

Page 46: ...982 14 G1 4 Bonded washer14 7X22X1 5 13 74X20 57X2 03 13 2 8 1 8 2 501014707 702770220 GB3541 M14X1 5 ZL KUBOTA B1620 154 Hinge joint bolt ON CYL Hinge joint bolt ON MOTOR 5 1 9 506010055 GB97 1 8 Pla...

Page 47: ...36 GB93 10 Spring washer 4 30 702770329 AM60 04 016 1 Swing arm cylinder 1 31 702770160 AM60 04 023 Small arm cylinder 1 32 702770152 AM60 04 015 Big arm cylinder 1 33 702770157 AM60 04 020 Swing arm...

Page 48: ...48...

Reviews: