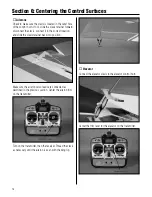


30
After you have graduated from the Progressive Training
System and are enjoying your F-22 Raptor PTS in its
aerobatic mode, you can take it even a step further and
add functional flaps. To do this, you’ll need to purchase
two additional servos from your local hobby store, such as
the JR SPORT
™
ST47 (JSP20050) servo and a Y-harness.
Then, simply remove the covering over the flap servo
openings in the wing panels, secure the servos to the flap
servo hatches, and secure the hatches to the wing. Hook
up the linkage to the servo following the directions and
you have a scale F-22 Raptor complete with functioning
landing flaps.
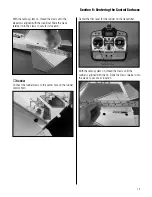
Note
: Using two standard rotation servos and a standard
Y-harness for the flap servos will result in them moving in
opposite directions instead of the same direction. There
are three options available that will result in the flaps
operating correctly.
Option 1
: Use two JR SPORT
ST47 (JSP20050) servos
and two 6-inch Servo Extensions (JSP98020) if your
radio has programmable mixing. You will need to use two
separate channels and use your radio to mix them together
electronically for this option to work.
Option 2
: Use two JR SPORT
ST47 (JSP20050) servos,
two 6-inch extensions and a JR
®
MatchBox
™
or a 6"
standard reversing Y-harness (EXRA320) to link the two
flap servos to operate properly.
Option 3
: Use a JR SPORT
™
ST47 (JSP20050) standard
servo and JR SPORT ST47 (JSP20050R) reverse servo
and a standard Y-harness.
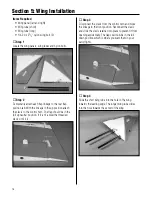
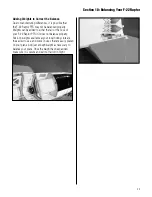
Items Required
• Wing (left and right)
•#2 x 3/8" screw (8)
• Servo hatch (left and right)
• 3/8 in x 3/4 in x 3/4 in (9.5mm x 19mm x 19mm)
servo mounting block (4)
Tools Required
• 6-minute epoxy
• Felt-tipped pen
• Drill bit: 1/16 in (1.5mm) • Drill
• Y-Harness (JSP98020)
• Hobby knife
• Phillips screwdriver (small)
• Razor saw
• Long Servo Arm (JRPA212) (2)
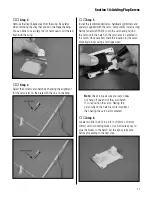
Step 1
Remove the flap linkage from the aircraft.
Step 2
Remove the covering from the servo opening in the
bottom of the wing using a hobby knife.
Section 14: Adding Flap Servos


