background image

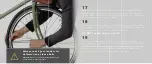
Failure to install our fenders properly and safely can result in serious 

injury or death.

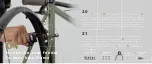
Recommended Tire Sizes: 700c tire required

35mm Mud Butler Fenders: 700 x 18 - 25c (and some smooth, low-profile 

28c tires)

45mm Mud Butler Fenders: 700 x 26 - 35c (and some smooth, low-profile 

38c tires)

Please follow these directions

, but note that for 

installation  on some bikes, occasionally you may need to get crafty. 

At the end of this booklet you will find a Troubleshooting / Tips and 

Tricks section. We don’t pretend that all scenarios are covered here. 

If something comes up, we would love to help.

We also invite you to follow along with our installation 
video. Find it at: http://bit.ly/installfender
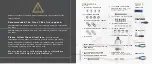
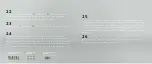
H A R D WA R E 

I N C L U D E D 

T O O L S 

N E E D E D

A  

(4) PHILLIPS HEAD BOLTS

B  

(4) LEATHER WASHERS

C  

(2) OVER STRUT MOUNT PLATES

D  

(2) UNDER STRUT MOUNT PLATES

E  

(2) STRUTS

F  

FRONT FENDER

      SHORTER WITH PRE-INSTALLED TAB

G  

REAR FENDER

      LONGER FENDER

H  

(1) STANDARD FORK CROWN


THROUGH BOLT

 50MM LONG

I   

(2) LARGER ALUMINUM WASHERS

J  

NUT

PRE-AS

SEMBLED

L  

(6) SHORTER HEX HEAD BOLTS

M  

(6) SMALLER WASHERS

N  

(4) PINCH SLEEVES

O  

(1) PVC COATED BRIDGE CLIP

P  

LONGER HEX BOLT WITH CORK

Q  

LONGER HEX BOLT

     25MM - Use when mounting
    rack + fender to the same hole
    

K  

(1) LONGER FORK CROWN

     THROUGH BOLT 

70MM LONG

     Use when 

H

 Is too short

     for your crown fork

4MM ALLEN 

PHILLIPS HEAD
SCREWDRIVER

10MM SOCKET

CUTTING TOOL

NEEDLE NOSE

T

SCREWDRIVER

Summary of Contents for Mud Butler Fender

Page 1: ...Mud Butler Fender installation guide...

Page 2: ...that your frameset is designed to accept full coverage fenders like these Mud Butler fenders were designed to mount easily to most 700c wheeled bikes designed to take bolted on full coverage fenders...

Page 3: ...We also invite you to follow along with our installation video Find it at http bit ly installfender HARDWARE INCLUDED TOOLS NEEDED A 4 PHILLIPS HEAD BOLTS B 4 LEATHER WASHERS C 2 OVER STRUT MOUNT PLAT...

Page 4: ...p your bike upside down to balance it on the saddle and handlebars 2 Lay out and organize all of your fender hardware Make sure you have all of the pieces listed on the previous page 3 Undo open both...

Page 5: ...n 1 of the under strut mount plates D to the pre drilled holes in the fender so that the protruding part of D is facing where the tire will be 6 Place 1 of the struts E over the fender so that it is i...

Page 6: ...Phillips head bolts A with the leather washer B on it attach the strut E to the fender Make sure the strut E stays centered over the fender Screw the bolts all of the way until snug 8 Repeat steps 5...

Page 7: ...The bolt should not extend out the back side so far that it touches the bike frame If your fork crown does not have a hole all of the way through but has a threaded mounting hole you may need to use 1...

Page 8: ...rown 12 If you have caliper style brakes use the post on the brake otherwise push the selected through bolt with washer through the pre installed tab on the fender through the hole in the crown of you...

Page 9: ...fender at all points 13 With your fingers install 1 of the larger aluminum washers I on the back side of the bolt going through the pre installed tab on the fender and the fork crown Then with your f...

Page 10: ...spacing 18 If the struts stick out too far you may need to cut down the strut with an angle grinder or hacksaw To make the cuts you ll need to mark the strut then remove the strut make the cut and th...

Page 11: ...positioning the bridge clip so that the tabs are not directly under the brake will help when installing the fender 21 If your bike has decent tire clearance and longer chainstays you may want to use t...

Page 12: ...the cork P Install 1 of M onto the bolt Put the bolt with washer through the slot on the rear fender from the inside Install the cork back onto the bolt Now skip to step 24 23 Install the bolt L with...

Page 13: ...doubt contact us or a qualified mechanic for advice 28 Fasten each side of the rear strut to the mounts near your rear axle Place 1 of M over 1 of L and insert into the side of N that has the clips s...

Page 14: ...ender should not be able to move and the struts should not slide in the clips If something is loose check the hardware retighten and check again for movement 31 The struts may be too long for your fra...

Page 15: ...e pads hit the rim at the same time on both sides If needed readjust your rear brake 34 Your fenders are now installed on your bike Take one more look around the fenders to make sure that they are sec...

Page 16: ...nt end of the front fender compressing it to the tire and then let go It should bounce back away from the tire but sit slightly closer and at the same time give a little more space over the tire near...

Page 17: ...side of the bolts we provide or you will need to purchase bolts and nuts from a hardware store Because of the numerous styles of bikes from many manufacturers we cannot provide all the hardware neede...

Page 18: ...lip to the underside of the seatstay bridge with the bridge clip facing backward Mount the fender like normal angling down the bridge clip to meet the fender when you pull it up Problem I cut my strut...

Page 19: ...vent that your Mud Butler fenders need to be returned or exchanged please refer to the return and exchange policies of the vendor you purchased them from Handsome Cycles accepts returns or exchanges o...

Reviews: