background image

8.2   614 Hub Assembly


REF # 

PART # 

DESCRIPTION 

QUANTITY 

3401-016 

Seal 2 x 3.63 x0.250  SE-16 

1145-135 

Bearing Cone - 1.78 ID LM 603049 

1150-026 

Bearing Cup - INN.H614 LM603011 

3408-615 

Hub 6 Bolt c/w Cups, Cones  5K - 614 

1150-027 

Bearing Cup -  LM48510 

3403-012 

Wheel Bolt 9/16-18 UNF x 1-1/4 

1145-022 

Bearing Cone - 1.37"ID LM48548 

3407-517 

SP. Washer 1.031x 2.00"x .187" 

3407-033 

Spindle Nut 1" -14 UNF  WB33 

10 

1700-190 

Pin - Cotter 3/16 x 1-1/2"  PLT 

11 

3402-015 

Dust Cap 2.72x1.45 CTD #DC15 

- 8.3 -

L

 R


 NOV 2016 

VK 

10 

11 

Summary of Contents for 2958

Page 1: ...PERATION OR MAINTENANCE OF THIS EQUIPMENT CAN RESULT IN SERIOUS INJURY OR DEATH 2958 OPERATOR PARTS MANUAL Bale Processor H S MANUFACTURING CO INC MARSHFIELD WISCONSIN 54449 715 387 3414 FAX 715 384 5...

Page 2: ...4 S S 2 4 T S 2 4 T S 2 4 S S 2 5 S F 2 6 3 D L S I D L 3 1 3 9 4 O T N O O 4 1 M C 4 2 B I 4 3 P O C 4 3 E M 4 4 C 4 5 4 6 A U 4 7 4 8 F O 4 9 4 14 T 4 15 4 16 S 4 17 5 S F 5 1 G 5 1 S I 5 2 5 3 S R...

Page 3: ...TABLE OF CONTENTS 8 P F A 8 1 8 2 614 H A 8 3 B C A 8 4 C R A 8 5 D R A 8 6 8 7 D A 8 8 8 9 V S 8 10 A D 8 11 L F A 8 12 8 13 C H 8 14 8 15 L C H 8 16 H D K O 8 17 9 N F A 9 1 9 2 1 2...

Page 4: ...1 3...

Page 5: ...1 4...

Page 6: ...PAGE INTENTIONALLY LEFT BLANK 1 5...

Page 7: ...your H S Bale Processor when ordering parts or requesting service or other information The serial number plate is located where indicated Please record the number in the space below for easy reference...

Page 8: ...hine read and understand the Safety Operation Maintenance and Trouble Shooting information contained within the Operator s Manual Use the Index or Table of Contents as a guide when searching for speci...

Page 9: ...tant to you Accidents Disable and Kill 3 Big Reasons Accidents Cost DANGER Indicates an imminently hazardous situation that if not avoided will result in death or serious injury This signal word is to...

Page 10: ...at a person who has not read and understood all operating and safety instructions is not qualified to operate the machine An untrained operator exposes himself and bystanders to possible serious injur...

Page 11: ...o the hydraulic system make sure all components are tight and that steel lines hoses and couplings are in good condition 16 Review safety instructions with all personnel annually 2 3 Maintenance Safet...

Page 12: ...ry level area Support the base with planks if required 2 6 Transport Safety 1 Make sure you are in compliance with all local regulations regarding transporting equipment on public roads and highways 2...

Page 13: ...installation area is clean and dry Be sure temperature is above 50 F 10 C Decide on the exact position before you remove the backing paper Remove the smallest portion of the split backing paper Align...

Page 14: ...e this equipment until such information has been reviewed Annually review this information with all personnel Make these periodic reviews of SAFETY and OPERATION a standard practice for all of your eq...

Page 15: ...elf with the various safety signs the type of warning and the area or particular function related to that area that requires your SAFETY AWARENESS THINK SAFETY WORK SAFELY 3 1 REMEMBER If safety signs...

Page 16: ...afety signs the type of warning and the area or particular function related to that area that requires your SAFETY AWARENESS THINK SAFETY WORK SAFELY REMEMBER If safety signs have been damaged removed...

Page 17: ...afety signs the type of warning and the area or particular function related to that area that requires your SAFETY AWARENESS THINK SAFETY WORK SAFELY REMEMBER If safety signs have been damaged removed...

Page 18: ...afety signs the type of warning and the area or particular function related to that area that requires your SAFETY AWARENESS THINK SAFETY WORK SAFELY REMEMBER If safety signs have been damaged removed...

Page 19: ...afety signs the type of warning and the area or particular function related to that area that requires your SAFETY AWARENESS THINK SAFETY WORK SAFELY REMEMBER If safety signs have been damaged removed...

Page 20: ...afety signs the type of warning and the area or particular function related to that area that requires your SAFETY AWARENESS THINK SAFETY WORK SAFELY REMEMBER If safety signs have been damaged removed...

Page 21: ...ous safety signs the type of warning and the area or particular function related to that area that requires your SAFETY AWARENESS THINK SAFETY WORK SAFELY REMEMBER If safety signs have been damaged re...

Page 22: ...ous safety signs the type of warning and the area or particular function related to that area that requires your SAFETY AWARENESS THINK SAFETY WORK SAFELY REMEMBER If safety signs have been damaged re...

Page 23: ...ous safety signs the type of warning and the area or particular function related to that area that requires your SAFETY AWARENESS THINK SAFETY WORK SAFELY REMEMBER If safety signs have been damaged re...

Page 24: ...s SMV signs and lights before transporting 14 Use hazard flashers on tractor when transporting 15 Install lift frame lock pin before transporting 16 Before applying pressure to the hydraulic system ma...

Page 25: ...radle of the processor A hydraulically powered cradle in the frame moves the bales over the rotor that extends along the bottom of the machine The rotor is equipped with swinging flails that shred the...

Page 26: ...4 4 PRE OPERATIONAL CHECKLIST Efficient and safe operation of the Bale Processor requires that each operator reads and understands the operating procedures and all related safety precautions outlined...

Page 27: ...ning and allow telescoping of the shaft Consult your tractor manual for the drawbar adjustment procedure 3 PTO Shaft The tractor PTO shaft must meet these specifications 1000 RPM 21 spline 1 3 8 inch...

Page 28: ...The discharge deflector is equipped with a lock pin system to set the deflector position Retract the lock pin and move the discharge deflector to its desired position Secure by inserting the lock pin...

Page 29: ...t is adjustable for speed and stroke to accommodate any type of bale or material a Speed A system is designed with a standard flow divider to change and set the system speed Set at 5 for maximum speed...

Page 30: ...move foreign objects from the machine and working area 2 Adjust the length of the drawbar to give the appropriate dimension between the PTO shaft and the drawbar pin hole Refer to Tractor Operator s M...

Page 31: ...area around the couplers on the tractor b Remove the plastic plugs from the couplers and isolate the hoses for the lift arm circuit from the hoses for the cradle tilt circuit c Match the appropriate...

Page 32: ...fore starting 9 Attach securely to the tractor using a retainer on the drawbar pin and a safety chain 10 Do not point discharge opening towards people animals or buildings when operating 11 Stay away...

Page 33: ...ines sliding under the bale c Slowly raise the tines until the bale clears the ground 4 10 Important When the second bale is loaded on the bale tines make sure that the loaded bale does not interfere...

Page 34: ...he CV joint and will void warranty e Increase engine RPM to rated PTO speed f Engage cradle tilt hydraulic circuit 4 11 6 Remove the strings twine or wrapping from the bale 7 Raise the bale tines and...

Page 35: ...urning before pushing the PTO clutch lever into its off detent if the PTO drive system on your tractor is designed with a brake that will top the PTO shaft in less than one revolution Stopping this 11...

Page 36: ...the rotor through the side access door on the side opposite to the discharge opening Always stop engine and remove ignition key before cleaning rotor 13 Shear Bolt Each input drive line is designed w...

Page 37: ...otor Entangled material can affect how the flails swing and contribute to backslap 16 Bale Tines It is recommended that the bale tines be raised into the vertical position when operating in and around...

Page 38: ...ing flashers on the tractor when transporting unless prohibited by law 4 9 TRANSPORTING Bale Processors are designed to be easily and conveniently moved from location to location When transporting fol...

Page 39: ...overtaking traffic to see the unit It is recommended that you wait for a more appropriate time to move the machine 11 It is not recommended that the machine be transported faster than 20 mph 32kph Ta...

Page 40: ...nd can move freely 3 Inspect all hydraulic hoses fittings lines couplers and valves Tighten any loose fittings Replace any hose that is badly cut nicked or abraded or is separating from the crimped en...

Page 41: ...circuit before servicing or disconnection from the tractor 9 Keep hands feet hair and clothing away from all moving and or rotating parts 5 1 SERVICE 5 1 1 FLUIDS AND LUBRICANTS 1 Grease Use a SAE mul...

Page 42: ...er following page 5 3 Follow Standard Interval Schedule 2 Check the conditions of the rotor and flails Remove all entangled material Repair damaged components Replace broken components 3 Check wheel b...

Page 43: ...ift system bushings eight locations 3 Grease roller and rotor bearing six locations a Rollers b Rotor 4 Check gearbox for signs of wear or leakage Annually Or 3000 Bales 5 Repack wheel bearings 6 Chan...

Page 44: ......

Page 45: ...iced By 8 Hours Daily or 10 Bales L PTO Shaft 8 I Rotor and Flails I Wheel Bearings I Shear Bolts Weekly or 50 Bales G Bale Cradle Bushings 4 G Bale Lift Bushing Bushings 8 G Rotor Roller Bearings 6 G...

Page 46: ...wn to decrease c The factory setting will provide the best overall performance and is set at 1 1 2 NOTE In general soft wet bales require more stroke than hard well formed bales The type of material b...

Page 47: ...olts to their specified torque e Adjust the stop bolt so that when the valve shift lever is touching the stop bolt there is approximately 1 32 inch clearance between the shift spool flange and the sto...

Page 48: ...vailing torque nut or jam nut on the flail bolt to prevent coming apart 34 Safety Shield Components 5 2 3 PTO SAFETY SHIELD It is important that the shield components rotate freely over the PTO shaft...

Page 49: ...nt parts 5 2 5 DRAWBAR The Bale Processor is equipped with an adjustable clevis style hitch It is a two piece design and is to be installed as shown Do not use the hitch with the clevis on top as it d...

Page 50: ...Vibrates CAUSE Rotor out of balance SOLUTION Check rotor remove entangled material Be sure all flails swing freely Check rotor Replace any bent damaged or missing flails Lift frame lifts slowly Insuff...

Page 51: ...gth No of Hammers Hammer Size Rotor Swing Diameter Discharge Direction 6300 lbs 1300lbs 1 3 8 21 1000RPMCV 83 32 1 2 x 2 x 5 3 4 25 1 8 Left Minimum Power Required 100 HP SPECIFICATIONS SUBJECT TO CHA...

Page 52: ...7 2 OVERALL DIMENSIONS 7 2 L R NOV 2016 VK...

Page 53: ...7 3 BOLT TORQUE 38 7 3 L R NOV 2016 VK...

Page 54: ...PAGE INTENTIONALLY LEFT BLANK...

Page 55: ...3 1471 291 Cradle Guide 4 14 1603 020 Flat Head Cap Screw 3 8 x 1 1 4 NC 8 15 J628 021 Shroud Weldment 2 16 1630 507 Bolt Carriage 3 8NC x 1 42 17 1001 702 12 16 5 6 Bolt RH Tire Rim 1 18 1471 290 Wea...

Page 56: ...8 1 Frame Assembly 8 2 8 2 L R NOV 2016 VK...

Page 57: ...1 4 3408 615 Hub 6 Bolt c w Cups Cones 5K 614 1 5 1150 027 Bearing Cup LM48510 1 6 3403 012 Wheel Bolt 9 16 18 UNF x 1 1 4 6 7 1145 022 Bearing Cone 1 37 ID LM48548 1 8 3407 517 SP Washer 1 031x 2 00...

Page 58: ...nap Ring Heavy Duty 2 7 1137 001 Composite Bearing 1 3 8 ID x 1 5 8 OD X 1 Long 2 8 1594 005 Bolt Hex 3 8NC x 3 Gr5 PLT 2 9 1672 648 Nut Nylock 5 16 NC PLT 4 10 1680 040 Washer Flat 5 16 USS PLT 4 11...

Page 59: ...088 Shield Cradle Roller 2 4 1672 688 Nut Nylock 1 2 NC PLT 16 5 1140 060 QJZ 1 3 4 Flange Block Bearing 4 6 1594 410 Bolt Hex 1 2NC x 1 3 4 Gr5 PLT 16 7 1630 507 Bolt Carriage 3 8NC x 1 14 8 1680 544...

Page 60: ...PAGE INTENTIONALLY LEFT BLANK...

Page 61: ...7 011 Rotor Mount Weldment Front 1 11 J400 069 Twine Shield 4 12 J627 002 JSB439 LH Rotor 1 13 1594 401 Bolt Hex 1 2NC x 1 1 2 Gr5 PLT 16 14 1680 066 Washer Flat 1 2 GR 8 32 15 1672 688 Nut Nylock 1 2...

Page 62: ...8 5 Drive Rotor Assembly 8 7 L R NOV 2016 VK...

Page 63: ...3031 119 Comp Spring 080W x 9375 x 2 1 11 1680 580 Washer Flat 5 8 SAE PLT 1 12 1722 780 Pin Spring 1 4 x 1 1 2 1 13 1594 543 Bolt Hex 9 16NC x 4 Gr5 PLT 1 14 J627 007 Deflector Frame Weldment LH 1 15...

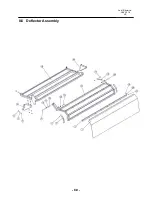
Page 64: ...8 6 Deflector Assembly 8 9 L R NOV 2016 VK...

Page 65: ...Shift Lever Weldment 1 6 1594 007 Bolt Hex 3 8NC x 3 1 2 Gr5 PLT 2 7 J400 103 Bearing Cover Plate 1 8 1471 292 Guide Shifter Spool 1 9 1680 540 Washer Flat 3 8 SAE PLT 2 10 1672 652 Nut Nylock 3 8 NC...

Page 66: ...NC x 2 Gr5 PLT 2 3 1672 688 Nut Nylock 1 2 NC PLT 2 4 1593 544 Bolt Hex 1 4 NC x 1 Gr5 PLT 1 5 1680 022 Washer Flat 1 4 USS PLT 1 6 1471 410 Round Rubber Bumper Pad 1 7 1672 642 Nut Nylock 1 4 NC PLT...

Page 67: ...J628 034 Lift Frame Weldment 1 9 J628 040 Bale Tine Weldment Left 1 10 0661 003 Pin Lift Frame 2 11 1672 652 Nut Nylock 3 8 NC PLT 6 12 1593 988 Bolt Hex 3 8NC x 1 1 2 Gr5 PLT 6 13 1680 540 Washer Fl...

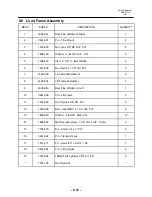
Page 68: ...8 9 Load Frame Assembly 8 13 L R NOV 2016 VK...

Page 69: ...070 202 Star Hydraulic Cradle Cylinder 2 x 46 25 2 10 0868 808 Elbow 90 8 ORBM x 8 JICM 2 11 0868 912 Elbow 90 12 ORBM x 8 JICM 2 12 0864 808 Hex Nipple 8 ORBM x 8 JICM 2 13 3935 087 1 2 2w x 87 x 8 J...

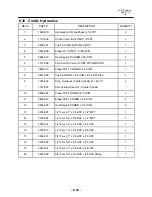
Page 70: ...8 10 Cradle Hydraulics 8 15 L R NOV 2016 VK...

Page 71: ...08 Elbow 90 8 ORBM x 8 JICM 4 4 1073 002 JSB404 Lift Cylinder 2 50 x 17 25 2 5 3935 241 1 2 2w x 241 x 8 JICF x 1 2 MPT 2 6 3934 021 3 8 2w x 21 x 8 JICF x 8 JICF 1 7 3934 029 3 8 2w x 29 x 8 JICF x 8...

Page 72: ...2 10 0867 808 Elbow 45 8 JICM x 8 ORBM 1 11 1593 961 Bolt Hex 3 8NC x 1 Gr5 PLT 2 12 0700 605 193320 Plastic Hose Holder 1 2 hose 3 13 1593 800 Bolt Hex 5 16NC x 2 1 2 Gr5 PLT 2 14 1680 040 Washer Fl...

Page 73: ...N 9 1...

Page 74: ...N 9 2...

Page 75: ......

Page 76: ......

Reviews: