background image

Page 15 / 20 

M

M

O

O

D

D


/

/


M

M

e

e

d

d

i

i

a

a


C

C

o

o

n

n

t

t

e

e

n

n

t

t


S

S

t

t

r

r

e

e

a

a

m

m

i

i

n

n

g

g


Before you begin, check to make sure that the Fast Ethernet cable is connected. 
 
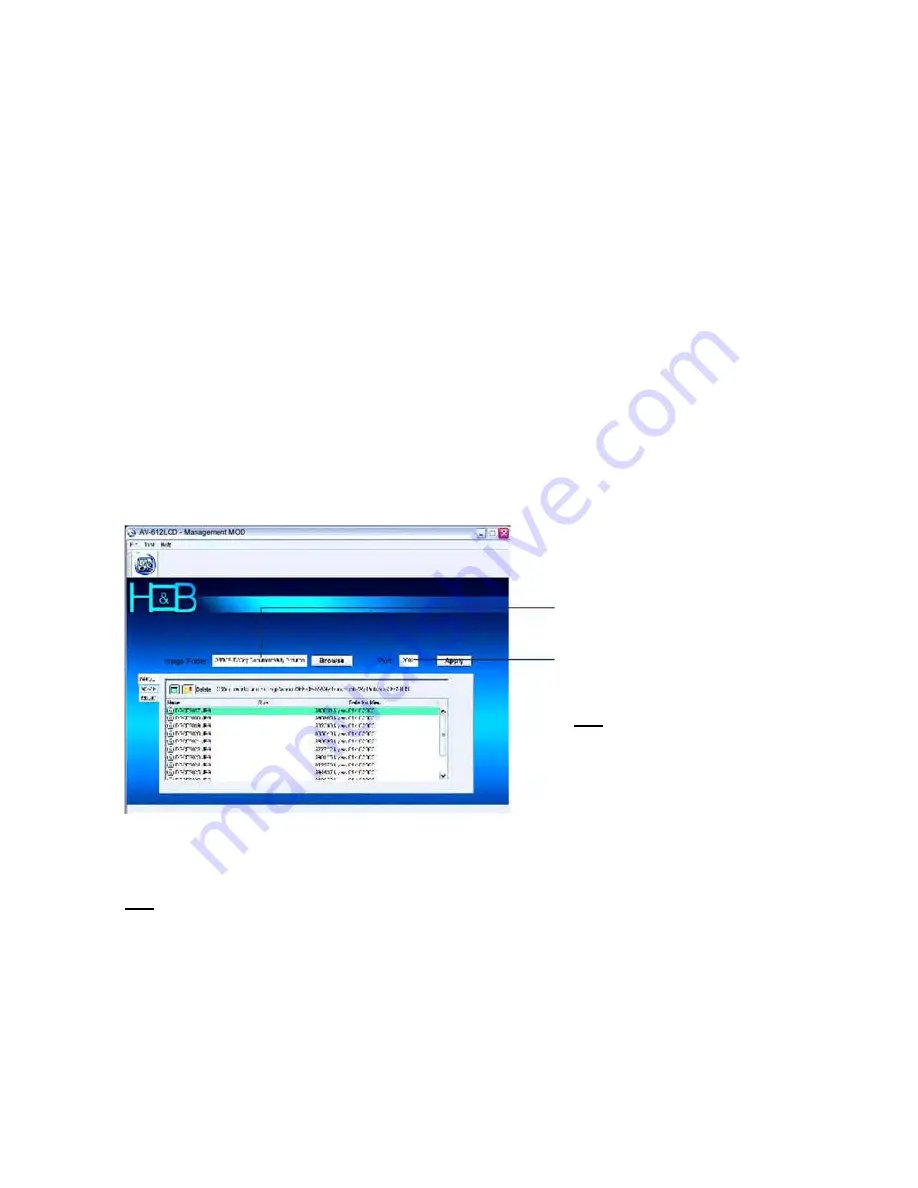
1. Go to your computer and click on Program to search for AV-612LCD PC Manager. Click open and you are now 
in your Management Program. 
 
2. If AV-612LCD is not found it will enter into MOD mode. The reason is that the USB cable is not connected. 
However, you can run the MOD program. 
 
3. From your computer click on Browse to pick out what you want to stream via the AV-612LCD. Click open the 
content you have selected and click Apply. The content will be shared to the AV-612LCD and ready for streaming. 
 
4. Go to your AV-612LCD and under MOD you will find that the same content will be displayed on your AV-
612LCD screen. Simply click on the files and select Play to playback these content that you have just picked to 
stream to your TV or even hifi system for music. 
 
5. On your AV-612LCD click on the MOD icon and select Connect. 
 
6. On the AV-612LCD the Parent Folder now shows that your AV-612LCD is connected to the computer that is 
currently running the AV-612LCD’s PC Management Program. 


Content folder that you have picked 
to share for streaming. 
 
Default Do not change this unless 
there is conflict with other computer 
service. 
Note :When this happens you can 

change Port number from 1023 to 
65535. 


Note: In  Fast Ethernet PC 

Ù

 AV612LCD connexion mode, ensure to use a crossed RJ45 Cable. 

Within a HUB or SWITCH ethernet connexion, ensure to use stright RJ45 cables. 

Summary of Contents for AV-612LCD

Page 1: ...M MO OB BI IL LE E M MU UL LT TI IM ME ED DI IA A P PL LA AY YE ER R A AV V 6 61 12 2L LC CD D...

Page 2: ...ions should be taken so that the grounding or polarization means of on appliance is not defected Power cord protections Power supply cords should be routed so that they are not likely to be walked on...

Page 3: ...enjoy the content you already stored in the AV 612LCD s enormous hard disk drive on its 3 5 inch TFT LCD screen or on your home entertainment big screen TV or even on projector You have made the right...

Page 4: ...l command executions Pause Resume During movie and music playback Zoom One push command and followed by left right push of the 4 way rocker switch for scale up and scale down Move Pen One push command...

Page 5: ...r pressing the right function Select key Setting Selection during pre set adjustment Power Play Mode Display etc 7 7 V Vo ol lu um me e D Di ia al l D Do ou ub bl le ed d A As s P Pr re e S Se et t K...

Page 6: ...c Sound tracks short cut Photo JPEG photos short cut HDD AV 612LCD s residence hard disk drive explore all media files on HDD Set up 7 pre set functions namely Sound Clock Power Play Mode Display Syst...

Page 7: ...f your resident hard disk drive where all your files are stored File List From the Folder List press the right function Select key to access your File Once in the File list press again the right funct...

Page 8: ...ou ur r M Mo ov vi ie e C Co on nt te en nt t Press the right side of the 4 way Rockerswitch to access the edit menu frame Note Edit will be described separately under Edit Function F Fu un nc ct ti...

Page 9: ...u F Fu un nc ct ti io on ns s D Du ur ri in ng g P Pl la ay yb ba ac ck k Fast Forward press the right side of the 4 way switch playback jumps forward 10sec NEXT PREVIOUS During music playback press t...

Page 10: ...left right side of the 4 way rocker switch to rotate the photo To shift press again the right function key to change the command and then followed by pressing the 4 way rocker switch to shift the pho...

Page 11: ...P Pl la ay y M Mo od de e Pre set your choice of viewing the photo album You can select from Slideshow of 1 picture 4 pictures or 9 pictures and time lapse for each preview D Di is sp pl la ay y Sele...

Page 12: ...r copy Next press the right side of the 4 way switch to access edit menu and select Your screen will be split into two columns The one on the right is the location where you want to migrate your conte...

Page 13: ...creen 4 With the remote control you can now operate from a distance 5 You can also playback sound tracks on your stereo system Note You can choose to output your video via S Video or Component Video c...

Page 14: ...sections the one on the left is content of your AV 612LCD and the one on the right is content of your PC Click on the program icons of MOVIE MUSIC PHOTO to access them and manage these content 5 You...

Page 15: ...ng 4 Go to your AV 612LCD and under MOD you will find that the same content will be displayed on your AV 612LCD screen Simply click on the files and select Play to playback these content that you have...

Page 16: ...USB cable and go to Setup on the main menu Note Before disconnecting the USB cable consult your tool bar at the bottom of your monitor screen for Safely Remove USB Mass Storage Device 7 Power on your...

Page 17: ...o headset or home theatre hi fi system analog A V Connections On Cradle Component Video S Video and A V ports enable connection to TV or projector On Device Stereo Port for headset Media Streaming On...

Page 18: ...roduct is fully legible 2 The obligations of H B are limited either to repair or replacement of defective components The repair or replacement of defective components is based on an assessment by H B...

Page 19: ...Page 19 20...

Page 20: ...Page 20 20...

Reviews: