background image

2016-08

4

 /

 12

-

-

5

-

-

5

5.1.a - MAINTENANCE PRELIMINARY OPERATIONS

Before starting the maintenance operations, it is necessary to:

Position the machine on a plane surface and make sure that it cannot move accidentally.

-  Turn off the machine and remove the ignition key.
-  Visually signal that you are carrying out maintenance opoerations.


WARNING:

Disconnect the battery before starting any operation on the electric system.

5.2 -  DAILY  MAINTENANCE

5.2.a - CLEANING THE WASTE BOX WITH WATER

-  Extract the waste box, empty it and wash with running water.
-  Wait until the box is perfectly dry and put it back in its housing.

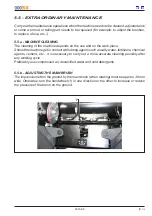
5.2.b - CHECKING FOR MATERIAL WOUND ON THE BRUSHES

-  Visually check the main and side brushes and make sure no material is wound on the 

brushes.


CAUTION:

Always touch the brushes wearing special safety gloves to avoid any lesion caused 
by cutting material possibly present between the bristles.

Summary of Contents for 900SX

Page 1: ...HAMMERHEAD CONT ACT US 800 626 7835 Contact HammerHeadClean com HammerHeadClean com USE MAINTENANCE MANUAL 900SX...

Page 2: ...u to fully appreciate the technical advantages and the stylistic research of your new machine The following pages contain indications concerning its correct use and maintenance as well as suggestions...

Page 3: ...sidual risk areas Handling and transport CHAPTER TECHNICAL DATA IDENTIFICATION Technical data Machine noise emission Information about vibrations Identi cation of the machine CHAPTER KNOWLEDGE USE Gen...

Page 4: ...4 1 2 GENERAL WARNINGS 5 1 2 a Operators instructions 5 1 2 b Operator s position 5 1 2 c Manufacturer s responsibility 5 1 2 d Servicing 5 1 2 e Spare parts 6 1 3 MACHINE DELIVERY 6 1 4 EXPECTED USE...

Page 5: ...nd personal protective equipment 8 1 8 c General warnings 8 1 8 d Before starting the machine 9 1 8 e During use 9 1 8 f Machine stop 10 1 8 g Safety instructions for supplies 10 1 9 MAINTENANCE INSTR...

Page 6: ...onal management and duration of the vehicle Non observance of such instructions could cause damage or harm to the vehicle to people and to the environment which cannot in any case be blamed on the man...

Page 7: ...eper s use or to sec tions of this manual to which particular attention must be paid REMEMBER Descriptions preceded by this symbol contain information or procedures recommen ded by Dulevo for optimum...

Page 8: ...t has not been previously authorized in writing by the manufacturer In particular the manufacturer declines any responsibility for any damage caused by Acts of God Wrong maneuvers Lack of maintenance...

Page 9: ...nce manual Spare parts manual Warranty Other documents related to electrical motor batteries accessories wiring diagram etc 1 4 EXPECTED USE OF THE MACHINE The machine may only be used for industrial...

Page 10: ...or accidents due to the use of the machine under conditions different than those speci ed in chapter 3 or elsewhere in this manual 1 7 CHECKS Before beginning work CHECK that all safety and emergency...

Page 11: ...effects of alcohol medicaments and or drugs Do not allow unauthorized people to get close to the machine 1 8 b ACCIDENTPREVENTIONCLOTHINGANDPERSONALPROTECTIVEEQUIPMENT Do not wear uttering clothing a...

Page 12: ...ne rags tools etc Make sure all the battery caps are positioned correctly in their seat The machine may only be operated after its good condition has been veri ed 1 8 e DURING USE Operate the machine...

Page 13: ...radius of the battery while it is being charged in the battery charging area or while it is cooling after having been charged 1 9 MAINTENANCE INSTRUCTIONS WARNING A general mechanical knowledge is not...

Page 14: ...posal of noxious substances such as batteries etc please comply with all applicable rules and regulations NOTICE Any irregularity committed by the customer before during or after scrapping and dis pos...

Page 15: ...2016 08 12 12 1 1...

Page 16: ...NG PLATES 2 2 2 SAFETY DEVICES 4 2 3 RESIDUAL RISK AREAS 5 2 4 HANDLING AND TRANSPORT 5 2 4 a Lifting and transport 5 2 4 b Assembling the handlebar 6 2 4 c Assembling the side brushes 6 SAFETY DEVICE...

Page 17: ...tery it indicates that it is strictly forbidden to smoke or to use open ames near the tank or battery so as to avoid any explosion or re hazard 3 Warning Keep the cover open while charging the battery...

Page 18: ...2016 08 3 6 2 1 2 4 3 5...

Page 19: ...2016 08 4 6 2 1 2 3 2 2 SAFETY DEVICES Starting key 1 Microswitch 2 it stops the machine if the main cover 3 is lifted when the machine is operative...

Page 20: ...es All loading and unloading operations must be carried out by SPECIALIZED PERSONNEL For the machine mass see chapter 3 See chapter 4 for the description of the controls and the use of the machine CAU...

Page 21: ...MBLING THE HANDLEBAR Lift the main cover 1 Release the 8 screws 2 Adjust the handlebar 3 at the desired height for work then tighten the screws 2 2 4 c ASSEMBLING THE SIDE BRUSHES Assemble the side br...

Page 22: ...1 a Limit weather conditions for the use 2 3 2 MACHINE NOISE EMISSION 3 3 3 INFORMATION ABOUT VIBRATIONS 3 3 4 IDENTIFICATION OF THE MACHINE 4 3 4 a Identi cation plate 4 3 4 b Sound power plate 4 TEC...

Page 23: ...and left OPT side brushes 1100 mm of main and side brushes 260 330 mm Waste box capacity 50 liters Filtering surface 2 1 m2 Ef ciency per hour 4900 m2 h Max speed 4 5 km h Max operating gradient 2 Wi...

Page 24: ...THE MACHINE IN THE ENVI RONMENT LwA 83 dB A See paragraph SOUND POWER PLATE POSITIONING 3 3 INFORMATION ABOUT VIBRATIONS The vibrations have been measured in a typical condition of machine use i e dur...

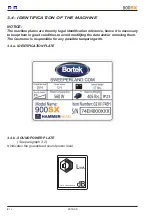
Page 25: ...nti cation reference hence it is necessary to keep them in good condition to avoid modifying the data and or removing them The Customer is responsible for any possible tampering with 3 4 a IDENTIFICAT...

Page 26: ...1 b Internal view 3 4 2 INSTRUMENTS AND CONTROLS 4 4 3 PRELIMINARY CHECKS 6 4 3 a Battery charge level 6 4 4 MACHINE START 7 4 5 CLEANING WORK 8 4 5 a Starting the sweeping 8 4 5 b Stopping both the s...

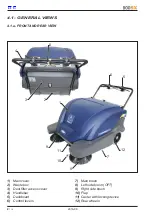
Page 27: ...0 4 1 GENERAL VIEWS 4 1 a FRONT AND REAR VIEW 7 Main brush 8 Left side brush OPT 9 Right side brush 10 Flap 11 Caster with locking device 12 Rear wheels 1 Main cover 2 Waste box 3 Dust lter access cov...

Page 28: ...4 8 6 1 7 2 9 4 1 b INTERNAL VIEW 1 Electric motor 2 Battery OPT 3 Battery charger OPT 4 Fuses 5 Dust suction turbine 6 Driving belts 7 Battery cables connector 8 Safety microswitch 9 Main brush groun...

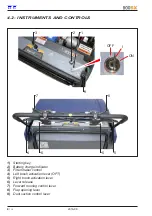
Page 29: ...STRUMENTS AND CONTROLS 1 Starting key 2 Battery charge indicator 3 Filter shaker control 4 Left brush activation lever OPT 5 Right brush activation lever 6 Lever release 7 Forward running control leve...

Page 30: ...es with dust suction turned off 4 Left brush activation lever OPT Release the lever to start the rotation and lower the left brush Press the lever to stop the rotation and lift the left brush 5 Right...

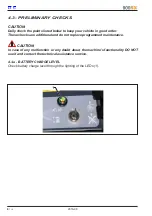
Page 31: ...good order These checks are additional and do not replace programmed maintenance CAUTION In case of any malfunction or any doubt about the machine s functionality DO NOT use it and contact the technic...

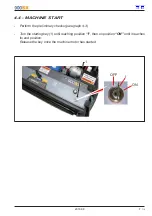
Page 32: ...I ON 4 4 MACHINE START Perform the preliminary checks paragraph 4 3 Turn the starting key 1 until reaching position I then on position ON until it reaches its end position Release the key once the mac...

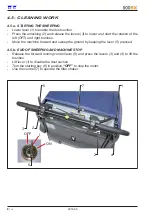
Page 33: ...e rotation of the left OPT and right brushes Move the machine forward and sweep the ground by keeping the lever 5 pressed 4 5 b END OF SWEEPING AND MACHINE STOP Release the forward running control lev...

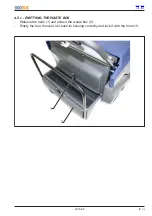
Page 34: ...2016 08 9 10 4 4 1 2 4 5 c EMPTYING THE WASTE BOX Release the hook 1 and extract the waste box 2 Empty the box then put it in back its housing correctly and lock it with the hook 1...

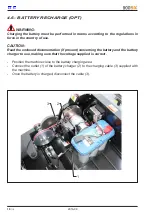
Page 35: ...use CAUTION Read the enclosed documentation if present concerning the battery and the battery charger to use making sure that the voltage supplied is correct Position the machine close to the battery...

Page 36: ...a Checking the wear of the waste box dust gaskets 5 5 3 b Checking the wear of the main brush rubber dust askets 5 5 3 c Checking the ef ciency of the brushes 5 5 4 PERIODICAL MAINTENANCE 6 5 4 a Dis...

Page 37: ...2016 08 2 12 5 5 INDICE INDEX 5 5 e Replacing the side brushes 11 5 5 f Replacement of fuses 12...

Page 38: ...AINTENANCE Daily maintenance every 8 hours Weekly maintenance every 40 hours Periodical maintenance 2 EXTRAORDINARY MAINTENANCE WARNING Maintenance operations must be carried out by skilled technical...

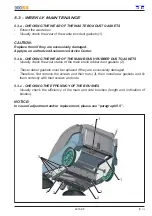
Page 39: ...the battery before starting any operation on the electric system 5 2 DAILY MAINTENANCE 5 2 a CLEANING THE WASTE BOX WITH WATER Extract the waste box empty it and wash with running water Wait until the...

Page 40: ...OF THE MAIN BRUSH RUBBER DUST GASKETS Visually check the wear status of the main brush rubber dust gaskets 2 These rubber gaskets must be replaced if they are excessively damaged Therefore rst remove...

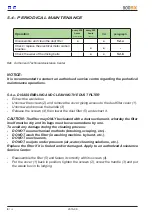
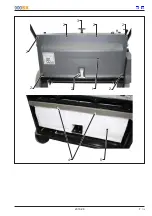
Page 41: ...d any damage during the cleaning process DO NOT use mechanical methods brushing scraping etc DO NOT wash the lter in washing machine by hand etc DO NOT use cleaners DO NOT use jets under pressure air...

Page 42: ...2016 08 7 12 5 5 2 2 2 2 2 2 2 3 4 1 5...

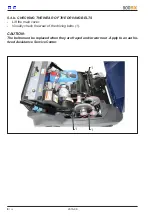
Page 43: ...CHECKING THE WEAR OF THE DRIVING BELTS Lift the main cover Visually check the wear of the driving belts 1 CAUTION The belts must be replaced when they are frayed and or worn out Apply to an autho riz...

Page 44: ...e work place Should the machine get in contact with strong agents such as salty water fertilizers chemical agents cement etc it is necessary to carry out a more accurate cleaning possibly after any wo...

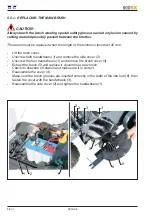
Page 45: ...is less than 20 mm Lift the main cover Unscrew both handwheels 1 and remove the side cover 2 Unscrew the four handwheels 1 and remove the brush cover 4 Extract the brush 5 and replace it Assemble a n...

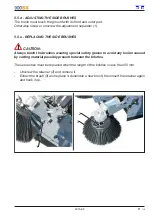
Page 46: ...G THE SIDE BRUSHES CAUTION Always touch the brushes wearing special safety gloves to avoid any lesion caused by cutting material possibly present between the bristles These brushes must be replaced wh...

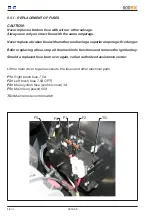
Page 47: ...e having a superior amperage re danger Before replacing a fuse stop all the machine s functions and remove the ignition key Should a replaced fuse burn over again call an authorized assistance center...

Page 48: ...CONT ACT US 800 626 7835 Contact HammerHeadClean com HammerHeadClean com HAMMERHEAD ENGINEERED SIMPLICITY...

Reviews: