


20
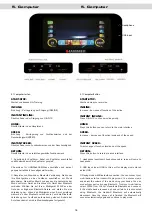
6. Schmierung des
Laufbands
Wichtiger Hinweis:
Bitte schmieren Sie das Laufband vor dem ersten
Gebrauch.
Achtung:
Wenn Sie das Laufband reparieren, reiningen oder schmieren,
bitte vom Netzstrom trennen.
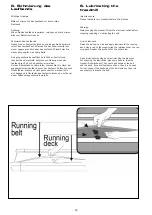
Schmieren des Laufbands:
Heben Sie den Laufgurt seitlich an und tragen Sie Schmiermit-
tel auf das Laufdeck auf. Wischen Sie das Schmiermittel mit
einem Lappen gründlich über das Laufdeck. Wiederholen Sie
diesen Vorgang für die andere Seite.
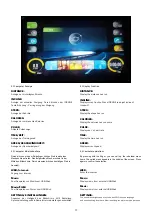
Eine gut geschmierte Lauffläche erhöht den Komfort und
reduziert den Verschleiß. Aufgrund von Reibung muss das
Laufband von Zeit zu Zeit geschmiert werden.
Um den Silikonstand zu überprüfen, stecken Sie Ihre Hand, bei
ausgeschaltetem Laufband, unter den Laufgurt. Sollten Sie noch
Silikon fühlen, braucht es nicht geschmiert zu werden, fühlt
sich dagegen die Rückseite des Laufgurts trocken an, sollte mit
einem Silikonspray geschmiert werden
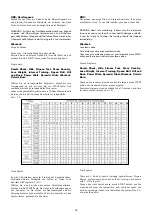
6. Lubricating the
treadmill
Important note:
Please lubricate your treadmill before the first use.
Warning:
Always unplug the treadmill from the electrical outlet before
cleaning, repairing or lubricating the unit.
How to lubricate:
Raise the belt up on side and apply lubricant to the running
deck. Use a rag to thoroughly wipe the lubricant over the run-
ning deck. Repeat this process for the other side.
A good lubricate running deck is minimizing the wearout.
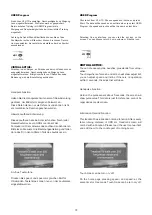
For checking the lubrication, please make sure, that the
treadmill is switched off. Put your hand between the belt
and the deck. If you still feel some silicon, then it is no need
for lubrication. If the backside of the belt feels dry, then it is
necessary to lubricate the belt.
Summary of Contents for LR 22i II TFT
Page 1: ......
Page 6: ...05 3 2 Montageschritte Assembly steps Schritt Step 1...
Page 7: ...06 Schritt Step 2...
Page 8: ...Schritt Step 3 07...
Page 9: ...Schritt Step 4 08...
Page 10: ...Schritt Step 5 09...
Page 11: ...Schritt Step 6 10...
Page 12: ...Schritt Step 7 11...
Page 13: ...Schritt Step 8 12...
Page 14: ...Schritt Step 9 13...
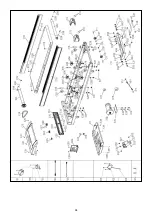
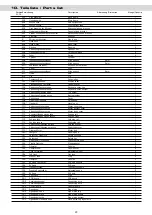
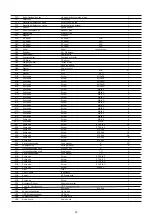
Page 28: ...9 Explosionszeichnung Explosiondrawing 27...
Page 29: ...28...


