


7
Note:
If PlayStation 2® Mini Wireless Controller does not fi nd a connection, please repeat 1 & 2 all over again to ensure
that your operation is right. If this does not work, please check your PlayStation 2® console for other issues.
Remarks:
Please connect the 1P - PlayStation 2® Mini Wireless Controller and 1P - Wireless Receiver before
connecting the 2P - PlayStation 2® Mini Wireless Controller and 2P - wireless receiver. Do not connect both receivers
and both PlayStation 2® Mini Wireless Controller at the same time. They must connect separately.
Control Modes and Functions
There are two different modes you can choose from depending on your style of play. You can change modes by pressing
the MODE button. The mode LED light will be on or off depending on which mode you are in.
Switching from digital to analog modes:
Analog Mode
-When the mode LED light is on, the controller is in analog mode. Games that are Vibration Function
Compatible will only vibrate if the controller is in analog mode.
Digital Mode
-When the mode LED light is off, the controller is in digital mode and the analog function is disabled.
This is the standard mode for PSone™ and PlayStation®.
Controller Diagram:
Directional Pad
The D-pad controls the direction in which the objects moves. It is also used for navigating menus and is the preferred
control for precision in direction when using the program function.
Analog Sticks, L3/R3
The two analog - sticks each control two axis‘ (X- and Y-axis). Different games will allow you to modify the way the
analog stick react. The analog sticks provide more sensitivity (i.e. if you press the analog sticks more fi rmly, the action
will be more dramatic than if you press the sticks lightly.) and versatility in motion than the D - pad and are the preferred
control for most driving, fi ghting, and other action games.
Action Buttons (Circle, Square, Triangle, X)
These buttons are used to perform various actions, depending on the game. For more details, see the game‘s instruction
manual.
6
Shoulder Buttons
These buttons are pressed using the index fi nger and function differently depending on the game being used.
They are pressure - sensitive and will operate differently if you press them slightly or completely.
Start Button
This button is generally used to make selections in the menu and for pausing the game. For more details, see the game‘s
instruction manual.
Select Button
This is a standard button that allows you to do various things, depending on the game. For more details, see the game‘s
instruction manual.
Connect Button
This button allows you to fi nd a suitable frequency point by pressing the Connect button. Use this if you have no
connection to the receiver after fi ve minutes. When pressing the Connect button on the receiver, the signal LED will
blink, and then become illuminated to indicate the right connection between the wireless controller and receiver.
How to set and deleta a turbo button
1. Setting TURBO: hold TURBO button, press the button
(Circle, Square, Triangle, X, L1, R1, L2, R2)
that you want to set
as “Auto fi re”.
2. Deleting TURBO: hold TURBO button, press the button
(Circle, Square, Triangle, X, L1, R1, L2, R2)
that yout want to
delete
CAUTION
• Use this controller only as instructed. Read all instructions before operating controller.
• To prevent fi re or shock hazard, do not expose this controller to rain of moisture.
• Do not disassemble. Refer to qualifi ed personnel only.
• This controller should only be operated from the power source indicated on the controller. If you are not sure of the
type of electrical power supplied to your home, contact your local power company.
• Never push objects of any kind, other than authorized items, into the product as they may touch dangerous voltage
points or short out parts that could result in fi re or electrical shock.
• The controller‘s vibration function can aggravate injuries. Do not use the controller if you have any injuries or
ailments in your hands or arms.
• Avoid leaving cords in places where they are likely to be walked on or tripped over. Do not pinch, damage, or wrap
cords around objects or people.
• Do not allow children to play with cords.
• Failure to follow these directions may violate the warranty.
See www.hama.de for declaration of conformity with R&TTE Directive 99/5/EC.
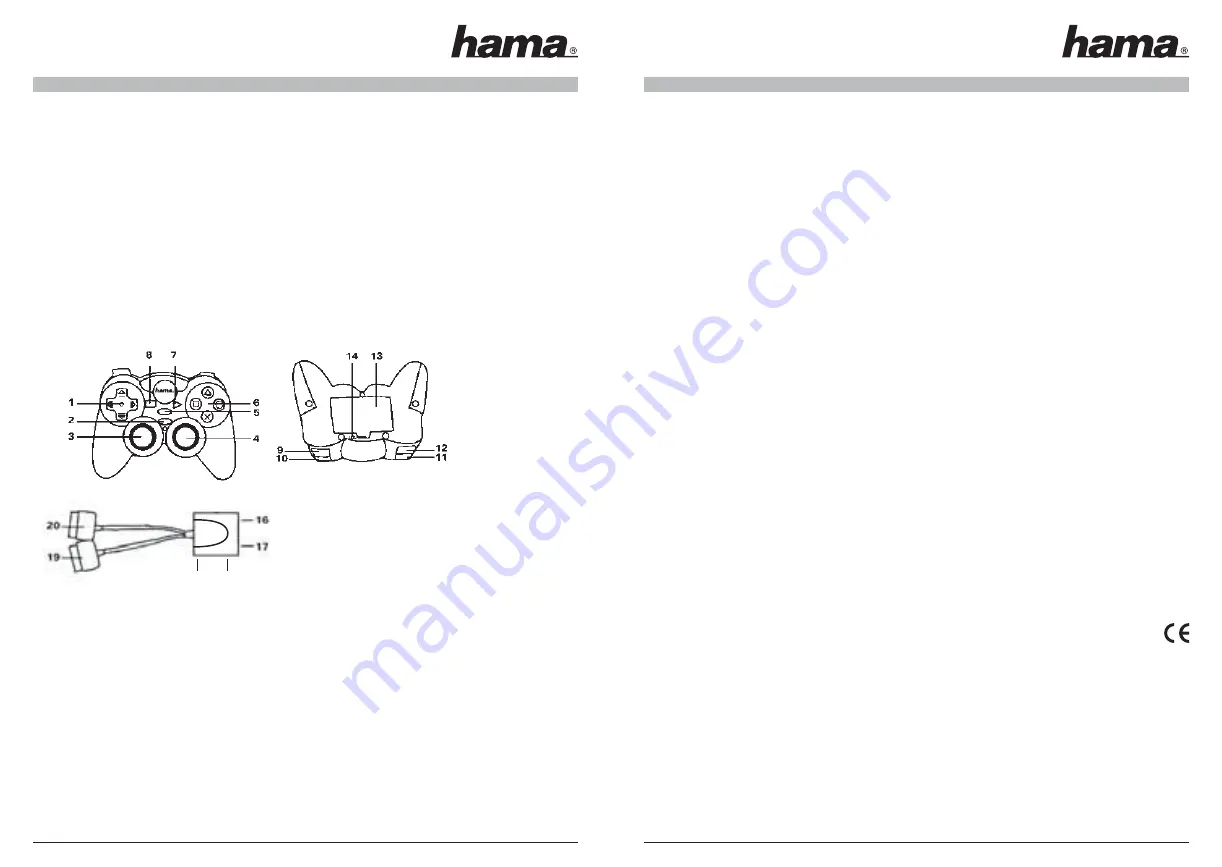
1. D-PAD
11. R1 BUTTON
2. MODE BUTTON
12. R2 BUTTON
3. LLEFT ANALOGUE STICK (L3) 13. BATTERY COMPARTMENT
4. RIGHT ANALOGUE STICK (R3) 14. POWER SWITCH
5. TURBO BUTTON
15. 2P-CONNECT BUTTON
6.
ö
/
Δ
/
ä
/ X - BUTTONS
16. 2P-LED
7. START BUTTON
17. 1P-LED
8. SELECT BUTTON
18. 1P-CONNECT BUTTON
9. L2 BUTTON
19. 1P-PORT
10. L1 BUTTON
20. 2P-PORT
15
18


