Haier L26A10A Operating Instructions Manual Download Page 5

7

PREPARATION FOR REMOTE CONTROL

3

2

1

+

+

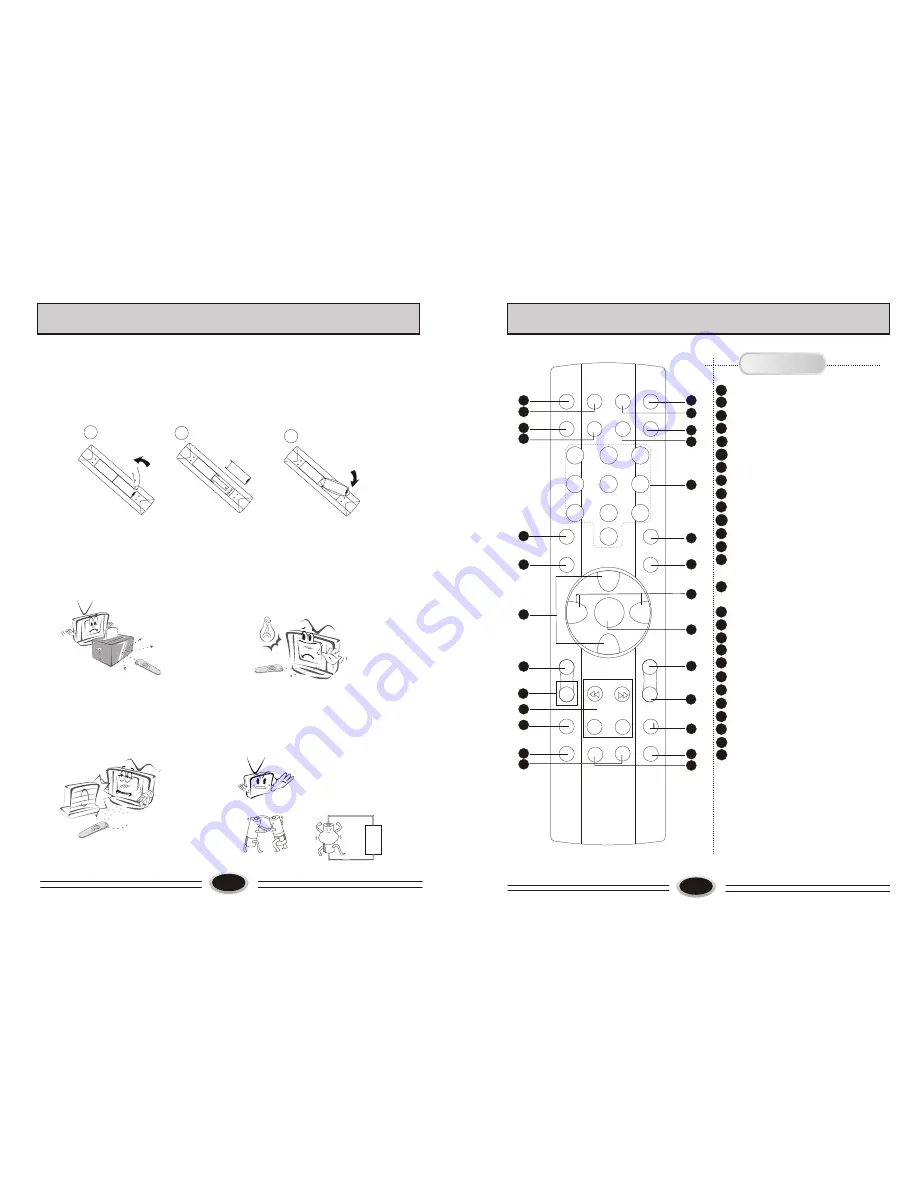
Remote control installation

1. According to the figure display below, place the remote control with face down,  
    then open the cover of  battery apartment. 
2. As in the figure display below, install two AA batteries. (The + and - symbol of 
    battery must match with the marks on the remote).
3.Close the cover of battery apartment.

Cautions for using remote control:
Confirm there is no object between the
remote control and the remote sensor
of TV set.

Sunshine or other strong light will 
interfere the signal sent by the remote
control. In this situation turn the TV
set to avoid the direct light source.

Do not put the remote control in direct
heat or a damp place, or potential 
damage to the remote may occur.

Please use two AA 1.5V batteries.
Do not mix battery types.
Install the batteries as the correct 
polarities.
Do not use rechargeable batteries.

REMOTE CONTROL PANEL

1

2

3

4

7

8

9

11

12

13

14

15

16

17

18

20

21

23

22

24

10

25

19

5

6

11

Power button
Mute button
TV/AV switch button
Display button
Dynamic AAA button
The function is not available
One digit selection button
Program recall button
Child lock button
Picture mode selection button
Sound mode selection button
Program up/down button, direction 
selection button
Volume up/down button, direction 
selection button
Menu call/selection button
Color system selection button
Sound system selection button
Program scan button
Picture still button
This function is not available
Picture size selection button
Sleep timer button
This function is not available
Program edit button
This function is not available
Channel list button

Buttons and Descriptions

26

27

5

8

9

10

1

2

3

4

5

6

7

8

9

0

=

1

3

7

2

6

4

PIP

AAA

25

24

23

22

21

20

19

18

17

16

15

14

13

12

11

MUTE

TV/AV

SOUND POWER

MAIN/SUB

DISPLAY

CHILD LOCK

P.STD

RECALL

S.STD

CH+

CH-

VOL-

VOL+

MENU

C.SYS

S.SYS

STILL

SCAN

BACK

ZOOM

SLEEP 

SIZE

27

26

I-II

8

Summary of Contents for L26A10A

Page 1: ...L26A10A L32A10A L37A10A L40A10A L42A10A L26A L32 L37 L40A L42A LCD COLOR TELEVISION OPERATING INSTRUCTIONS Wide view angle display high contrast AAA HDMI 01 009050 ...

Page 2: ... SERVICEABLE PARTS INSIDE FOR ANY PROBLEM REFER SERVICING TO QUALIFIED SERVICE PERSONNEL THERE IS A LIGHTNING ARROW SYMBOL IN THE TRIANGLE THIS SYMBOL INDICATES HIGH VOLTAGE IS PRESENT INSIDE IT IS DANGEROUS TO MAKE ANY KIND OF CONTACT WITH ANY INSIDE PART OF THIS PRODUCT THERE IS A EXCLAMATION MARK IN THE TRIANGLE THIS SYMBOL ALERTS YOU THAT IMPORTANT LITERATURE CONCERNING OPERATION AND MAINTENAN...

Page 3: ......

Page 4: ...d if the product is without base 3 Mount the airproof board 4 Take out the switching support from the accessory bag and use four M5 16 screws included in the Base Switching support Switching support Airproof board L26A10A L32A10A L37A10A L42A10A L40A10A accessory bag to fix the switching support on the back of complete set 5 The remaining four M5 16 screws in the accessory bag are used to mount th...

Page 5: ...es REMOTE CONTROL PANEL 1 2 3 4 7 8 9 11 12 13 14 15 16 17 18 20 21 23 22 24 10 25 19 5 6 11 Power button Mute button TV AV switch button Display button Dynamic AAA button The function is not available The function is not available The function is not available One digit selection button Program recall button Child lock button Picture mode selection button Sound mode selection button Program up do...

Page 6: ... is in standby status pressing power button can cancel the standby status then enter the power on status The power on channel number will display on the screen and it will disappear without operation in 5 seconds 2 Pressing power button again the TV set will enter standby status Standby set connecting the power supply wire the TV set will enter standby status TV PROGRAM SELECTION AND VOLUME ADJUST...

Page 7: ...ing auto search to search the program when you use this TV set for the first time 1 Press MENU button to make the main menu display 2 Press VOL button to select TUNER menu press CH button to enter 3 Press CH button to select AUTO SCAN 4 Press VOL button to start searching press MENU button to stop auto scan during searching Note The order of the auto scan is due to the frequency of the program gen...

Page 8: ...tion you need insert Press VOL button to insert the selected channel in this position during operating press green button to cancel insert 3 For example insert the channel 5 before channel 2 you can first press CH button to select channel5 then press VOL button to drag channel 5 then press CH button to select channel 2 press VOL button to insert this position and save the program in channel 5 is b...

Page 9: ...SOUND menu press CH button to enter 3 Press CH button to select SOUND item 4 Press VOL button to select STANDARD NEWS USER or MUSIC Note You can also press S STD button on the remote control to select the sound modes BALANCE 1 Press MENU button to make the main menu display 2 Press VOL button to select SOUND menu press CH button to enter 3 Press CH button to select BALANCE item 4 Press VOL button ...

Page 10: ...nter setting Press VOL button to select hour or minute position press CH button to adjust the value After setting press MENU button to save and exit Note Functions only work when clock is set TIME SETTING 17 FUNCTION SETTING 4 Press CH button to select different item press VOL button to adjust AAA using this function can improve the brightness contrast and arrangement of image There are ON SPLIT M...

Page 11: ...button to set the maximum volume the limited range is 10 100 9 Press CH button to select PW CHANNEL item press VOL button to set channel number this channel is the pw channel number if select OFF it will turn off the pw channel lock function 10 BUS item is not available After setting the locked item it will enter the locked item for example the video1 doesn t display the image it will display LOCK...

Page 12: ...TERNAL AUDIO AND VIDEO EQUIPMENT CONNECTION DVD HDMI 22 VIDEO IN AUDIO IN L R S VIDEO IN DVD VIDEO IN 21 HDMI The HDMI logo and High Definition Multimedia Interface is a trademark or registered trademark of HDMI Licensing This TV can receive the High Definition Multimedia Interface HDMI This TV supports HDCP High bandwidth Digital Contents Protection Protocol for 720x480p 1280x720p and 1920x1080i ...

Page 13: ...ded here are for reference only Differences may occur as product technology is updated See rating plate 23 USING YOUR TV AS A COMPUTER DISPLAY VGA AUDIO IN VGA VGA input 1 Connect the VGA output port in the computer to the VGA port in the TV set 2 Connect the audio cable in computer to VGA AUDIO IN port in TV set 3 Press TV AV button to select VGA mode 4 Turning on the computer the screen image of...

Page 14: ...tor Vehicle Fluorescence lamp etc Volume Sound mute The power plug isn t plugged in AC outlet The main power isn t turned on The setting up of contrast brightness and volume Adjust color control Adjust channel again The following problems are not always caused by hardware failure Please use the follow troubleshooting guide before you call for service Picture with Snow No Color No Picture Normal Di...

Reviews: