Haier HWM60-20B User Manual Download Page 16

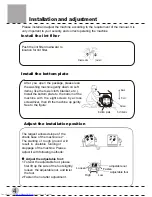
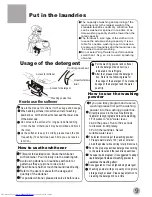
Clean the detergent box and set it on
the control panel seat.

The method of dismantle : Push it up

aslant and gently.

The method of install : install it upwards

and aslant and push it in .

14

Disposal after washing 

After using, please clean the lint and foreign materials of the lint filter etc. in time. 
Otherwise it may influence your using the machine.

Please first pull off the power plug from the receptacle before cleaning.

Dismantle

Install

The filter screen of the water inlet valve is 
likely to be blocked  by foreign materials 
and influence the water inlet. Please clean
 it with brush every two months.

Thinner

Petr

ol

Alcohol

If the cabinet is dirty, wipe it with wet cloth
     Do not flush it directly with water.
     Wipe it with neutral detergent.

Do not wipe it with thinner, petrol, alcohol etc

.

1.After washing, close the water faucet.  ( If needed, you can dismantle the water inlet hose).

2.Do not store water in the washing machine for a long period.  Drain  the  water  completely after each using.
3.Be sure to pull off the power plug before maintenance.

4.Hang up the power cord and drain hose.

5.Wipe off the water drops on the surface of the machine and inside the tub. Open the top lid for some
   time (about 1 hour), then close the top lid.

Clean

The lint filter must be used during 
washing.
It must be cleaned in time after each
 using
Lint filter:
1.Rotate the inner tub with hand till the 
   lint filter reaches the position convenient
   for you to take it off. Pull it up to dismantle.
2.Push it down to install.
3.Clean the filter screen after washing.

Dismantle

Install

Dismantle and Install

Summary of Contents for HWM60-20B

Page 1: ...Full Automatic Washing Machine User s manual This manual is for Please read this manual carefully before using Retain it for future reference HWM60 20B 0030507862 ...

Page 2: ...4 Preparation before washing 8 Put in the laundries 9 Usage of the detergent 9 Use the operation buttons 10 Close the top lid 13 Finish washing 13 Disposal after washing 14 Trouble shooting Answer to question 15 Packing list 16 Contents Specification Water level Water quantity about Water inlet pressure MPa 0 03 0 78 Rated washing spinning capacity kg 6 0 6 0 ...

Page 3: ...he safety of the product and the personal safety of the users Please operate in strict conformity to the contents otherwise it may cause damage of the machine or injure the personal safety of the user Contents marked with that symbol are actions forbidden to perform Performing of those actions may result in damage of the machine or injure the personal safety of the user Notes All illustrations in ...

Page 4: ... the machine Do not use wet hand to insert or pull out the power plug In case the washing machine is installed on ground with carpet do not block the ventilation hole with carpet Do not let the machine share one receptacle with other electric appliances If the power plug is damaged or the plugging into the receptacle is loose do not use the plug any more Do not wash water proof laundries like the ...

Page 5: ...Take special care of the children Do not let the children climb the washing machine Petrol Thinner Dismantle Install To prevent the lint inside the tub from blocking the cascade outlet during washing please keep the lint filter in good condition and install it to proper position If the lint filter is lost or damaged please contact the local after sales service department of our company To protect ...

Page 6: ...ttom plate to the bottom of the machine with the eight screws by a cross screwdriver then lift the machine up gently See to the figure Back Front Soft items Bottom plate Screw Adjust the installation position The largest allowed slope of the shank base of the machine is 2 The slanting or rough ground will result in unstable running or stoppage of the machine Please adjust it with following methods...

Page 7: ... off the drain hose frame As indicated in Figure 1 put the drain hose into the cabinet Then stretch one hand into the cabinet to nip the claw of the drain hose bush ing to remove the claw from original position Take off the drain hose bush ing with the other hand As indicated in Figure 2 and 3 Drain hose frame Outer drain hose 1 The height of the drain hose shall be less than 10cm or the drainage ...

Page 8: ... to Figure 1 Remarks Before twisting the fastening nut the thread is 4mm above the upper surface of the nut After twisting the fastening nut the thread is 2mm above the upper surface of the nut See to Figure 6 5 Take off the nameplate Twist the fastening nut as per the indication of the figure See to Figure 5 4 Fasten the four screws evenly See to Figure 4 10mm Outlet end surface Nut About 4mm bef...

Page 9: ...inter Release the slider till a click sound is heard Locking lever Slider Water absorption cushion Nut of the water inlet hose Jointer of the water inlet valve Slider Jointer of the water inlet hose Locking lever Connection between the water inlet hose and the washing machine Connection between the jointer of the water inlet hose and the water inlet hose Check the connection between the jointer of...

Page 10: ...jeans shall be put in loosely Pay attention to followings before washing the laundries A Please check if the laundries are applicable for washing b Separate those not colorfast from other laundries C For laundries not water absorbing please put them into water with hands D For laundries with much soil please remove the soil first You can add detergent on the part with serious soil directly It is m...

Page 11: ...rgent box Refer to the following table for the usage of the detergent The standard dosage of the detergent and the water quantity How to use the washing powder How to usethe whitener Fill water to decided level Dilute the whitener with container Pour it slowly into the washing tub Avoid using whitener on laundries with color or pattern as they are prone to lose color The whitener shall not touch t...

Page 12: ...sflash The otherindicatorsareoff Push theRESERVEbuttontodisplay thereservemode P R O G R A M The following five programs are available for your option Standard Heavy Gentle Fast Common washing Washing the heavy clothes Washingthewoolentextilesorunderwear 10 minute quick washing of laundries with light soil Jeans Washing the relatively big and thick laundries Mode and meaning of the indicator Flash...

Page 13: ... FAST program for laundries with small quantity and light soil Page 10 In selecting the standard program the machine will execute fuzzy program to select water level and wash time according to the cloth and weight of the laundries The full procedure is controlled automatically PROCEDURE After switching on the power the washing machine will set wash rinse spin procedure automatically it is the stan...

Page 14: ... shirtare very dirty First soak thenwash WASH RINSE SPIN STANDARD procedure RINSE SPIN WASH RINSE the rinsing liquid remains in the tub SOAK WASH RINSE SPIN When prevent the laundries from corrugating and the laundries do not need spinning SOAK WASH RINSE SPIN SOAK WASH RINSE SPIN SOAK WASH RINSE SPIN SOAK WASH RINSE SPIN SOAK WASH RINSE SPIN Push the PROCEDURE button for 6 times and it will resum...

Page 15: ...l be finished after 18 hours Confirm the operation of reserve program Page When the RESERVE function is activated the digitron of TIME REMAIN is flash The other indicators are off Push the RESERVE button to display the reserve mode To change the running program or cancel the reserve setting you need to switch off the power and make new selection Push the start Pause button Close the lid Finish was...

Page 16: ...h it directly with water Wipe it with neutral detergent Do not wipe it with thinner petrol alcohol etc 1 After washing close the water faucet If needed you can dismantle the water inlet hose 2 Do not store water in the washing machine for a long period Drain the water completely after each using 3 Be sure to pull off the power plug before maintenance 4 Hang up the power cord and drain hose 5 Wipe ...

Page 17: ...ightly Is the top lid closed reliably Are the laundries set flat Is the machine slanting Are the laundries put slantingly in spinning Are there any foreign materials Is the screw of the jointer of water inlet hose loose or awry Close the top lid Put down the drain hose Open and close the top lid once Clean the foreign material Open and close The top Lid Once Close the top lid Open the water tap Op...

Page 18: ...16 User s manual Components of the water inlet hose Bottom plate Tapping screws One One One Seven One Full automatic washing machine Packing list Lint filter One Guarantee One Name Quantity ...

Reviews: