


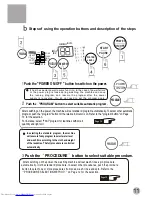


Even there's no water in the tub, a certain period is
required before spin starting.
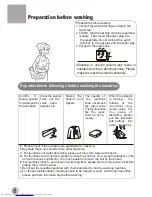
Do not use the soak program for the woolen textiles.
Separate the laundries that are not colorfast from
other laundries in washing.
WATER
LEVEL
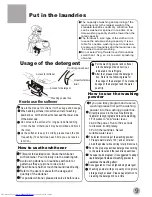
When the laundries need only
rinsing, spinning after manual
washing
12
The pulsator will not rotate unless the water is filled to selected water level.
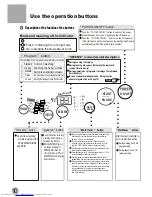
Procedure selection method
Times of pushing the
PROCEDURE button
Selected procedure
Applicable circumstance
Contents (the lighted indicators
indicate the programs about to run)
SPIN
(spin after drain)
WASH
(the washing liquid
remains in the tub)
When the common laundries need
washing, rinsing and spinning.
SOAK WASH RINSE SPIN
Repeat using the washing liquid
When the laundries need only
spinning after manual washing
(first drain then spin)
The laundries are very dirty, or the
sleeves and collars of the shirt are
very dirty. First soak then wash.
WASH - RINSE-SPIN
(STANDARD procedure)
RINSE - SPIN
WASH - RINSE
(the rinsing liquid
remains in the tub)
SOAK - WASH-
RINSE-SPIN
When prevent the laundries from
corrugating, and the laundries
do not need spinning
SOAK WASH RINSE SPIN
SOAK WASH RINSE SPIN
SOAK WASH RINSE SPIN
SOAK WASH RINSE SPIN
SOAK WASH RINSE SPIN
Push the PROCEDURE button for 6 times, and it will resume the initial mode. It will circulate in that sequence.
The SOAK procedure can work in cooperation with automatic programs like standard ,jeans and heavy. There
is intermittent pulsator stirring during soak.
Press " WATER LEVEL "button,
select suitable water level
After switching on the power, the washing machine will execute fuzzy program automatically to detect
the cloth. After defection, it can set the water level automatically. To select other water level, first
push the "start/pause" button, then push the "water level" button to set the water level, to
select a
suitable water level depending on the load.
Attention
Refer to the "water level button" on Page 10 for
the selection.