
NOTICE:
NOTICE:
NOTICE:
NOTICE:
�
This appliance is not intended for use by persons (including children) with reduced physical, sensory or
mental capabilities, or lack of experience and knowledge, unless they have been given supervision or
instruction concerning use of the appliance by a person responsible for their safety.
�
WARNING-Do not use mechanical devices or other means to accelerate the defrosting process, other than
those recommended by the manufacturer.
�
WARNING-Do not damage the refrigerant circuit.
�
WARNING-Do not use electrical appliances inside the food storage compartments of appliance, unless
they are of the type recommended by the manufacturer.
�
WARNING-To avoid a hazard due to instability of the appliance, it must be fixed in accordance with the
instructions.
�
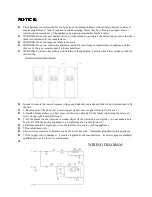
In order to ensure the water dispenser with enough stability, users should follow below instructions to fix
the unit:
�
1. Remove one of the body rear’s screw (upper right corner or upper left corner) (Picture 1)
�
2. Install a bracket where you have removed the screw already, fix the bracket tightening the removed
screw on the right location(Picture 2)
�
3. Fix the bracket on the wall side or similar object (if the wall side is too rigidity), you can make a hole
by electric drill, then using expanded screw tightening the bracket (Picture 3)
�
4.Children should be supervised to ensure that they do not play with the appliance.
�
5.Household used only
�
6.Do not store explosive substances such as aerosol cans with
flammable propellant in this appliance.
�
7.If the supply cord is damaged
,
it must be replaced by the manufacturer
,
its service agent or similarly
qualified persons in order to avoid a hazard.
�
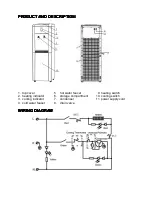
WIRING DIAGRAM


