Haier HLM-32B Instruction Manual Download Page 5

strongly recommend that you turn off the hot water function.

Draining

Draining

Draining

Draining the

the

the

the Dispenser

Dispenser

Dispenser

Dispenser

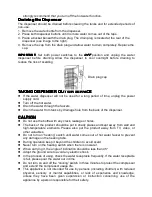
The dispenser should be drained before cleaning the tanks and for extended periods of
non-use.
1. Remove the water bottle from the dispenser.
2. Press both dispenser buttons until no more water comes out of the taps.
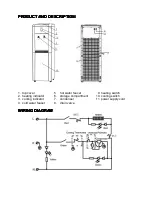
3. Place a bucket beneath the drain plug. The drain plug is located at the rear of the

dispenser (see image to the right).

4. Remove the cap from the drain plug and allow water to drain completely. Replace the

cap.

IMPORTANT:

IMPORTANT:

IMPORTANT:

IMPORTANT:

Set both power switches to the

OFF

OFF

OFF

OFF

position and unplug the water

dispenser before draining. Allow the dispenser to cool overnight before draining to
reduce the risk of scalding

Drain plug cap

TAKING

TAKING

TAKING

TAKING DISPENSER

DISPENSER

DISPENSER

DISPENSER OUT

OUT

OUT

OUT OR

OR

OR

OR SERVICE

SERVICE

SERVICE

SERVICE

If the water dispenser will not be used for a long period of time, unplug the power
supply cord.

Turn off the hot water.

Drain the water through the faucets.

Drain the water from tanks by drainage hole from the back of the dispenser.

CAUTION

CAUTION

CAUTION

CAUTION

Do not use the bottle with any crack, leakage or holes.

The back of the product should be put in shady places and kept away from wall and
high-temperature elements. Please also put the product away from TV, video, or
other valuables.

Do not turn on “heating” switch until water comes out of hot water faucet to prevent
any damage on the heating tube.

During operation keep it beyond the children to avoid scald.

Never turn on the heating switch when there is no water.

When carrying it, the angle of inclination should be less than 45

°

.

Adopt the ground wire to avoid any electric shock.

In the process of using, check the water receptacle frequently. If the water receptacle
is full, please pour the water out in time.

Do not turn on and off the “cooling” switch in three minutes to protect the compressor
and extend the compressor usage life.

This appliance is not intended for use by persons (including children) with reduced
physical, sensory or mental capabilities, or lack of experience and knowledge,
unless they have been given supervision or instruction concerning use of the
appliance by a person responsible for their safety.

Summary of Contents for HLM-32B

Page 1: ...INSTRUCTION INSTRUCTION INSTRUCTION INSTRUCTION MANUAL MANUAL MANUAL MANUAL WATER WATER WATER WATER DISPENSER DISPENSER DISPENSER DISPENSER H H H HLM LM LM LM 32B 32B 32B 32B ...

Page 2: ...SCRIPTION DESCRIPTION 1 top cover 5 hot water faucet 9 heating switch 2 heating indicator 6 storage compartment 10 cooling switch 3 cooling indicator 7 condenser 11 power supply cord 4 cold water faucet 8 drain valve WIRING WIRING WIRING WIRING DIAGRAM DIAGRAM DIAGRAM DIAGRAM ...

Page 3: ...ove the third ground prong from the power cord under any circumstances Any questions concerning power and or grounding should be directed toward a certified electrician or an authorized products service center This water dispenser is not recommended for outdoor usage Do not locate the dispenser in the area where the temperature may fall below freezing point 0 or 32 Keep area around dispenser free ...

Page 4: ...d water required need no particular adjustment Do not connect the electrical power plug until water comes out of the hot water faucet After plug the yellow LED indicator will be on indicating the power is ON Turn on the heating switch the red LED indicator will be on and the heating system starts working When the hot water comes up to 85 95 or so the red light goes off the heating system stops wor...

Page 5: ...ater Drain the water through the faucets Drain the water from tanks by drainage hole from the back of the dispenser CAUTION CAUTION CAUTION CAUTION Do not use the bottle with any crack leakage or holes The back of the product should be put in shady places and kept away from wall and high temperature elements Please also put the product away from TV video or other valuables Do not turn on heating s...

Page 6: ... then cleaning If the problems can not be solved contact your dealer or the Service Center of our company If power supply cord on this device is damaged it must be replaced with a special power supply cord that is obtainable at Service Center of our company TROUBLESHOOTING TROUBLESHOOTING TROUBLESHOOTING TROUBLESHOOTING GUIDE GUIDE GUIDE GUIDE You can solve many common water dispenser problems eas...

Page 7: ... in accordance with the instructions In order to ensure the water dispenser with enough stability users should follow below instructions to fix the unit 1 Remove one of the body rear s screw upper right corner or upper left corner Picture 1 2 Install a bracket where you have removed the screw already fix the bracket tightening the removed screw on the right location Picture 2 3 Fix the bracket on ...

Reviews: