background image

Installation


Haier LED HDTV 

EN-10

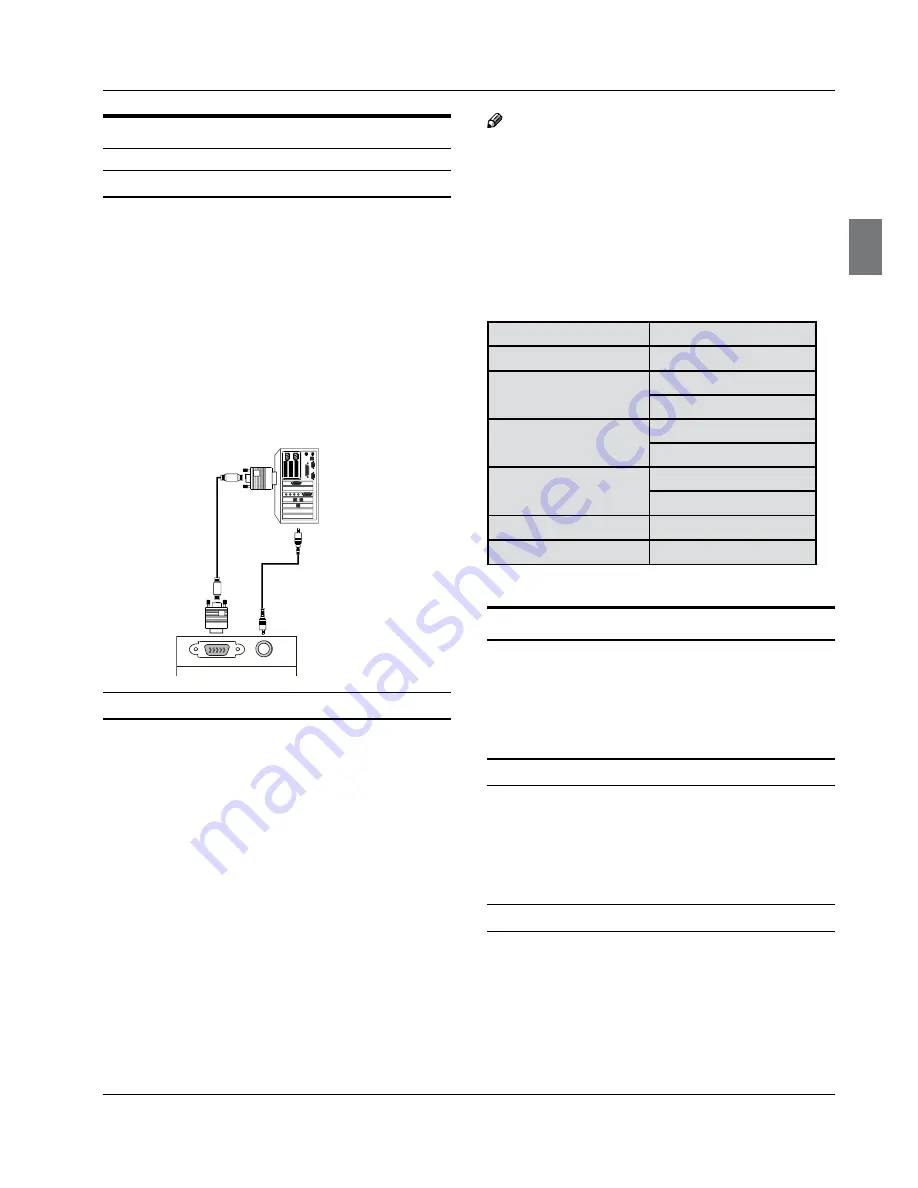
Connecting a computer

How to connect

To get the best picture quality, adjust the VGA 

graphics card to 1024

×

768.

Use the corresponding cable to connect the  TV’s 

VGA or DVI (Digital Visual Interface) to the PC's video 
output, depending on your computer connector.

Then, make the corresponding audio connection  

by connecting an audio cable from your PC's audio 
out or headphone jack to the TV's PC/DVI audio in 
jack. If using a sound card, adjust the VGA sound as 
required.

Back of TV

PC/DVI AUDIO

PC

PC IN

How to use

Turn on the computer and the TV.

Use INPUT on the remote control to select VGA or 

HDMI source.

Check the image on your TV. There may be noise 

associated with the resolution, vertical pattern, 
contrast or brightness in VGA mode. If noise 
is present, change the VGA mode to another 
resolution, change the refresh rate to another rate 
or adjust the brightness and contrast on the menu 
until the picture is clear. If the refresh rate of the VGA 
graphic card can not be changed, change the VGA 
graphic card or consult the manufacturer of the VGA 
graphic card.

 Note

Use a DVI cable.


R

Avoid keeping a fixed image on the TV’s screen 


R

for a long period of time. The fixed image may 

become permanently imprinted on the screen.

The synchronization input form for Horizontal and 


R

Vertical frequencies is separate.

Resolution 


Y


Resolution

Frame frequency (Hz)

640

×

480

60Hz

800

×

600

60Hz
75Hz

1024

×

768

60Hz
75Hz

1280

×

1024

60Hz
75Hz

1360

×

768

60Hz

1920

×

1080

60Hz

HDMI and DVI input

When the source device (DVD player , Bluray player, 

or Set Top Box) supports HDMI.

This TV supports HDCP (High-bandwidth Digital 

Contents Protection) protocol for Digital Contents 

(480p,720p,1080i).

How To Connect

Connect the source device to the HDMI port of 

this TV with an HDMI cable (not supplied with this 
product).

No separated audio connection is necessary.

How To Use

If the source device supports the Auto HDMI 


function, the output resolution of the source 
device will be automatically set to the appropriate 
resolution.

If the source device does not support the Auto 


HDMI, you need to set the output resolution 

Summary of Contents for HL32LE2

Page 1: ...01 0090509831 Please READ this manual carefully before operating yourTV and retain it for future reference HL32LE2 HL37XLE2 HL42XLE2 LED HDTV OWNER S MANUAL ...

Page 2: ...o not use this apparatus near water 5 Clean only with dry cloth 6 Do not block any ventilation openings Install in accordance with the manufacturer s instructions 7 Do not install near any heat sources such as radiators heat registers stoves or other apparatus including 8 amplifiers that produce heat Protect the power cord from being walked on or pinched particularly at plugs convenience receptacl...

Page 3: ...receiver Connect the equipment into an outlet on a circuit different from that to which the receiver is connected Consult the dealer or an experienced radio TV technician for help This device compiles with Part 15 of the FCC Rules Operation is subject to the following two conditions 1 This device may be not cause harmful interference 2 This device must accept any interference received including in...

Page 4: ... USB 24 Maintenance 25 Specification 25 Troubleshooting 26 Warranty 26 Warning 1 Safety Instructions 2 Introduction 4 Controls 4 Connection Options 5 Remote control 6 Installation 7 External Equipment Connections 7 Accessories 7 Antenna Connection 7 Choose Your Connection 8 Connecting a VCR 8 External A V Source Setup 8 Connecting a DVD player 8 Connecting a DTV digital TV 9 Connecting a digital a...

Page 5: ...he input source mode Press repeatedly to change the source to the one you want to watch 3 VOL Presstoadjustthevolume IntheMENUscreen thesebuttonsserveasleft rightbuttons 4 CH Press to scan through channels To scan quickly through channels press and hold down either In the MENU screen these buttons serve as up down buttons 5 POWER Press to turn on and off theTV 6 Remote Sensor Receivers IR signals ...

Page 6: ... to these jacks 5 HDMI In Connect a HDMI device to receive digital audio and uncompressed digital video 6 Video In Connect a composite video device to these jacks 7 AUDIO In Connect the audio L R cables from the composite video signal source to these jacks 8 Antenna Input Connect cable or antenna signals to theTV either directly or through your cable box 9 AUDIO Out Usetheincluded adaptertoconnect...

Page 7: ...MTS sound Mono Stereo and SAP in Analog mode Change the audio language in DTV mode C GUIDE Press to display the guide when you are watching analog or digital channels D CCD closed caption Select a closed caption E HDMI Press to select a device connected to the HDMI input F PC Press to select the computer connected to theVGA input G Number buttons Press to change a channel H button Press to select ...

Page 8: ...ll antenna socket Wall Antenna Socket RF Coaxial Wire 75 ohm Single family Dwellings Houses Connect to wall jack for outdoor antenna Outdoor Antenna To improve the picture quality in a poor signal area please purchase a signal amplifier and install properly If the antenna needs to be split for two TV s install a 2 Way Signal Splitter in the connections To install the antenna properly please contac...

Page 9: ...manual Select the input source with using the C INPUT button on the remote control and then press 5 6button to select the source press ENTER button to confirm External A V Source Setup How to connect Connect the audio and video cables from the external equipment s output jacks to the TV input jacks as shown in the figure When connecting the TV to external equipment match the jack colors Video yell...

Page 10: ...igital external device such as a cable box refer to the figure below How to connect Use the TV s COMPOSITE COMPONENT or HDMI jack for video connections depending on your set top box connector Then make the corresponding audio connections 4 5 2 5 8 4 4 How to use Turn on the digital set top box Refer to the owner s A manual for the digital set top box Use INPUT on the remote control to select B COM...

Page 11: ...e refresh rate of the VGA graphic card can not be changed change the VGA graphic card or consult the manufacturer of the VGA graphic card Note Use a DVI cable R R Avoid keeping a fixed image on the TV s screen R R for a long period of time The fixed image may become permanently imprinted on the screen The synchronization input form for Horizontal and R R Vertical frequencies is separate Resolution...

Page 12: ...resolution of the source device if available to 1280 720p for the 32 TV and 1920 x 1080 for the 37 and 42 TVs Press the INPUT button to select the corresponding HDMI input source Connecting Headphones You can connect a set of headphones to your set if you wish to watch a TV program without disturbing the other people in the room 2 8 5 5 Plug a set of headphones into the 3 5mm mini jack socket on t...

Page 13: ...Hole and Blade Remove 5 M4 screws securing the stand to the TV then remove the stand Use 4 M6 screws to secure the wall bracket not supplied to the back of your TV Your TV is VESA mount compatible 200 x 200 Removing the table stand and installing a wall mount bracket HLC32R1 ...

Page 14: ... screen display may be different from your TV s because it is just an example to help you with the TV operation There are several options you might need to set up in order for your TV to work properly Read the instructions that follow Initial Setup Set according to the screen display Switching On Off the TV set First connect power cord correctly A Select the viewing source by using the B INPUT but...

Page 15: ...cture Note The picture options can only be adjusted in the R R CUSTOM mode The other picture modes are preset Advanced Video Y Y The Advanced Video menu contains the following options Aspect Ratio Overscan Color Temperature Backlight Noise Reduction Adaptive Contrast Aspect Ratio Select Normal Zoom Wide or Cinema Overscan Turn this on to adjust the picture s reproduction rate when receiving DVI si...

Page 16: ...gnal when the TV station transmits the proper signals Mono sound is automatically received if the broadcast is only in Mono even though Stereo or SAP has been selected Select Mono if you want to listen to mono sound during stereo SAP broadcasting Stereo or SAP can be received in a Analog channel Use the A MTS SAP button to select your desired MTS mode for an analog signal Each time you press the M...

Page 17: ...ext time you press the 5 6buttons but you can press the number buttons to select the channel If you want to add the channel select the channel and press the ENTER button Favorites Press the A 4 ENTER button to enter the submenu Use the B 5 6buttons to select a channel number eg Ch 3 0 and then press the ENTER button to confirm A check mark will be displayed in the circle This channel will appear i...

Page 18: ... and then use the3 4 buttons to select the SETTINGS menu Use the B 5 6buttons and then press the4 ENTER button The following menu will appear on the screen Use the number buttons to input the password the C initial password is 0000 The following menu will be displayed Button Lock Lock or unlock the front buttons on the TV Block Unrated TV Block TV programs that do not have a rating USA Parental Lo...

Page 19: ...plies to TV PG TV 14 TV MA FV Fantasy Violence applies to TV Y7 Canadian Parental Locks Press the A 4 ENTER button to enter the submenu shown below Use the B 5 6buttons to select the item you want to block Then press the ENTER button to confirm block and press again to unblock it To clearly understand Canadian program rating codes read the following list CA Eng Rating C Children C8 Children eight ...

Page 20: ... captioning availability entirely depends on broadcasters supplying the signal Therefore closed captioning might not always be available and language availability will differ by broadcast Note R R Select CC1 for full translation of the primary language such as English in your area Select CC2 for secondary language translation such as French or any other language that may be broadcast in your area ...

Page 21: ...tons to select the correct month Day Use the3 4 buttons to select the correct day Hour Use the 3 4 buttons to select the hour minute and AM PM options and then use the 5 6buttons to set Sleep Timer Set a time for the TV to turn off automatically You can select Off 5 Minutes 10 Minutes 15 Minutes 30 Minutes 45 Minutes 60 Minutes 90 Minutes 120 Minutes 180 Minutes and 240 Minutes Menu Settings Press...

Page 22: ... button to open the menu Auto Adjust Automatically adjust the display of the picture Only available in PC source Position Adjust the screen position Phase Adjust the phase of the pixel clock Reset Computer Settings Resets the computer settings to the factory default Other Functions Brief Info Brief Info shows the present screen information Press the DISPLAY button to show the Brief Info on the scr...

Page 23: ...tem USB Hard drive support only supports the class of USB HD that follows the USB power consumption specification The television operation may be halted due to D excessive rate of information code errors In such cases restart the system Please note there are many nonstandard USB mobile devices in the market If a nonstandard device is used then an identification problem may occur USB Media Menu ope...

Page 24: ...sic Press the A USB button on the remote control to enter the USB media mode 9 06 6OIZ XKY 36 9UTMY 9KZZOTMY 9 JK OIK JKZKIZKJ Use the B 5 6buttons to select MP3 Song Press the ENTER button to enter 36 9 OK Enter EXIT Usb 3U OK GI 3 YOI Use the C 5 6 3 4buttons to select a folder or file and then press the ENTER button to enter playback mode 9N LLRK JOU 5TR_ Menu 36 2OYZ EXIT 9 Yesterday once more...

Page 25: ...hen use the ENTER button to display the picture To set up the USB Press the A USB button on the remote control to enter the USB media mode 9 06 6OIZ XKY 36 9UTMY 9KZZOTMY 9 JK OIK JKZKIZKJ Press the MENU button and then use the B 5 6 buttons to select Settings Press the ENTER button to enter 9KZ V 36 9UXZ 06 N SHTGOR 9O K OK Enter Select EXIT USB Use the C 5 6buttons to select MP3 Sort and then pr...

Page 26: ...a soft dry lint free cloth Please be sure not to use a wet cloth Extended Absence If you expect to leave your TV dormant for a long time such as a vacation it s a good idea to unplug the power cord to protect against possible damage from lightning or power surges Specification Product Specification Resolution 32 37 42 1366X768 1920 1080 Power requirement 120V 60Hz Color system NTSC ATSC Clear QAM ...

Page 27: ...or power tool Television unresponsive Disconnect the television from power supply and 10 seconds later connect the television to the power supply If the problem still exists contact authorized after sales service for technical assistance Note Do not leave the television on a static picture in R R an extended period as the image may become permanently burned Note Production of the LCD screen requir...

Page 28: ...the purchaser with respect to the product and shall constitute full satisfaction of all claims whether based on contract negligence strict duality or otherwise In no event shall Haier be liable or in any way responsible for any damages or defects in the product which were caused by repairs or attempted repairs performed by anyone other than an authorized service center or dealer nor shall Haier be...

Reviews: