background image

OPERATING INSTRUCTIONS

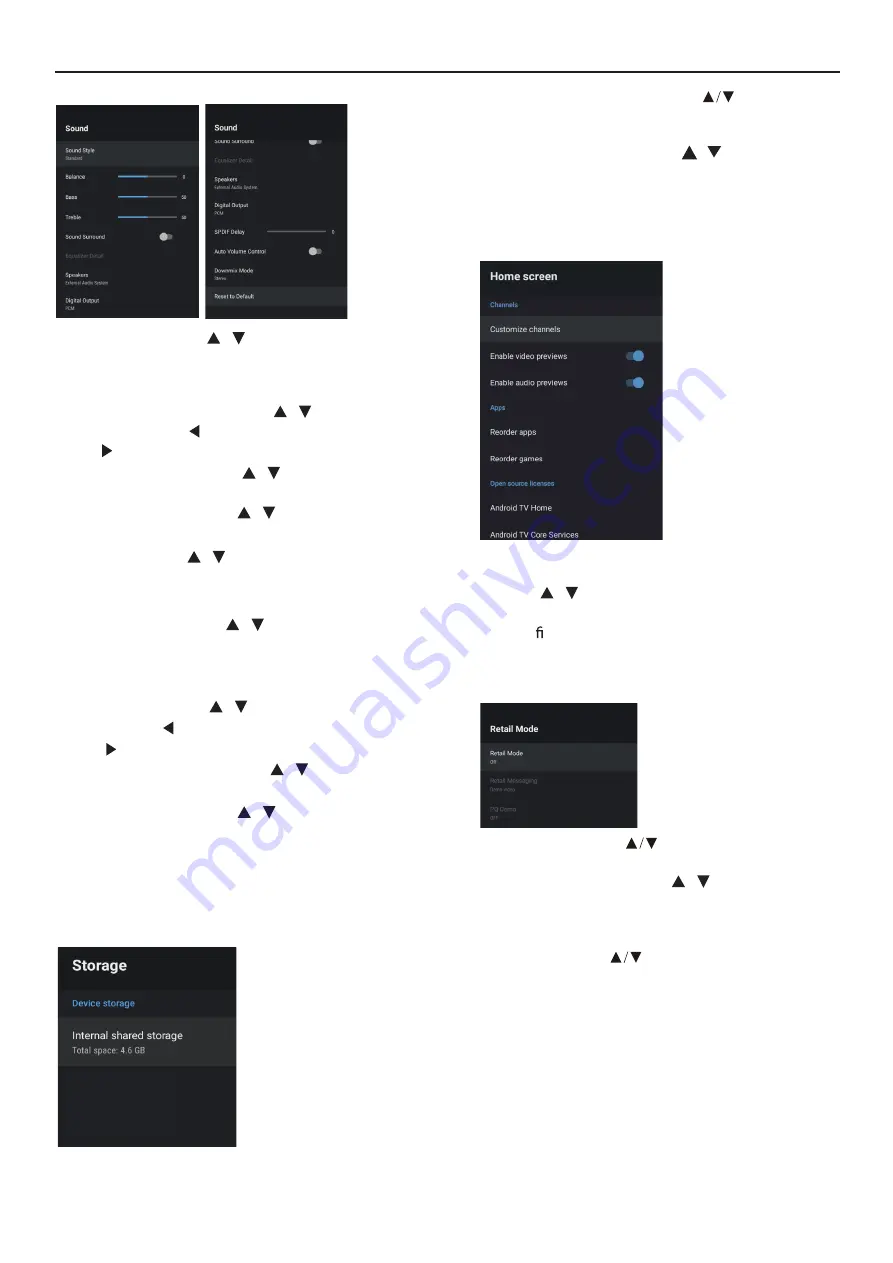
SOUND

Speakers –

Press

/

button to select the option

then press

OK

button to enter the sub-menu.

(Optional:TV Speaker,External Audio System).

Digital Output –

Press

/

button to select the

option then press

OK

button to enter the sub-menu.

(Optional:Auto,Bypass,PCM ,Dolby Digital Plus,Dolby

Digital).

SPDIF Delay –

Press

/

button to select the

option. Press

to decrease the parameter.

Press

to increase the parameter.

)

Balance/ Bass/ Treble –

Press

/

button to select

the option. Press

to decrease the parameter.

Press

to increase the parameter.

Sound Surround –

Press

/

button to select the

option then press

OK

button to choose ON/OFF.

Equalizer Detail –

Press

/

button to select the

option then press

OK

button to enter the sub-menu.

Sound style –

Press

/

button to select the

option then press

OK

button to enter the sub-menu.

(Optional: user,Standard,Vivid,Sports,M ovie,M usic,

News .

Auto Volume Control –

Press

/

button to select

the option then press

OK

button to choose ON/OFF.

Downmix Mode–

Press

/

button to select the

option then press OK button to enter the sub-menu.

(Optional:Stereo,Surround).

Reset to Default –

Reset all settings to the factory

defaults.

STORAGE

Removable Storage –

Press

/

button to

select the option then press

OK

button to enter

the sub-menu.( Note:Show external devices if

available)

select the option then press 

OK

 button to enter the 

sub-menu.

 – Press           button to 

Internal shared storage

HOME SCREEN

3. After nishing your adjustment, Press BACK

button return to the previous menu.

In this menu, you can set channels, apps, open

source licenses.

1. Press

/

button to select what you want set.

2. Press

OK

button to adjust.

Retail messaging

Press

/

button to select

the option then press

OK

button to

enter the

sub-menu.( Note:Demo video,e-POP left,e-POP

bottom)

PQ Demo –

option

then press

OK

button to enter the sub-menu.

( Note:OFF,LEFT,RIGHT)

RETAIL MODE

option then press 

OK

 button to choose ON/OFF.

 – Press           button to select the 

Press           button to select the 

Retail mode

14

Summary of Contents for H55S6UG PRO

Page 1: ...H55S6UG PRO ...

Page 2: ...1 2 3 4 5 6 7 8 9 TV OPEARTION 19 ...

Page 3: ... Actual product may vary in appearance from above image ...

Page 4: ...If you are going to clean the product Unplug the TV use soft fabric no water never chemicals ...

Page 5: ... of your TV using four screws Follow the instructions of the user manual that came with the wall mount bracket to install TURNING ON THE TV 1 Install the stand and place the TV on a solid surface Ensure that the TV is placed in a position to allow free back cover To prevent any unsafe situations no naked sources such as lighted candles should be placed on or in the vicinity Avoid heat direct sunli...

Page 6: ...OPTICAL EARPHONE TF MINI YPbPr COMMON INTERFACE CI ANT IN ANTENNA CABLE LNB IN SATELLITE HDMI1 HDMI2 HDMI3 HDMI4 ARC ...

Page 7: ...ONE TF MINI YPbPr COMMON INTERFACE CI ANT IN ANTENNA CABLE LNB IN SATELLITE 5 HDMI Connect to High definition multimedia signal resource 4 USB Connect USB device 2 YPbPr Component input terminal 6 AV INPUT Video input Audio input 3 HEADPHONE Headphone output Note Video And YPbPr share one audio channel HDMI1 HDMI2 HDMI3 HDMI4 ARC ...

Page 8: ...OPERATING INSTRUCTIONS 6 2 6 5 9 21 25 29 28 23 13 17 19 12 11 1 4 3 7 20 24 27 26 22 10 14 15 8 16 18 ...

Page 9: ...ice and press OK Used to set your device s password to ensure security and privacy 1 Your device is powered by Android TV and press the button to select the browsing feature 2 You can get more apps from Google Play and press the button to go to the next screen 3 Transfer photos and other content to the TV via the built in chromecast press OK to complete the browsing Press to select the system lang...

Page 10: ...ons installed on the TV the icons for the favourite applications are shown inside here Favourite applications can be added deleted changed its order by users Apps Click to jump to Apps screen where all the installed applications are listed Inputs Icon to select an input source Network Interent Settings For details on the settings see the next explanation HOME SCREEN The IOT system is working suppo...

Page 11: ...OPERATING INSTRUCTIONS Channel Parental controls Open Source Licenses 2 28 5build 18321512 Version ...

Page 12: ... broadcasting signals Channel installation mode Select on screen display channel sources You can select the signal type Antenna 1 Menu Settings Channel Channel Installation Mode enter choose Antenna 2 Enter Menu Settings Channel Channels 3 Channel Scan directly enters the ATV DTV automatic search platform interface of Antenna Update Scan Re automatically search for frequency points outside the sta...

Page 13: ...have Advance Quick and Full Scan modes Satellite Re scan Satellite automatically searches for relevant Settings 1 Press OK to select Next to enter the default satellite channel search 2 Select different types of satellite stars and satellite types Satellite Manual Tuning Manually search for a certain TP which can be added by Satellite Re scan if needed ...

Page 14: ...OPERATING INSTRUCTIONS OK OK DEVICE PREFERENCES OK ...

Page 15: ...OK OK OK OK OK OK OK OK OK OK OK OK OK ...

Page 16: ...Volume Control Press button to select the option then press OK button to choose ON OFF Downmix Mode Press button to select the option then press OK button to enter the sub menu Optional Stereo Surround Reset to Default Reset all settings to the factory defaults STORAGE Removable Storage Press button to select the option then press OK button to enter the sub menu Note Show external devices if avail...

Page 17: ... sub menu Need Audio Description O N Hearing Impaired Press button to select the option then press OK button to choose ON OFF Captions Press button to select the option then press OK button to e e h t r e t n sub menu High contrast text Press button to select the option then press OKbutton to choose ON OFF Text to speech Press button to select the option then press OK button to enter the sub menu ...

Page 18: ...ERATING INSTRUCTIONS RED BLUE OK RED BLUE BACK REMOTE ACCESSORIES ADD AND USE OF MULTI MEDIA PLAYER NOTE Accessibility shortcut Press button to select the option then press OK button to enter the sub menu ...

Page 19: ... the application Specific services may differ with the version of the application installed on the TV Application content is subject to change by the services provider without prior notice Applications services and updates may become unavailable Manufacture takes no legal responsibility whatsoever for any interruption of App services caused by the service provider for any reason Due to the product...

Page 20: ......

Page 21: ...B G 140W Power consumption 126CM UHD Digital LED TV Connectivity DTV Tuner Decorder Additional features Sound quality Digital features Standby Power consumption 1116x727x255mm 1250x140x790mm 1116x674x64mm 16 02kg 12 88kg 11 68kg PRODUCT SPECIFICATION 19 ...

Page 22: ...levision picture quality Connectivity DTV Tuner Decorder Additional features Sound quality Digital features Standby Power consumption 2 9 5 15 3kg 14 1kg 1229x730x68mm 1229x782x255mm 1355x860x143mm TV System PAL B G SECAM B G 180W Power consumption 20 ...

Page 23: ... 165CM UHD Digital LED TV Connectivity DTV Tuner Decorder Additional features Sound quality Digital features Standby Power consumption 1615x1015x185mm 1448x907x295mm 1448x857x67mm 25 85kg 19 7kg 14 8kg TV System PAL B G SECAM B G 200W Power consumption ...

Page 24: ......

Reviews: