background image

Page  34

31-5000727   Rev. 0

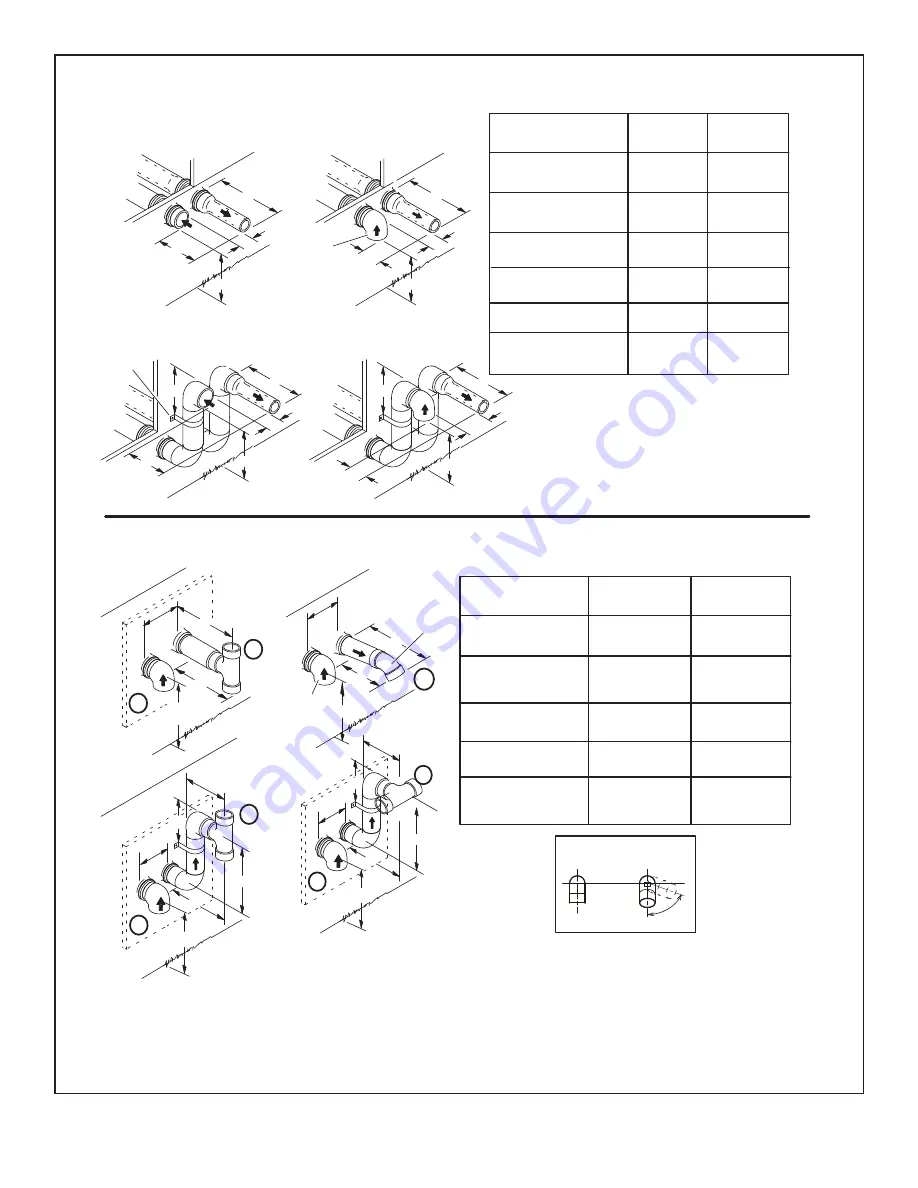
Figure 34. 

* Use wall support every 24” (610 mm). Use two 

wall supports if extension is greater than 

24” (610 mm) but less than 48” (1219 mm).

NOTE 

 One wall support must be within 6” (152 mm)

from top of each pipe (intake and exhaust) to prevent

movement in any direction.

NOTE 

 FIELD

PROVIDED

REDUCER MAY BE

REQUIRED TO ADAPT

LARGER VENT PIPE SIZE

TO TERMINATION

STRAIGHT

APPPLICATION

EXTENDED

APPLICATION

D

B

D

B

A

2” (51mm)

Vent Pipe

3” (76mm)

Vent Pipe

A

 Minimum clearance

above grade or average

snow accumulation

B

 Maximum horizontal

    separation between

    intake and exhaust

D

 Maximum exhaust

pipe length

E

 Maximum wall support

distance from top of each

pipe (intake/exhaust)

12” (305 mm)

12” (305 mm)

12” (305 mm)

6” (152 mm)

6” (152 mm)

6” (152 mm)

6” (152 mm)

8” (203 mm)

8” (203 mm)

20” (508 mm)

6” (152 mm)

6” (152 mm)

A

Intake

Elbow

* WALL

SUPPORT

B

A

D

E

B

D

E

A

ALTERNATE TERMINATIONS (TEE & FORT

Y−FIVE DEGREE ELBOWS ONLY)

C2 -

Minimum from end of

exhaust to inlet of intake

C1 -

Minimum from end of

exhaust to inlet of intake

FIELD FABRICATED 

W

ALL TERMINATION

C1

C2

C1

C2

Front View of

Intake and Exhaust

Intake

Exhaust

C

B

1

2

D

A

C

3

Intake

Elbow

Exhaust

B

A

D

2” (51MM)

Vent Pipe

3” (76MM)

Vent Pipe

A

 Clearance above

grade or average snow

accumulation

B

 Horizontal

separation between

intake and exhaust

C

 Minimum from

end of exhaust to

inlet of intake

D

 Exhaust pipe length

E

 Wall support distance

from top of each pipe

(intake/exhaust)

12” (305 mm) Min. 12” (305 mm) Min.

6” (152 mm) Min.

24” (610 mm) Max.

9” (227 mm) Min.

12” (305 mm) Min.

16” (405 mm) Max.

6” (152 mm) Max.

6” (152 mm) Min.

24” (610 mm) Max.

9” (227 mm) Min.

12” (305 mm) Min.

20” (508 mm) Max.

6” (152 mm) Max.

D

C

12”

1

2

E

B

A

The exhaust termination tee should be connected to the 2” or 3” PVC flue pipe as shown in the illustration.

Do not use an accelerator in applications that include an exhaust termination tee.

The accelerator is not required.

As required. Flue gas may be acidic and may adversely affect some building materials. If a side wall vent

termination is used and flue gases will impinge on the building materials, a corrosion-resistant shield

(24 inches square) should be used to protect the wall surface. If optional tee is used, the protective shield

is recommended. The shield should be constructed using wood, sheet metal or other suitable material.

All seams, joints, cracks, etc. in affected area, should be sealed using an appropriate sealant.

3

Exhaust pipe 45

°

 elbow can be rotated to the side away from the combustion air inlet to direct exhaust 

away from adjacent property. The exhaust must never be directed toward the combustion air inlet.

D

C

12”

1

2

E

B

A

Summary of Contents for GE NF96DV

Page 1: ...31 5000727 Rev 0 10 22 GEA NF96DV 96 Downflow Two Stage Variable Speed Gas Furnace Service Manual READ CAREFULLY KEEP THESE INSTRUCTIONS...

Page 2: ...ol on labels or in manuals be alert to the potential for personal injury or death Electric shock hazard Can cause injury or death Before attempting to perform any service or maintenance turn the elect...

Page 3: ...136 NF96D090V5C 57 000 56 000 88 000 85 000 96 0 5 1 2 120 60 1 20 12 8 40 164 NF96D110V5C 72 000 70 000 110 000 106 000 96 0 5 1 2 120 60 1 20 12 8 40 176 Note For vent length and clearances to combu...

Page 4: ...0 1230 660 820 940 1120 Norm 680 825 910 1085 575 735 850 995 NF96D090V5C 1 11x11 40 70 High Fire 1395 1555 1695 1825 2nd Stage 1335 1600 1750 1980 1275 1395 1585 1670 1225 1450 1630 1830 Norm 1145 12...

Page 5: ...g Base 11M60 17 5 B Width 11M61 21 0 C Width Flush Mount Termination 90 Furnaces only 51W11 2 3 0 Vent Concentric Vent Kit 90 Furnaces only 71M80 1 1 2 Vent Version US 69M29 2 Vent Version US 60L46 3...

Page 6: ...Page 6 31 5000727 Rev 0 Parts Arrangement Figure 1 Access Panel Combustion Air Inducer Burner Box Assembly Gas Valve Control Box Blower Assembly...

Page 7: ...ensure furnace ignition and ignitor durability The control provides gas ignition safety checks and indoor blower control with two stage gas heating The furnace combustion air inducer gas valve and ind...

Page 8: ...100 CFM count the flashes and multiply by 100 to determine the actual CFM delivered for example 5 flashes x 100 500 CFM Pin Function 1 Gas Valve Second Stage 2 Second Stage Prove Switch 3 Rollout Swit...

Page 9: ...Humidifier 120VAC Line Input 120VAC XFMR Transformer 120VAC EAC Indoor Air Accessory 120VAC Cool Cool Speed 120VAC Park 1 Dead terminal for alternate speed tap Park 2 Dead terminal for alternate speed...

Page 10: ...earings MOTOR CONTROLLER J49 J48 Figure 4 GenTeq Blower Motor B3 STATOR WINDINGS OUTPUT SHAFT BEARING ROTOR Figure 5 Blower Motor Components Internal Operation Each time the controller switches a stat...

Page 11: ...is the power plug Line voltage must be applied to J48 pins 4 and 5 in order for the motor to operate When using 120VAC pins 1 and 2 must be jumpered Jack J49 connects the unit controls to the motor Th...

Page 12: ...AT output from controller to motor windings O volts 325VDC One revolution O volts 325VDC O volts 325VDC WINDING 1 WINDING 2 WINDING 3 O volts 325VDC O volts 325VDC O volts 325VDC WINDING 1 WINDING 2 W...

Page 13: ...e burner box front panel in place Each burner uses an orifice that is precisely matched to the burner input Burners can be removed as a one piece assembly for service If burner assembly has been remov...

Page 14: ...Page 14 31 5000727 Rev 0 Intake Air Top Cap Sensor Rollout Switch Rollout Switch Burner Assembly Ignitor Manifold And Gas Orifices Two Stage Gas Valve Burner Box Cover Figure 9 Heating Components...

Page 15: ...ug Reading should be between 39 and 70 ohms If the reading is correct then the problem is with the wiring between the jack plug and the control If reading is not correct the issue is the ignitor Test...

Page 16: ...inside the combustion air inducer decreases to a certain set point Set points vary depending on unit size See Table 6 The pressure sensed by the switch is negative relative to atmospheric pressure If...

Page 17: ...square tubing and tee into the tubing from the negative side of the cold end header box and the other side of the 2 square tubing Connect the other end of the 10 square tubing the the negative side o...

Page 18: ...commended during cooler weather Metal or plastic strapping may be used for vent pipe hangers Uniformly apply a liberal coat of PVC primer for PVC or use a clean dry cloth for ABS to clean inside socke...

Page 19: ...et with cement forcefully insert end of pipe into socket until it bottoms out Turn PVC pipe 1 4 turn during assembly but not after pipe is fully inserted to distribute cement evenly DO NOT turn ABS or...

Page 20: ...only run with separate gas appliances the venting system is likely to be too large to properly vent the remaining attached appliances CHIMNEY OR GAS VENT Check sizing for water heater only FURNACE WAT...

Page 21: ...y of the preceding tests the common venting system must be modified to correct the problem Resize the common venting system to the minimum vent pipe size determined by using the appropriate tables in...

Page 22: ...listed in Table 10C If 3 diameter pipe is used reduce to 2 diameter pipe to accommodate the debris screen 3 Route piping to outside of structure Continue with installation following instructions given...

Page 23: ...rm venting system for assembly or if requirements are more restrictive The PolyPro by Duravent and InnoFlue by Centrotherm venting system must also follow the uninsulated and unconditioned space crite...

Page 24: ...pe MUST be glued to furnace exhaust fittings NOTE Exhaust piping should be checked carefully to make sure there are no sags or low spots NOTE If right side venting option is used you must include the...

Page 25: ...3 8 87 68 68 9 11 60 38 n a 82 63 63 10 6 55 33 77 58 58 Standard Termination Elevation 4500 10 000 ft Number of 90 Elbows Used 1 1 2 Pipe 2 Pipe 2 1 2 Pipe 3 Pipe Model Model Model Model 070 090 110...

Page 26: ...a 55 39 n a 71 64 64 9 50 34 66 59 59 10 45 29 61 54 54 Concentric Termination Elevation 4 501 10 000 ft Number of 90 Elbows Used 1 1 2 Pipe 2 Pipe 2 1 2 Pipe 3 Pipe Model Model Model Model 070 090 1...

Page 27: ...Z223 1 NFPA 54 in U S A and current CSA B149 Natural Gas and Propane Installation Codes in Canada for details Position termination according to location given in Figure 22 or Figure 31 In addition po...

Page 28: ...3 N A N A N A N A N A 2 in 12 10 19 16 18 15 2 1 2 in 7 N A 13 N A 12 N A 3 in N A N A 8 8 7 7 1 Refer to 99 Minimum Design Temperature table provided in the current edition of the ASHRAE Fundamentals...

Page 29: ...s 152mm for appliances 10 000 pliances 10 000 Btuh 3kw and 50 000 pliances 50 000 Btuh 15kw 6 inches 152mm for appliances 10 000 Btuh 3kw 12 inches 305mm for appliances 10 000 Btuh 3kw and 100 000 Btu...

Page 30: ...e Inlet Air Minimum 12 in 305MM above grade or snow accumulation Figure 25 Exiting Exhaust and Intake Vent no common pressure zone 1 Intake and exhaust pipes should be placed as close together as poss...

Page 31: ...D REDUCER MAY BE REQUIRED TO ADAPT LARGER VENT PIPE SIZE TO TERMINATION 12 305mm INTAKE AIR EXHAUST VENT Figure 30 Direct Vent Concentric Rooftop Termination 71M80 69M29 or 60L46 US 44W92 or 44W93 Can...

Page 32: ...above paved sidewalk or paved driveway located on public property Clearance under veranda porch deck or balcony 12 Equal to or greater than soffit depth 3 feet 9m 12 3 feet 9m within a height 15 feet...

Page 33: ...exhaust pipe size must be done after the final elbow 4 Distance between exhaust pipe terminations on multiple furnaces must meet local codes UNCONDITIONED ATTIC SPACE 3 76MM OR 2 51MM PVC PROVIDE SUP...

Page 34: ...bove grade or average snow accumulation B Horizontal separation between intake and exhaust C Minimum from end of exhaust to inlet of intake D Exhaust pipe length E Wall support distance from top of ea...

Page 35: ...for all provinces of Canada GEA approves the following termination for use in all provinces of Canada C 12 D B A 2 51MM Vent Pipe 3 76MM Vent Pipe 12 305 mm Min 12 305 mm Min 6 152 mm Min 24 610 mm Ma...

Page 36: ...the unused plug for tightness to prevent leakage 2 Install the cap over the clean out opening at the base of the trap Secure with clamp See Figure 41 and Figure 42 3 Install drain trap using appropria...

Page 37: ...t be used Condensate drain line should be routed within the conditioned space to avoid freezing of condensate and blockage of drain line If this is not possible a heat cable kit may be used on the con...

Page 38: ...h PVC Pipe Not Furnished Drain Assembly for 3 4 inch Drain Pipe Condensate Drain Connection In Unit Condensate Drain Connection In Unit Vent To Drain Condensate Drain Connection In Unit Optional Conde...

Page 39: ...inch PVC To Drain 90 Elbow 1 2 inch PVC Not Furnished 1 2 inch PVC Pipe Not Furnished Drain Assembly for 3 4 inch Drain Pipe 90 Street Elbow 1 2 inch PVC Not Furnished Condensate Drain Connection In...

Page 40: ...ove the switch Never use tools If the the switch will not move by hand replace the valve Do not try to repair it Force or attempted repair may result in a fire or explosion Placing the Furnace into Op...

Page 41: ...trol to shut the unit off 6 Is gas turned on at the meter 7 Is the manual main shut off valve open 8 Is the internal manual shut off valve open 9 Is the unit ignition system in lockout If the unit loc...

Page 42: ...positive side to manifold pressure tap on gas valve as noted above 2 Tee into the gas valve regulator vent hose and connect to test gauge negative 3 Ignite unit on low fire and let run for 5 minutes t...

Page 43: ...1 10000ft Low Fire High Fire Low Fire High Fire Low Fire High Fire Low Fire High Fire Low Fire High Fire Min Max All Models Natural 1 7 3 5 1 6 3 3 1 5 3 2 1 5 3 1 1 7 3 5 4 5 13 0 Lp Propane 4 9 10 0...

Page 44: ...n of load indicates a poor or partial ground Compare the readings to Table 17 If the readings exceed the maximum shown in Table 17 make repairs before operating the furnace 1 In addition measure the A...

Page 45: ...Temperature Return Duct Temperature _ Temperature Rise Figure 47 Temperature Rise External Static Pressure 1 Tap locations shown in Figure 47 2 Punch a 1 4 diameter hole in supply and return air plen...

Page 46: ...The pressure drop may also cause the limit to trip more frequently during the winter and the indoor coil to freeze in the summer resulting in an increase in the number of service calls Before using an...

Page 47: ...emove the assembly Keep tubing attached to pressure switches 2 Disconnect the plug from the combustion air inducer Remove two screws which secure combustion air inducer to collector box Remove combust...

Page 48: ...from the gas valve 3 Remove the burner box cover if equipped 4 Disconnect the gas supply line from the gas valve Remove gas valve manifold assembly 1 Mark and disconnect sensor wire from the sensor D...

Page 49: ...WITH WIRING MATERIAL HAVING A TEMP RATING OF AT LEAST 90 c 3 PROPER POLARITY MUST BE OBSERVED FOR FIELD LINE VOLTAGE SUPPLY IGNITION CONTROL WILL LOCK OUT IF POLARITY IS REVERSED 4 FOR TEMPORARY SERV...

Page 50: ...ains energized until the limits are closed Fan On When the thermostat is set for continuous fan operation and there is no demand for heating or cooling a call for fan closes the R to G circuit and the...

Page 51: ...Page 51 31 5000727 Rev 0 Notes...

Page 52: ...Page 52 31 5000727 Rev 0 Printed in the U S A All specifications and illustrations subject to change without notice and without incurring obligations...

Reviews: