background image


16

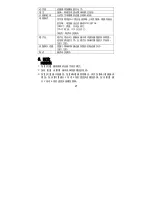
拍摄模式 

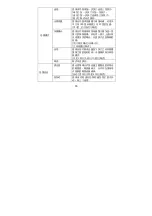
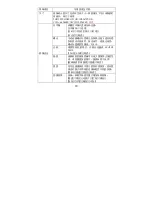
连拍 

使用该功能来按一次快门连拍三张照片。 

[单张]:  按一次快门只拍一张照片。 

[连拍]:  按一次快门连续拍三张照片。 

[取消]:  取消本次操作。 

全景拍摄 

使用此功能来拍摄整个周围环境,对准水

平方向 180 度和垂直方向 90 度的位置。 

[关/[往上]/[往右]/[取消] 

多重曝光 

使用此功能是将两张场景图片叠加到一张

图片的特殊效果。即在同一照片上进行两

次或更多次的曝光,以使照片达到特殊的

效果。 

[关]/[两次曝光]/长曝光]/ 

[立体拍摄]/[取消] 

自拍 

使用自拍功能来设置按下快门之后和拍摄

图像之前的延时时间。本摄像机有五种拍

照模式: 

[关]/[2 秒]/[5 秒]/[10 秒]/[取消] 

取消 

取消本次操作。 

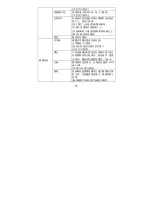
拍摄设定 

感光度 

感光度菜单允许您设置主题附近的四周光

的敏感度,敏感值越大,允许你在黑暗地

点拍照的敏感设置越高。 

[自动]/[100]/[200]/[400]/[取消]. 

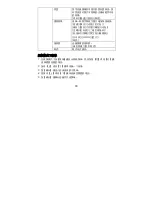
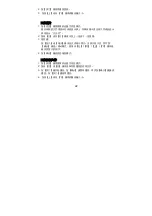
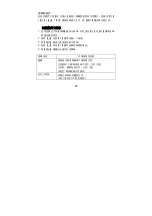
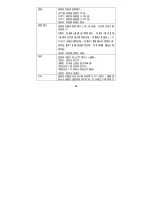
防抖动 

使用该功能是在拍照时避免我们的手抖

动。有三个选项: 

Summary of Contents for DV-V20

Page 1: ...DV V20...

Page 2: ...1 1 3 2 4 4 5 5 6 6 7 LCD 7 3 11 11 12 12 13 13 14 4 14 15 18 20 5 21 21 22 22 6 25 25 25 26 26...

Page 3: ...2 7 27...

Page 4: ...3 1 1 2 3 4 5 6 7 8 9 HDMI 10 11 12 SD 13 USB 14 AV 15 LED 16 17 18 19...

Page 5: ...4 20 21 22 23 LED 24 25 26 27 2 1 2 3...

Page 6: ...5 8 a USB b c SD MMC SD MMC 32GB 1 2 SD 3 4...

Page 7: ...6 1 2 3 1 2 3...

Page 8: ...7 1 2 3 4 LCD 1 14 15 4 3 2 1 8 16 11 12 13 6 5 9 7 10...

Page 9: ...8 2 3 4 SD 5 SD 6 7 8 9 10 4000X3000 3648x2048 2592x1944 2048x1536 1920x1080...

Page 10: ...9 11 12 13 14 15 16 LOMO 3 2 1 0 1 2 3 100 200 400...

Page 11: ...10 1 2 3 4 SD 5 6 7 8 9 10 1 2 3 SD 4 1 2 3 4 5 6 7 8 9 10 1 2 3 4...

Page 12: ...11 1 2 3 SD 4 5 6 7 3 1 2 3 3 2 1 5 6 7 4...

Page 13: ...12 1 2 3 4 5...

Page 14: ...13 LED LED 1 2 3 LED LED 1 2 3...

Page 15: ...14 2 2 5 5 10 10 4 5 1 2 3 4...

Page 16: ...15 1 2 3 4 5 6 10 12M 4000x3000 7MHD 3648x2048 HD 5M 2592x1944 3M 2048x1536 2M 1920x1080 3...

Page 17: ...16 180 90 2 5 10 100 200 400...

Page 18: ...17 3 3 60HZ 50HZ 50HZ 60HZ...

Page 19: ...18 LOMO 1 2 3 4 5...

Page 20: ...19 FHD 1920x1080 HD HD 1280x720 HD VGA 640x480 QVGA 320x240 3 3 60HZ 50HZ 50HZ 60HZ...

Page 21: ...20 LOMO 1 2 3 4 5 1 3 5 10...

Page 22: ...21 AV NTSC PAL NTSC PAL 5 1 2 3 2 4 2 4...

Page 23: ...22 4 5 1 2 3 4 1 2 3 4...

Page 24: ...23 1 2 3 4 5 3 5 10...

Page 25: ...24 90o 90 180o 180 270o 270 USB...

Page 26: ...25 6 1 AV 2 AV 3 4 1 2 HDMI 3...

Page 27: ...26 12M 4000x3000 7M 3648x2048 5M 2592x1944 3M 2048x1536 2M 1920x1080 4 5 6 7 8 9 SD USB 1 2 windows...

Page 28: ...27 3 USB 1 USB USB z PC CAMERA USB PC CAMERA 2 windows DCIM 3 DCIM 7 500 CMOS 2 7 4 3 TFT 1 5m F 3 1 f 7 5mm 1 2 1 1800...

Page 29: ...12M 4000x3000 7MHD 3648x2048 HD 5M 2592x1944 3M 2048x1536 2M 1920x1080 FHD 1920x1080 HD HD 1280x720 HD VGA 640x480 QVGA 320x240 100 200 400 3EV to 3EV 1 0 3 LOMO 2 5 10 SD MMC NTSC PAL 4 0 C 40 C 20...

Page 30: ...29 120 2x58 3x56 mm 285g...

Page 31: ...30...

Page 32: ...31...

Page 33: ...of the camcorder 3 2 Preparing for using 4 Installing the Battery 4 Charging the battery 5 Format the memory card 6 Setting the Language 6 Setting the date and time 7 Monitor screen display 7 3 Using...

Page 34: ...ps 21 Playback still image 22 6 Making connections 25 Connecting the Camcorder to a TV 25 Connecting the Camcorder to a HDTV 60 Connecting the Camcorder to a PC 25 7 Software Installation Installing t...

Page 35: ...providers Keep the camcorder away from water and other liquids Do not use the camcorder with wet hands Never use the camcorder in the rain or snow Moisture creates the danger of electric shock Use on...

Page 36: ...g indicator light 11 Shutter button 12 SD Card slot 13 USB jack 14 AV out jack 15 Right LED On Off button 16 Down Zoom out button 17 OK button 18 Left Display button 19 Speaker 20 LCD screen 21 Self t...

Page 37: ...Battery 1 Slide the battery cover and open it 2 Place the accessory li ion battery into the compartment Note that the metallic contacts must be aligned with the contacts in the compartment 3 After the...

Page 38: ...record more you have to use a SD or MMC card The MAX SD MMC card that this camcorder could support is up to 32GB Turn off the camcorder before inserting or removing the memory card Be sure to orient t...

Page 39: ...r on and set the camcorder to the Setup Menu 2 Press the UP or DOWN buttons to select Format then press OK button to launch the submenu 3 Press the UP or DOWN buttons to select the item YES and then p...

Page 40: ...Menu 2 Press the UP or DOWN buttons to select Set Date then press the OK button to launch the submenu 3 Press the UP or DOWN buttons to change the highlighted value Press the LEFT or RIGHT buttons to...

Page 41: ...m Value Level 7 Battery Power Level 8 Smile Capture 9 Face Detect 10 Anti Shake 4000X3000 12M 3648x2048 7M 2592x1944 5M 2048x1536 3M 1920x1080 2M Auto Sport Night Portrait Landscape Backlight Party Be...

Page 42: ...Video record mode 5 Video recording icon Normal B W Sepia Red Green Blue Sunset Warm Cool Over Exposure IR Binary Vivid Undertone Dog Eye Aibao Gothic Japan Style LOMO Negative 3 2 1 0 1 2 3 Auto 100...

Page 43: ...level 10 Battery power level 11 Effect 12 Exposure 13 Video Quality 14 White Balance Audio mode z Audio recording icon z Audio recording time available z Battery power level z SD Card inserted Playbac...

Page 44: ...yback video file 3 Using this camcorder Turning the Camcorder On and Off 1 Open the LCD panel to power on the camcorder and close the LCD panel to turn off the camcorder 2 You can also press the POWER...

Page 45: ...out the subject The value of magnification level appears on the LCD monitor 3 Press the SHUTTER button to start recording 4 Press the OK button to pause and press it again to continue to recording 5...

Page 46: ...ZOOM OUT buttons to zoom in or zoom out the screen The value of magnification level appears on the LCD monitor 3 Hold the camcorder steady and then press the SHUTTER button down to take a picture When...

Page 47: ...imer 5S The shutter release will delay for 5 seconds Self timer 10S The shutter release will delay for 10 seconds Burst Press the shutter button once to take three pictures continuously 4 Press the UP...

Page 48: ...sired menu 3 Press the UP or DOWN buttons to select an item 4 Press the OK button to enter the submenu 5 Use the UP or DOWN buttons to select the desired item 6 Press the OK button to confirm the sett...

Page 49: ...e it detects smile the camcorder will auto take a picture On Off Cancel Shooting Multi Snapshot Use this function to take 3 pictures continuously Single Press the shutter button once to take one pictu...

Page 50: ...49...

Page 51: ...50...

Page 52: ...51...

Page 53: ...d exit the menu Menu item Function Size Select small movie size to record longer time There are five items for option FHD 1920x1080 HD HD 1280x720 HD VGA 640x480 QVGA 320x240 Cancel Image Setting Whit...

Page 54: ...53...

Page 55: ...ra is turned off automatically after a period of time There are six options for choice Off 1Min 3 Min 5 Min 10 Min Cancel Beep Set the operation sound on or off Language Select a language for the Disp...

Page 56: ...55 memory if there is no card inserted All data will be deleted including protected files Be sure to download important files to your computer before formatting Yes No...

Page 57: ...the OK button to pause it and press it again to continue Press the RIGHT button to fast forward and press the LEFT button to back forward 4 Press the SHUTTER button again to stop playing Playback sti...

Page 58: ...T buttons to select the audio files you want to playback Press the OK button to pause it and press it again to continue Press the RIGHT button to fast forward and press the LEFT button to back forward...

Page 59: ...lete all files except locked files Cancel No delete the file Slide Plays the files automatically interval a few seconds 3 Sec 5 Sec 10 Sec Cancel Rotate Use this function to rotate the images 90o Rota...

Page 60: ...59...

Page 61: ...back mode Push the joystick leftward or rightward to select the file demanded 4 Press SHUTTER button to Play the selected video file on HDTV press the SHUTTER button again to Stop the playing 5 Press...

Page 62: ...rage appears on the screen when Connection to the computer has been successfully completed Please ensure that there is SD card in the camcorder Since the camcorder is without the internal memory there...

Page 63: ...Open My Computer or Windows Explorer A Removable Disk appears in the drive list Double click the Removable Disk icon to view its contents Files stored on the camera are located in the folder named DC...

Page 64: ...000x3000 7M 3648x2048 5M 2592x1944 3M 2048x1536 2M 1920x1080 Video FHD 1920x1080 HD HD 1280x720 HD VGA 640x480 QVGA 320x240 Sensitivity Auto 100 200 400 White balance Auto Daylight Cloudy Tungsten Flu...

Page 65: ...ec Storage External memory SD MMC TV system NTSC PAL Digital zoom 8x Power Supply Li ion battery Ambient temperature Operating 0 C to 40 C Storage 20 to 60 C Microphone Built in Speaker Built in Dimen...

Page 66: ...65...
Reviews: