Numerazione delle unità interne
28
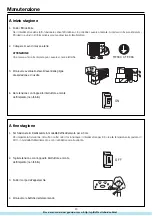
Le unità interne devono essere numerate. Ogni unità deve corrispondere alla propria coppia di tubi, usare come riferimento il
seguente schema:
L'unità interna numerata 1 deve corrispondere al circuito frigorifero A
L'unità interna numerata 2 deve corrispondere al circuito frigorifero B
L'unità interna numerata 3 deve corrispondere al circuito frigorifero C
L'unità interna numerata 4 deve corrispondere al circuito frigorifero D
L'unità interna numerata 5 deve corrispondere al circuito frigorifero E
Verificare la corretta corrispondenza delle unità interne con i relativi circuiti frigoriferi (es. unità interna numerata
1 (A) collegata effettivamente al circuito frigorifero A)
ISTRUZIONI
1. Alimentare il sistema.
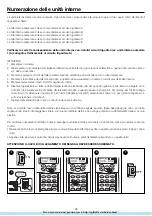
2. Tenere premuto il pulsante di emergenza della prima unità interna (sopra la morsettiera) fino a quando non verranno emes-
si 4 beep consecutivi.
3. Premere il pulsante On-Off del telecomando facendo attenzione ad accendere solo l'unità interessata.
4. Premere il tasto Sleep del telecomando fino a quando verrà visualizzato il numero 1 nel display dell'unità interna.
5. Premere nuovamente il tasto On-Off spegnendo l'unità.
6. Ripetere l'operazione su tutte le unità interne facendo attenzione che per quando riguarda l'unità interna collegata al cir-
cuito B si dovrà premere il tasto Sleep del telecomando fino a quando apparirà il numero 2 nel display, per l'unità collega-
ta al circuito C selezionare il numero 3, per l'unità collegata al circuito D selezionare il numero 4, per l'unità collegata al cir-
cuito E selezionare il numero 5.
7. Togliere l'alimentazione per circa un minuto e riavviare il sistema.
Nota: se durante l'avvio delle unità interne viene emesso un continuo segnale acustico (beep beep beep) da una o più unità,
verificare che il tasto di emergenza situato sopra la morsettiera elettrica non venga premuto accidentalmente dalla scocca in
plastica.
Per verificare nuovamente l'effettivo numero assegnato all'unità interna posizionarsi di fronte allo split e procedere come de-
scritto:
• Tenere premuto il tasto di emergenza (sopra la morsettiera dell'unità interna), fino a quando verranno emessi 5 beep conse-
cutivi.
• Appena verrà rilasciato il pulsante, nel display apparirà il numero precedentemente impostato su quella unità.
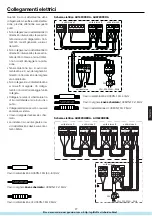
ATTENZIONE: IL CAVO DI COLLEGAMENTO DEI SEGNALI DEVE ESSERE SCHERMATO.
ON
1
OFF
7
3
2
4
5
Все каталоги и инструкции здесь:
http
:
//splitoff.ru/tehn-doc.html
Summary of Contents for AS072XVERA
Page 6: ...Все каталоги и инструкции здесь http splitoff ru tehn doc html ...
Page 7: ...Все каталоги и инструкции здесь http splitoff ru tehn doc html ...
Page 8: ...Все каталоги и инструкции здесь http splitoff ru tehn doc html ...
Page 9: ...Все каталоги и инструкции здесь http splitoff ru tehn doc html ...
Page 10: ...Все каталоги и инструкции здесь http splitoff ru tehn doc html ...
Page 11: ...Все каталоги и инструкции здесь http splitoff ru tehn doc html ...
Page 12: ...Все каталоги и инструкции здесь http splitoff ru tehn doc html ...
Page 13: ...Все каталоги и инструкции здесь http splitoff ru tehn doc html ...
Page 14: ...Все каталоги и инструкции здесь http splitoff ru tehn doc html ...
Page 15: ...Все каталоги и инструкции здесь http splitoff ru tehn doc html ...
Page 16: ...Все каталоги и инструкции здесь http splitoff ru tehn doc html ...
Page 17: ...Все каталоги и инструкции здесь http splitoff ru tehn doc html ...
Page 18: ...Все каталоги и инструкции здесь http splitoff ru tehn doc html ...
Page 19: ...Все каталоги и инструкции здесь http splitoff ru tehn doc html ...
Page 20: ...Все каталоги и инструкции здесь http splitoff ru tehn doc html ...
Page 21: ...Все каталоги и инструкции здесь http splitoff ru tehn doc html ...
Page 22: ...Все каталоги и инструкции здесь http splitoff ru tehn doc html ...
Page 23: ...Все каталоги и инструкции здесь http splitoff ru tehn doc html ...
Page 24: ...Все каталоги и инструкции здесь http splitoff ru tehn doc html ...
Page 25: ...Все каталоги и инструкции здесь http splitoff ru tehn doc html ...
Page 26: ...Все каталоги и инструкции здесь http splitoff ru tehn doc html ...
Page 27: ...Все каталоги и инструкции здесь http splitoff ru tehn doc html ...
Page 28: ...Все каталоги и инструкции здесь http splitoff ru tehn doc html ...
Page 29: ...Все каталоги и инструкции здесь http splitoff ru tehn doc html ...
Page 30: ...Все каталоги и инструкции здесь http splitoff ru tehn doc html ...
Page 31: ...Все каталоги и инструкции здесь http splitoff ru tehn doc html ...
Page 32: ...Все каталоги и инструкции здесь http splitoff ru tehn doc html ...
Page 33: ...Все каталоги и инструкции здесь http splitoff ru tehn doc html ...
Page 34: ...Все каталоги и инструкции здесь http splitoff ru tehn doc html ...
Page 35: ...Все каталоги и инструкции здесь http splitoff ru tehn doc html ...
Page 36: ...Все каталоги и инструкции здесь http splitoff ru tehn doc html ...
Page 37: ...Все каталоги и инструкции здесь http splitoff ru tehn doc html ...
Page 38: ...Все каталоги и инструкции здесь http splitoff ru tehn doc html ...
Page 39: ...Все каталоги и инструкции здесь http splitoff ru tehn doc html ...

