


H Y D R O T E C H P E R F O R M A N C E M O N I T O R
A D VA N C E D F I LT R AT I O N S Y S T E M
w w w. f l u v a l - g . c o m
EN.
7
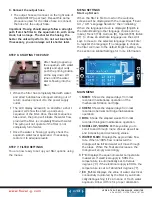
HYDROTECH TECHNOLOGY
Microprocessor Controlled
From the drive pump to the interactive 8000 pixel
LCD panel all functional aspects and monitoring
features of the Fluval G operational systems are
powered by a Microchip Flash Microcontroller with
nanoWatt XLP™ Technology. This application is a
first for aquatic filtration and have resulted in
advanced features to help hobbyists with their
passion for fish keeping.
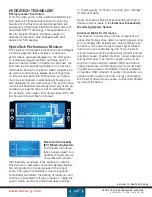
HydroTech Performance Monitor
The Fluval G incorporates a distinctive and intelligent
monitoring system that provides a continuous
performance overview displayed on the LCD panel.
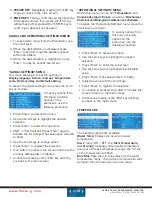
To indicate a clogged pre-filter cartridge and/or
assure maximum water circulation at all times, the
yÜÊÀ>ÌiÊÃÊ«iÀ>iÌÞÊ } } Ìi`ÊÊÌ iÊÃVÀii°Ê
Information about the aquarium water temperature,
as well as conductivity is always at your fingertips.
To let you know when the filter service or replace-
ment was completed, maintenance schedules are
also displayed on the main screen. The performance
ÌÀÊÜÊy>à ÊiÀÌÊÜ>À}ÃÊÜ iÊ>ÞÊvÊÌ iÊ«>
-
rameters go beyond the pre-set or defaulted limits.
ÀÊiÝ>«i]ÊÜ
iÊÜ>ÌiÀÊyÜÊ`À«ÃÊLiÜÊÎä¯]ÊÌ
iÊ
ÜÊyÜÊÜ>À}ÊÜÊy>Ã
ÊÊÃVÀii°Ê
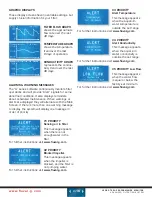
Electrical Conductivity
(EC) Monitoring System
The Fluval G instrumen-
tation senses water con-
ductivity through the use
of two titanium probes
that instantly recognizes if the aquarium contains
fresh water or salt water and automatically displays
the temperature corrected values in the proper
scale. The system constantly monitors aquarium
conductivity and allows the setting of maximum and
minimum visual alarms. It also provides a rolling line
graph, which records the historical daily readings
(1 reading every 12 hours), covering up to 48 days
of historical data.
Read more about Electrical Conductivity and how to
choose correct levels in the
Electrical Conductivity
Monitoring System Section
.
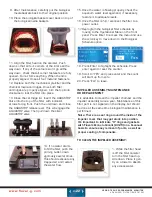
Advanced Motor Performance
The Fluval G is powered by a three component ad-
vanced technology drive system providing power, long
term reliability with virtually zero noise and high per-
formance. The powerful yet compact synchronized
dual drive coil is controlled by one of two Fluval G
microprocessors which continuously monitor and ad-
just start speed, impeller direction, power absorption
and performance. The ferrite impeller spins on an
aluminum oxide ceramic impeller shaft and rides a
high temperature performance polymer thrust bear-
ing offering a unique combination of wear resistant
properties. With unheard of quality components, ad-
vanced control system and low energy consumption
the Fluval G drive pumps equate to unparallel durabil-
ity and performance.
ESC
R E T U R N T O C O N T E N T S PA G E
Summary of Contents for FLUVAL G 3
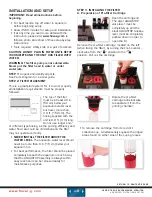
Page 1: ...USER GUIDE ENTER...


