CI-1255e™ Power Amplifier
Hafler
Passion for Perfection
4
mouNTING oPTIoNS
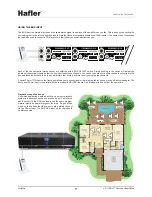
Before making connections, take a few minutes to ensure you are familiar with where the amplifier will be residing. Whether you plan
to install it on a shelf, in a rack or in a cupboard, you must ensure that it has proper ventilation to ensure proper performance. If you do
not allow for proper ventilation, the amp may shut down due to thermal overload. The Hafler CI-1255e is equipped with a side access
HushTone™ fan that ventilates hot air out of the amplifier as it draws fresh air in from the other side. Inside, a series of heat sink blades
transfer the heat from the power transistors to the air as it runs across and around them.
It is also important that you allow enough extra wiring to move the amp around during the installation. This will make it much easier
especially when troubleshooting. As a rule, try to allow roughly 16”-24” (40-60cm) of extra wire for this purpose.
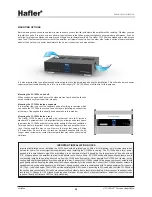
mounting the CI-1255e on a shelf
When used on an open shelf, ensure the sides are free from debris to allow the
amp’s ventilation system to perform properly.
mounting the CI-1255e inside a cupboard
It is important that you vent the cupboard as heat build-up is common which
can cause the CI-1255e to over heat and shut down. Installing an exhaust fan
at the rear of the cupboard is usually an adequate fix to this problem.
mounting the CI-1255e inside a rack
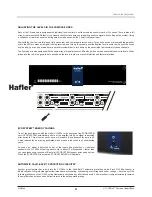
The Hafler CI-1255e may be ordered with rack-mount ears to fit inside a
standard 19” equipment rack. It is important that you allow an extra rack space
in between the CI-1255e and other rack gear for optimal air flow and ventilation.
This is particularly important if rack mounting more than one amplifier in your
rack. If being used this way, you can remove the large feet using a Philips
# 2 screwdriver. Be sure to use the rack ear hardware supplied with the kit.
Longer mount screws may contact internal parts that may cause critical safety
violations.
HIGH CURRENT AMPLIFIER
12 X 55 WATTS
2
3
4
5
6
7
8
9 10 11 12
CLIP
SIGNAL
CI-1255e
POWER
1
BUS IN
Hafler
TM
<OPEN RACK SPACE>
ImPoRTANT INSTALLATIoN NoTeS
Important installation notes: Installing the CI-1255e should be relatively easy. With a bit of planning, it will provide trouble-free
service for years. The most important consideration when installing the CI-1255e is cooling. The CI-1255e has a lot of power
packed into a small chassis size. When installing it in an equipment stack, it should be the top component. It needs at least
3”-5” of space above the amplifier to allow for adequate convection cooling. If CI-1255e channels frequently shutdown due to
overheating, install a fan pointing directed up from the CI-1255e bottom center. Never operate the CI-1255e on its side, as the
cooling potential drops significantly when operated this way. Connect the CI-1255e inputs to the source component outputs with
good quality cables. Keeping the cables short will reduce opportunity for induced noise. Connect the CI-1255e speaker outputs to
speakers using good quality speaker wire. Minimum 16 gauge copper wire is recommended with 14 gauge minimum for runs over
30’ (10m) — see chart below. The CI-1255e works optimally with 6-8 Ω loads. Connecting to 4 Ω loads won’t hurt the CI-1255e but
those channels connected to 4 Ω loads may occasionally shutdown due to thermal overloading. Never connect to speaker loads
less than 4 Ω. Channels 11/12 bridged mode require a minimum 8 Ω speaker. For best performance, adjust the channel trims as
required. Ideally, all trims are 100% on (fully clockwise).
Summary of Contents for CI-1255e
Page 2: ......


