background image

1

Initial Control Inspection

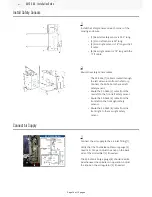
Danger: At this point, there should be no electrical

connection to the machine. Electrical panel must be

closed and secured. When main switch is on, there is

HIGH VOLTAGE throughout the electrical panel (including

the circuit boards and logic circuits) and some

components operate at high temperatures. Therefore,

exercise extreme caution when working in the panel.

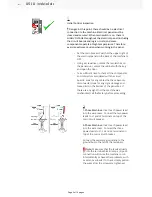
• Set the main breaker switch at the upper right of

the electrical panel on the back of the machine to
OFF.

• Using a screwdriver, unlock the two latches on

the panel door, unlock the cabinet with the key
and open the door.

• Take sufficient time to check all the components

and connectors associated with the circuit
boards. Look for any cables that have become
disconnected, look for any signs damage and
loose parts in the bottom of the panel box. If
there are any signs that the machine was
mishandled, call the factory before proceeding.

2

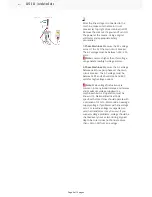
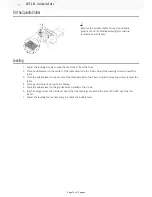
1-Phase Machines:

Insert each power lead

into the wire cover. Connect the two power

leads to L1 and L3 terminals on top of the

main circuit breaker.

3-Phase Machines:

Insert each power lead

into the wire cover. Connect the three

power leads to L1, L2 and L3 terminals on

top of the main circuit breaker.

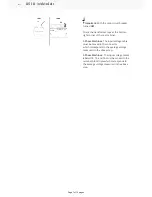
Connect the separate ground line to the

ground bus to the left of the terminals.

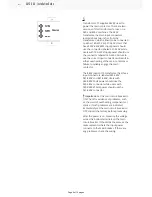
Note:

Make sure that the leads actually

go into the terminal-block clamps . (A poor

connection will cause the machine to run

intermittently or have other problems, such

as servo overloads.) To check, simply pull on

the wires after the screws are tightened.

GM-2-5AX - Installation Guide

Page 5 of 15 pages

Summary of Contents for GM-2-5AX

Page 1: ...een coated with rust inhibitor Let it soak for a few minutes before removing it Then use shop towels to remove it For thick applications of rust inhibitor use a plastic scraper to remove it Important Do not use scotch brite or metal scrapers these will scratch the way covers Furthermore to avoid any contamination of the way cover seals with the sticky residue Do not move any of the axes until all ...

Page 2: ...Electrical Installation GM 2 5AX Installation Guide Page 2 of 15 pages ...

Page 3: ...GM 2 5AX Installation Guide Page 3 of 15 pages ...

Page 4: ...THE SOURCE PRIOR TO CONNECTING THE LINE WIRES TO CNC HOWEVER IF THIS NOT THE CASE OR ARE NOT SURE HOW TO DO THIS CHECK WITH APPROPIATE PERSONNEL OR OBTAIN THE NECESSARY HELP BEFORE CONTINUING ALWAYS CHECK THE INCOMING LINES WITH AN AC VOLTAGE DETECTOR TO MAKE SURE POWER HAS BEEN DISCONNECTED GM 2 5AX Installation Guide Page 4 of 15 pages ...

Page 5: ... boards Look for any cables that have become disconnected look for any signs damage and loose parts in the bottom of the panel box If there are any signs that the machine was mishandled call the factory before proceeding 2 1 Phase Machines Insert each power lead into the wire cover Connect the two power leads to L1 and L3 terminals on top of the main circuit breaker 3 Phase Machines Insert each po...

Page 6: ...s at the main circuit breaker The AC voltage must be between 195 and 260 volts 360 and 480 volts for high voltage option Note Wide voltage fluctuations are common in many industrial areas minimum and maximum voltage supplied to a machine while it is in operation must be known U S National Electrical Code specifies that machines should operate with a variation of 5 to 5 around an average supply vol...

Page 7: ... The input voltage cable must be moved to the connector which corresponds to the average voltage measured in the above step 3 Phase Machines The input voltage cables labeled 74 75 and 76 must be moved to the terminal block triple which corresponds to the average voltage measured in the above step GM 2 5AX Installation Guide Page 7 of 15 pages ...

Page 8: ...ngage the main contactor The 480V option T5 transformer has three input connectors labeled 340 380V 381 440V and 441 480V Users with 340 380V 50Hz power should use the 340 380V connector while users with 380V 440V 50Hz power should use the 381 440V connector Important Set the main circuit breaker to ON Check for evidence of problems such as the smell of overheating components or smoke If such prob...

Page 9: ... main circuit breaker to OFF Close the door lock the latches and turn the power back on Remove the key from the control cabinet and give it to the shop manager 8 Activation When the machine is properly placed and connected to both air and electrical power it is ready for final installation removing shipping blocks leveling spindle sweep etc and software activation The HFO service technician does t...

Page 10: ...ng holes on the B axis body 2 To unblock Y axis Remove the Y axis shipping bolts 1 that secure the Z axis sub plate 2 to the bridge To unblock X axis Remove two bolts 3 that secure the X axis shipping bracket 5 to the gantry column Remove two bolts 4 that secure the X axis shipping bracket 5 to the table Remove the shipping bracket 5 Reinstall the table bolts 4 Perform the same steps to remove the...

Page 11: ...Install the Enclosure Panels GM 2 5AX Installation Guide Page 11 of 15 pages ...

Page 12: ...e NOTE The weight of the frame weldment is approximately 160 lbs Use the forklift or other lifting device to lift the frame 2 Install the front enclosure frame tubes 1 as shown on the picture Use the following hardware 2 to secure the frame tubes 8X SHCS 3 8 16 X 3 8X NUT 3 8 16 HEX 16X WASHER 3 8 HARD 3 Install panels 1 8 4 Install panels 1 4 GM 2 5AX Installation Guide Page 12 of 15 pages ...

Page 13: ...he arm and attach the harness retainer 5 Install the pendant arm cover 7 Route the pendant cables 1 into the pendant 2 and install the cable harness retainer Connect the cables to the SKBIF PCB Refer to VMC PENDANT INSTALLATION step 2 for connections Install the back cover 3 Attach the pendant assembly to the pendant stand 4 Install the dome plugs 5 GM 2 5AX Installation Guide Page 13 of 15 pages ...

Page 14: ...ear left safety sensor Route the 33 0626 2 cable from the rear left to the front left safety sensor Route the 33 0624 3 cable from the front left to the front right safety sensors Route the 33 0623 4 cable from the front right to the rear right safety sensor 1 Connect the air supply to the air inlet fitting 1 Verify that the Tool Release Pressure gauge 2 read 140 160 psi Adjust the knob on the bac...

Page 15: ...he leveling screws to level the table 4 Place a granite block on top of the bridge 5 Place the bubble level on the granite block parallel to the Y Axis 6 Jog the bridge across the full travel Verify that the readings are within the limit of 0 0002 over the full travel 7 Adjust the leveling feet as necessary Re check the bubble level 1 Remove the spindle chiller fill cap 1 and add 4 gallons of a 50...

Reviews: