background image

Installation

G&D FIBREVision-USB 2.0 · 

10

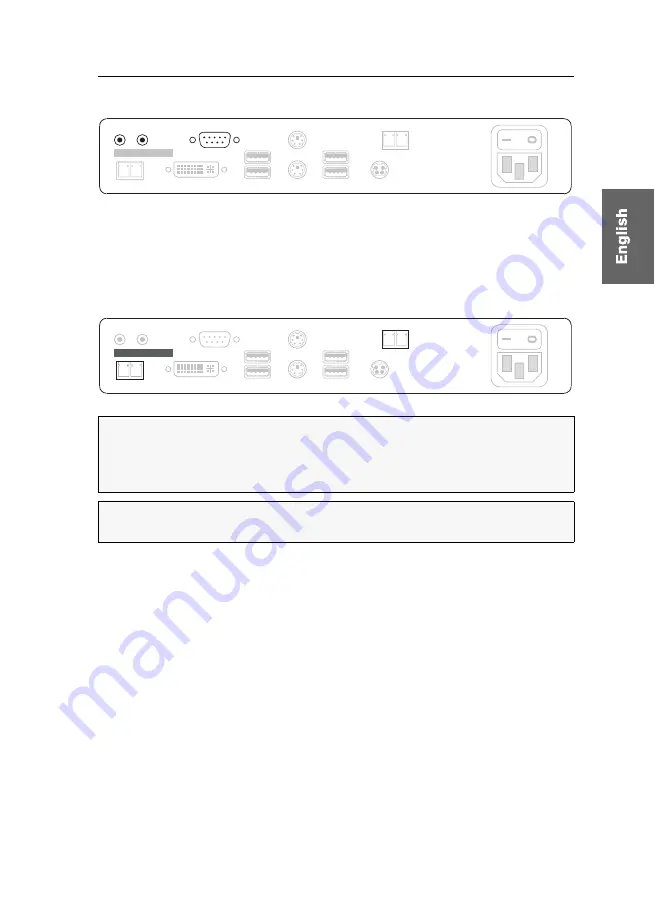
Additional interface of expanded variants

Speaker: 

Connect the console speakers to this interface.

Micro In: 

Connect a microphone to this interface.

RS232: 

Connect the serial end device to this interface.

Connections for data transmission

Transmission – Tx: 

Insert the LC plug of a fibre optic cable.

Connect the other end of the cable to the 

Transmission – Rx

 interface of the computer 

module.

Transmission – Rx: 

Insert the LC plug of a fibre optic cable.

Connect the other end of the cable to the 

Transmission – Rx

 interface of the computer 

module.

IMPORTANT: 

The device uses components with laser technology which comply 

with laser class 1. Although class 1 lasers are usually not dangerous considered, 

please avoid direct eye contact for your own safety.
Do not use optical instruments to look into the beam!

NOTE: 

Remove the protection caps from the 

Transmission

 interface and the cable 

plugs.

RS232

Speaker Micro In

Rx

USB 2.0 Trans.

Tx

Class 1 Laser Product

Rx

Transmission

Tx

Main

Power

DVI/VGA Out

Red. Power

Keyb.

Mouse

USB 2.0 Devices

USB Keyb./Mouse

Rx

USB 2.0 Trans.

Tx

Class 1 Laser Product

Rx

Transmission

Tx

Main

Power

DVI/VGA Out

Red. Power

Keyb.

Mouse

RS232

Speaker Micro In

USB 2.0 Devices

USB Keyb./Mouse

Summary of Contents for FIBREVision-USB 2.0

Page 1: ...G D FIBREVision USB 2 0 DE Installationsanleitung EN Installation Guide Guntermann Drunck GmbH www gdsys de A9100153 1 20 ...

Page 2: ...übernimmt keine Gewährleistung für Geräte die nicht bestimmungsgemäß eingesetzt wurden nicht autorisiert repariert oder modifiziert wurden schwere äußere Beschädigungen aufweisen welche nicht bei Lieferungserhalt angezeigt wurden durch Fremdzubehör beschädigt wurden G D haftet nicht für Folgeschäden jeglicher Art die möglicherweise durch den Einsatz der Produkte entstehen können Warenzeichennachwe...

Page 3: ...omversorgung 8 Zusätzliche Schnittstellen der Multi Channel Varianten 8 Installation des Arbeitsplatzmoduls 9 Anschluss des entfernten Arbeitsplatzes 9 Anschlüsse für USB 2 0 Geräte 9 Zusätzliche Schnittstellen der erweiterten Varianten 10 Anschlüsse für Datenübertragung 10 Anschlüsse für Stromversorgung 11 Zusätzliche Schnittstellen der Multi Channel Varianten 11 Inbetriebnahme 12 Weiterführende ...

Page 4: ...nungsversorgung am Gerät ab Ständigen Zugang zu den Netzsteckern der Geräte sicherstellen Achten Sie bei der Installation der Geräte darauf dass die Netzstecker der Geräte jederzeit zugänglich bleiben Lüftungsöffnungen nicht verdecken Bei Gerätevarianten mit Lüftungsöffnungen ist eine Verdeckung der Lüftungs öffnungen unbedingt zu vermeiden Korrekte Einbaulage bei Geräten mit Lüftungsöffnungen sic...

Page 5: ...bdecken Decken Sie die optischen Anschlüsse der Transmission Buchse und die Kabel stecker stets mit einer Schutzkappe ab wenn diese nicht verbunden sind Ausschließlich von G D zertifizierte Übertragungsmodule verwenden Es ist nicht zulässig solche Übertragungsmodule zu verwenden die nicht der Laser Klasse 1 gemäß DIN EN 60825 1 2001 11 entsprechen Durch die Ver wendung solcher Module kann die Einh...

Page 6: ...llänge hängt von der Art der Lichtwellenleiter ab Zusätzliche Funktionen erweiterter Varianten Audio Die Audio Übertragung nur in Kombination mit der RS232 Option erhältlich ermöglicht die bidirektionale Übertragung von Audiosignalen zwischen dem ent fernten Arbeitsplatz und dem Rechner RS232 Die RS232 Übertragung nur in Kombination mit der Audio Option erhältlich ermöglicht den Anschluss externer...

Page 7: ... Varianten mit Audio und RS232 Übertragung 2 Audio Kabel Audio M M 2 1 serielles Anschlusskabel RS232 M F 2 Zusätzlicher Lieferumfang der Multi Channel Varianten Die Multi Channel Varianten der FIBREVision USB 2 0 Serie beinhalten für jeden Videokanal ein separates Videokabel Die Variante FIBREVision MC2 wird beispiels weise mit zwei Videokabeln ausgeliefert HINWEIS Zur Montage der Geräte in einem...

Page 8: ...FIBREVision CPU wird der Rechner angeschlossen dessen Signale an den entfernten Arbeitsplatz übertragen werden Zusätzlich besteht die Möglichkeit einen lokalen Arbeitsplatz an das Rechnermodul anzuschließen WICHTIG Die Geräte verwenden Baugruppen mit Laser Technologie die der Laser Klasse 1 entsprechen Sie erfüllen dabei die Richtlinien gemäß DIN EN 60825 1 2001 11 IEC 60825 1 sowie U S 21 CFR 104...

Page 9: ...ätzliche Zugriffsmög lichkeit auf den Rechner einrichten Schließen ggf die Tastatur und die Maus sowie den Monitor des lokalen Arbeitsplat zes an die nachfolgend aufgeführten Schnittstellen an DVI VGA Out Schließen Sie den Monitor des lokalen Arbeitsplatzes an Ist der Monitor mit einem analogen VGA Eingang ausgestattet stecken Sie einen optionalen Adapter auf diese Schnittstelle und schließen hier...

Page 10: ...binden Transmission Rx Stecken Sie den LC Stecker eines Glasfaserkabels ein Das andere Ende des Kabels ist mit der Schnittstelle Transmission Tx des Arbeits platzmoduls zu verbinden WICHTIG Das Gerät verwendet Baugruppen mit Laser Technologie die der Laser Klasse 1 entsprechen Obwohl Laserstrahlung der Klasse 1 als ungefährlich angesehen wird ist der direkte Blick in den Strahl zu vermeiden Blicke...

Page 11: ...tecken Sie den LC Stecker eines Glasfaserkabels ein Das andere Ende des Kabels ist mit der Schnittstelle Transmission x Tx des Arbeitsplatz moduls zu verbinden DVI CPU x Verbinden Sie den digitalen Videoausgang des Rechners mit dieser Schnittstelle Verwenden Sie hierzu das Kabel DVI D SL M M 2 DVI VGA Out x Schließen Sie den Monitor des lokalen Arbeitsplatzes an Ist der Monitor mit einem analogen ...

Page 12: ...ßen Sie ggf bis zu zwei USB Geräte an der Frontseite an USB 2 0 Devices Schließen Sie ggf bis zu zwei USB Geräte an der Rückseite an Der am Rechnermodul FIBREVision CPU angeschlossene Recher kann diese USB Geräte zusätzlich zu den direkt am Rechner angeschlossenen USB Geräten nutzen HINWEIS Die Maus sowie die Tastatur des entfernten Arbeitsplatzes können wahlweise als PS 2 oder USB Gerät angeschlo...

Page 13: ...ls ist mit der Schnittstelle Transmission Tx des Rechner moduls zu verbinden WICHTIG Das Gerät verwendet Baugruppen mit Laser Technologie die der Laser Klasse 1 entsprechen Obwohl Laserstrahlung der Klasse 1 als ungefährlich angesehen wird ist der direkte Blick in den Strahl zu vermeiden Blicken Sie nicht mit optischen Instrumenten in den Strahl HINWEIS Entfernen Sie die Schutzkappen der Transmiss...

Page 14: ... Transmission x Rx des Rechnermoduls zu verbinden Transmission x Rx Stecken Sie den LC Stecker eines Glasfaserkabels ein Das andere Ende des Kabels ist mit der Schnittstelle Transmission x Tx des Rechnermoduls zu verbinden DVI VGA Out x Schließen Sie den Monitor des Arbeitsplatzes an Ist der Monitor mit einem analogen VGA Eingang ausgestattet stecken Sie einen optionalen Adapter auf diese Schnitts...

Page 15: ...ermodul FIBREVision CPU ein 3 Schalten Sie den am Rechnermodul angeschlossenen Rechner ein Nach dem Einschalten des Systems signalisieren die LEDs an den Frontseiten des Rechner und des Arbeitsplatzmoduls den Betriebszustand des Systems Weitere Hin weise hierzu erhalten Sie im Kapitel Statusanzeigen ab Seite 16 HINWEIS Die empfohlene Einschaltreihenfolge stellt sicher dass das FIBREVision System d...

Page 16: ...ein freier Raum von mindestens 7 9 mm entspricht der Höhe der Gerätefüße emp fohlen Geräteseiten mindestens 5 cm Geräteoberseite mindestens 3 cm Geräteunterseite mindestens 7 9 mm entspricht der Höhe der Gerätefüße Geräteseiten mindestens 5 cm Luftzirkulation Es ist stets sicherzustellen dass der rechten Seite und ggf der Unterseite kühle Luft in ausrei chender Menge zuströmt Die erwärmte Luft mus...

Page 17: ...ederholraten und Auflösungen möglich Welche Bildschirmmodi zur Auswahl stehen hängt maßgeb lich von der Grafikkarte dem installierten Gerätetreiber sowie dem Betriebssystem und dem angeschlossenen Monitor ab Die vom Rechner an das Rechnermodul FIBREVision CPU übertragenen Bildda ten werden mit dem gleichen Timing an den Monitor des entfernten Arbeitsplatzes weitergegeben Frequenzen und Bildlage de...

Page 18: ...eschlossenen Monitors oder die Werks vorgabe im FIBREVision System zu Verfügung Üblicherweise werden die DDC Informationen des Monitors unverändert an den Rechner weitergeleitet Stellt das FIBREVision System aber fest dass sich die Infor mationen des Monitors nicht vollständig auslesen lassen oder diese unzulässige Ein träge enthalten werden die Informationen vervollständigt oder korrigiert HINWEI...

Page 19: ...gaben des Anwenders bestimmt Main an Die Hauptspannungsversorgung liefert die erforderliche Spannung aus Der Netzschalter ist ausgeschaltet oder die Verbindung des Gerätes mit dem Stromnetz ist nicht hergestellt Prüfen Sie den korrekten Anschluss des Stromversorgungskabels Red an Das optionale Netzteil ist angeschlossen und eine Spannung von 12 Volt verfügbar aus Das optionale Netzteil ist nicht k...

Page 20: ...erätes mit dem Stromnetz nicht hergestellt Prüfen Sie den korrekten Anschluss des Stromversorgungskabels Red an Das optionale Netzteil ist angeschlossen und eine Spannung von 12 Volt verfügbar aus Das optionale Netzteil ist nicht korrekt angeschlossen Sys an System betriebsbereit blinkt Setup Modus aktiviert blinkt langsam Interne Kommunikation fehlerhaft Schalten Sie das Gerät aus und wieder ein ...

Page 21: ...IBREVision USB 2 0 18 Video an Das am Videoeingang des Rechnermoduls eingehende Bildsignal wird korrekt durch das Arbeitsplatzmodul empfangen blinkt Es werden keine Bilddaten vom Rechnermodul empfangen LED Status Bedeutung ...

Page 22: ...USB 2 0 Übertragungsart transparent Übertragungsrate bis 480 Mbit s Unterstützte Geräte High Power Devices bis 500 mA Audio kostenpflichtige Option Übertragungsart transparent bidirektional Auflösung 24 bit digital Stereo Abtastrate 96 kHz Bandbreite 22 kHz RS232 kostenpflichtige Option Übertragungsart transparent Übertragungsrate max 115 200 bit s Übertragene Signale RxD TxD RTS CTS DTR DSR DCD H...

Page 23: ...aße B H T 210 44 210 mm Desktop 19 1 HE 210 mm Rackmount Gewicht ca 1 5 kg Einsatzumgebung Temperatur 5 bis 45 C Luftfeuchte 80 nicht kondensierend FIBREVISION USB 2 0 CON ARBEITSPLATZMODUL Schnittstellen für Arbeitsplatz Monitor 1 DVI I Buchse Tastatur 1 PS 2 Buchse 1 USB A Buchse Maus 1 PS 2 Buchse 1 USB A Buchse USB 2 0 2 USB A Buchse Frontseite 2 USB A Buchse Rückseite Audio kostenpflichtige O...

Page 24: ...ium eloxiert Maße B H T 435 44 210 mm Gewicht ca 3 1 kg Einsatzumgebung Temperatur 5 bis 40 C Luftfeuchte 80 nicht kondensierend FIBREVISION USB 2 0 MC2 CON ARBEITSPLATZMODUL Schnittstellen für Arbeitsplatz Monitor 2 DVI I Buchse Tastatur 1 PS 2 Buchse 1 USB A Buchse Maus 1 PS 2 Buchse 1 USB A Buchse USB 2 0 2 USB A Buchse Frontseite 2 USB A Buchse Rückseite Audio kostenpflichtige Option 3 5 mm Kl...

Page 25: ...rzinkt unten Maße B H T 435 44 2185mm Gewicht ca 3 1 kg Einsatzumgebung Temperatur 5 bis 35 C Luftfeuchte 80 nicht kondensierend FIBREVISION USB 2 0 MC4 CON ARBEITSPLATZMODUL Schnittstellen für Arbeitsplatz Monitor 4 DVI I Buchse Tastatur 1 PS 2 Buchse 1 USB A Buchse Maus 1 PS 2 Buchse 1 USB A Buchse USB 2 0 2 USB A Buchse Frontseite 2 USB A Buchse Rückseite Audio kostenpflichtige Option 3 5 mm Kl...

Page 26: ...DC 1 9A MC2 ARU2 CON AC100 240V 60 50Hz 0 6 0 3A 12VDC 2 6A MC4 ARU2 CPU AC100 120V 210 240V 60 50Hz 0 9 0 4A 12VDC 3 3A MC4 ARU2 CON AC100 120V 210 240V 60 50Hz 0 9 0 4A 12VDC 3 2A VARIANTE MAIN POWER REDUNDANT POWER ARU2 CPU 17 5W 100VAC 17 5W 240VAC 14W 12VDC ARU2 CON 28W 100VAC 28W 240VAC 23 6W 12VDC MC2 ARU2 CPU 24 5W 100VAC 24 5W 240VAC 20W 12VDC MC2 ARU2 CON 32W 100VAC 33W 240VAC 27W 12VDC ...

Page 27: ...Fasern mit 200 MHz km Leistungsdaten Wellenlänge 850 nm 770 nm bis 860 nm Optische Abgabeleistung PAVG in 50 oder 62 5 μm MMF 9 5 dBm bis 3 dBm Empfangsempfindlichkeit PMIN 17 dBm Empfindlichkeit Stressed PS 13 5 dBm 50 m MMF SINGLEMODE ÜBERTRAGUNGSMODUL Datenübertragung Art Lichtwellenleiter 2 Glasfasern Schnittstellentyp LC Duplex Kabellänge max Singlemode 9 125μm Klasse OS1 2 Kilometer Wellenlä...

Page 28: ...not provide warranty for devices that Are not used as intended Are repaired or modified by unauthorized personnel Show severe external damages that was not reported on the receipt of goods Have been damaged by non G D accessories G D will not be liable for any consequential damages that could occur from using the products Proof of trademark All product and company names mentioned in this manual an...

Page 29: ... transmission 7 Connecting the power supply 8 Additional interfaces of the multi channel variants 8 Installing the user module 9 Connecting the remote console 9 Connecting USB 2 0 devices 9 Additional interface of expanded variants 10 Connections for data transmission 10 Connecting the power supply 11 Additional interfaces of the multi channel variants 11 Start up 12 Further information 13 Special...

Page 30: ...ug or the power supply of the device Ensure constant access to the power plugs During the installation of the devices ensure that the power plugs remain accessible Do not cover the ventilation openings Ventilation openings prevent the device from overheating Do not cover them Ensure proper installation position For reasons of electric safety the device has to be installed upright and horizontally ...

Page 31: ...lways connect optical connections or cover them with protection caps Optical connections of the Transmission socket as well as cable plugs must always be covered with a connector or a protection cap Only use G D certified transmission modules It is not allowed to use transmission modules that do not comply with laser class 1 according to DIN EN 60825 1 2001 11 By applying such modules the complian...

Page 32: ...um cable length depends on the applied fibre optics Special functions of expanded variants Audio Audio transmission only available in combination with RS232 option enables the bidirectional transmission of audio signals between remote console and com puter RS232 RS232 transmission only available in combination with Audio option ena bles the connection of external serial devices to the user module ...

Page 33: ... listed below Variants with audio and RS232 transmission 2 Audio cable Audio M M 2 1 serial connection cable RS232 M F 2 Additional scope of delivery for multi channel variants Multi channel variants of the series include a separate video cable for each video chan nel FIBREVision MC2 variants for example are shipped with two video cables NOTE The scope of delivery of multi channel devices provides...

Page 34: ...he remote console is connected to the FIBREVision CPU computer module A local console can also be connected to the computer module IMPORTANT The devices use components with laser technology which comply with laser class 1 They meet the requirements according to DIN EN 60825 1 2001 11 IEC 60825 1 as well as U S CFR 1040 10 and 1040 11 Please consider the following safety guidelines regarding this m...

Page 35: ...puter module Connect keyboard mouse and monitor of the local console to the highlighted inter faces in the image below DVI VGA Out Connect the local console monitor to this interface If the monitor provides an analog VGA input connect an optional adapter to this interface Afterwards connect the monitor s VGA cable to the adapter Keyb Connect the PS 2 keyboard of the local console to this interface...

Page 36: ...of a fibre optic cable Connect the other end of the cable to the Transmission Tx interface of the user module IMPORTANT The device uses components with laser technology which comply with laser class 1 Although class 1 lasers are usually not considered dangerous please avoid direct eye contact for your own safety Do not use optical instruments to look into the beam NOTE Remove the protection caps f...

Page 37: ...e other end of the cable to the Transmission x Rx interface of the user module DVI CPU x Use the DVI D SL M M 2 cable to connect the computer s digital video output to this interface DVI VGA Out x Connect the local console monitor to this interface If the monitor provides an analog VGA input connect an optional adapter to this interface Afterwards connect the monitor s VGA cable to the adapter NOT...

Page 38: ...B 2 0 Connect up to two USB devices to the front panel USB 2 0 Devices Connect up to two USB devices to the front panel The computer that is connected to the FIBREVision CPU computer module can use these USB devices as well as the devices that are directly connected to the computer NOTE Mouse and keyboard of the remote console can either be PS 2 or USB devices DVI VGA Out Keyb Mouse USB Keyb Mouse...

Page 39: ... to the Transmission Rx interface of the computer module IMPORTANT The device uses components with laser technology which comply with laser class 1 Although class 1 lasers are usually not dangerous considered please avoid direct eye contact for your own safety Do not use optical instruments to look into the beam NOTE Remove the protection caps from the Transmission interface and the cable plugs RS...

Page 40: ...ssion x Rx Insert the LC plug of a fibre optic cable Connect the other end of the cable to the Transmission x Tx interface of the compu ter module DVI VGA Out x Connect the local console monitor to this interface If the monitor provides an analog VGA input connect an optional adapter to this interface Afterwards connect the monitor s VGA cable to the adapter NOTE Remove the protection caps from th...

Page 41: ... 3 Turn on the computer that is connected to the computer module After the system has been switched on the LEDs on the front panel of both the computer module and the user module show the system s operating status For fur ther advices on this topic see the chapter Status displays on page 16 ff NOTE The recommended activation sequence ensures that the FIBREVision sys tem is able to read out the fea...

Page 42: ...e for example provide a free space of at least 7 9 mm equals the height of the device stands Device sides at least 5 cm Device top side at least 3 cm Device bottom side at least 7 9 mm equals the height of the device stands Device sides at least 5 cm Air circulation Always ensure that the right hand side and if necessary the bottom side of the devices are cooled by air Heated air must be able to s...

Page 43: ...le FIBREVision CPU are forwarded to the monitor of the remote console with the same timing Frequencies and the signal s image position at the computer module correspond to those at the graphics output IMPORTANT To protect the device from overheating the video signal of the chan nels 2 to 4 is switched off when the temperature reaches the critical value Alarm level Action 70 C Blinking Sys LED at d...

Page 44: ...an integrated cache function This way the computer that is connected to the computer module FIBREVision CPU can already access the remote monitor during the booting process Even if the computer module or the user module are turned off or the devices are not interconnected the properties of the most recently connected monitor or a default data block are provided in the FIBREVision system The DDC in...

Page 45: ...o voltage at PS 2 interface or USB bus Main off The power switch is turned off or the connection with the mains could not be established Please check if the power cable is properly connected to the device on The main power supply provides the necessary voltage Red off The optional power pack is not properly connected on The optional power pack is connected and provides the required voltage 12 Volt...

Page 46: ...cted to the device on The main power supply provides the necessary voltage Red off The optional power pack is not properly connected on The optional power pack is connected and provides the required voltage 12 Volt Sys blinking Activated setup mode cyclic blinking The firmware that the update wizard transmitted to the device is being transmitted to all system components This process may take sever...

Page 47: ... G D FIBREVision USB 2 0 18 Video blinking The video signal coming in from the computer could not be detected or cannot be processed due to its lacking quality on Stable image signal at video input LED Status Meaning ...

Page 48: ...Hz USB 2 0 Transmission type transparent Transmission rate up to 480 Mbit s Supported devices High power devices up to 500 mA Audio premium option Transmission type transparent bidirectional Resolution 24 bit digital stereo Sampling rate 96 kHz Bandwidth 22 kHz RS232 premium option Transmission type transparent Transmission rate max 115 200 bit s Transmitted signals RxD TxD RTS CTS DTR DSR DCD Mai...

Page 49: ... D 210 44 210 mm desktop 19 1 HU 210 mm rackmount Weight ca 1 5 kg Operational environment Temperature 5 to 45 C Air humidity 80 non condensing FIBREVISION USB 2 0 CON USER MODULE Interfaces for console Monitor 1 DVI I socket Keyboard 1 PS 2 socket 1 USB A socket Maus 1 PS 2 socket 1 USB A socket USB 2 0 2 USB A socket front panel 2 USB A socket back panel Audio premium option 3 5 mm jack plug Spe...

Page 50: ...m Dimensions W H D 435 44 210 mm Weight approx 3 1 kg Operational environment Temperature 5 to 40 C Air humidity 80 non condensing FIBREVISION USB 2 0 MC2 CON USER MODULE Interfaces for console Monitor 2 DVI I socket Keyboard 1 PS 2 socket 1 USB A socket Maus 1 PS 2 socket 1 USB A socket USB 2 0 2 USB A socket front panel 2 USB A socket back panel Audio premium option 3 5 mm jack plug Speaker 3 5 ...

Page 51: ...tom Dimensions W H D 435 44 285 mm Weight ca 3 1 kg Operational environment Temperature 5 to 35 C Air humidity 80 non condensing FIBREVISION USB 2 0 MC4 CON USER MODULE Interfaces for console Monitor 4 DVI I socket Keyboard 1 PS 2 socket 1 USB A socket Maus 1 PS 2 socket 1 USB A socket USB 2 0 2 USB A socket front panel 2 USB A socket back panel Audio premium option 3 5 mm jack plug Speaker 3 5 mm...

Page 52: ...12VDC 1 9A MC2 ARU2 CON AC100 240V 60 50Hz 0 6 0 3A 12VDC 2 6A MC4 ARU2 CPU AC100 120V 210 240V 60 50Hz 0 9 0 4A 12VDC 3 3A MC4 ARU2 CON AC100 120V 210 240V 60 50Hz 0 9 0 4A 12VDC 3 2A VARIANT MAIN POWER REDUNDANT POWER ARU2 CPU 17 5W 100VAC 17 5W 240VAC 14W 12VDC ARU2 CON 28W 100VAC 28W 240VAC 23 6W 12VDC MC2 ARU2 CPU 24 5W 100VAC 24 5W 240VAC 20W 12VDC MC2 ARU2 CON 32W 100VAC 33W 240VAC 27W 12VD...

Page 53: ... meters fibres with 200 MHz km Performance data Wavelength 850 nm 770 nm to 860 nm Optical power output PAVG in 50 oder 62 5 μm MMF 9 5 dBm to 3 dBm Receiver sensitivity PMIN 17 dBm Sensitivity Stressed PS 13 5 dBm 50 µm MMF SINGLEMODE TRANSMISSION MODULE Data transmission Art Fibre optics 2 fibres Port type LC Duplex Cable length max Singlemode 9 125μm class OS1 2 kilometers Wavelength 1310 nm 12...

Page 54: ...NOTES ...

Page 55: ...NOTES ...

Page 56: ...fend aktualisiert und im Internet veröffentlicht http gdsys de A9100153 The manual is constantly updated and available on our website Guntermann Drunck GmbH Obere Leimbach 9 57074 Siegen Germany http www gdsys de sales gdsys de ...

Reviews: