background image

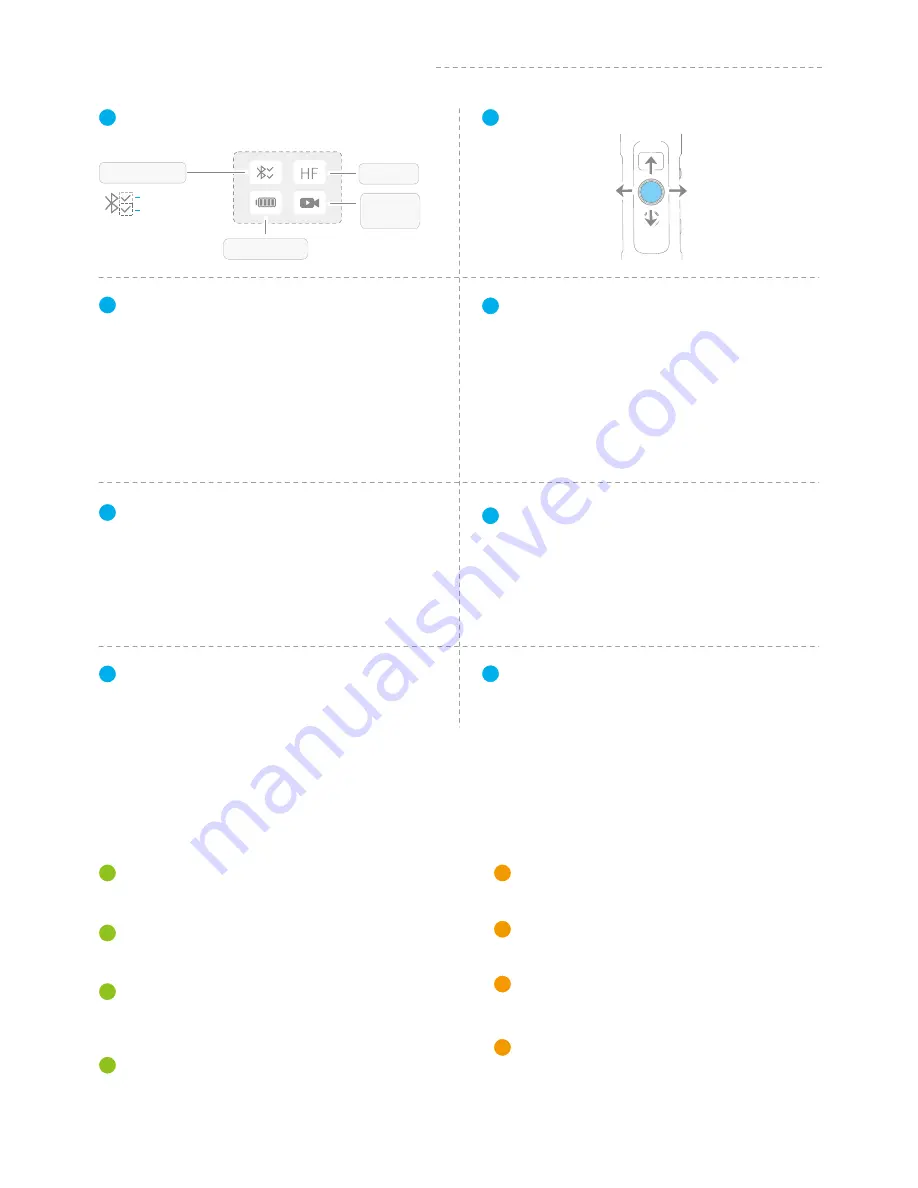
Display

Introduction of Display and Buttons

Introduction of Axis and Knob

1

Joystick

2

Tilt Axis

Take the Smartphone lens as the base point, and control the 

smartphone lens to move upward or downward by tilt axis. 

1

4

Roll axis

Take the smartphone lens as the base point, and control 

the smartphone lens to tilt to the left or tilt to the right by 

roll axis. 

2

3

Pan axis

Pan Axis

Take the smartphone  lens as the base point, and control 

the smartphone  lens to turn left or turn right by pan axis.

Used for fixing the cross arm.

Knob Ring

Introduction of Other Components

Cross arm

Used for adjusting the up and down centre-of-gravity 

position of smartphone.

Used for fixing the Smartphone.

1

Smartphone holder

2

Vertical arm

Used for connecting the rolling axis and the panning

 axis.

Used for holding the gimbal by one hand.

3

Hand grip

4

Function Button

3

Shutter Button

4

Setting Button

5

Horizontal Adjustment Button

6

Multifunction Knob

8

Up

Left

Right

Down

Double tap

Follow Mode

Quadruple tap

Auto-rotation Mode

Five tap

Initialization

Refer to Page 7

Refer to Page 8

  (Connect to the mobile phone APP

 for use)

Refer to Page8

Refer to Page 7

Refer to Page 9

Triple tap

All Follow Mode

Panning Mode / Lock Mode   

Single tap

After the gimbal is connected to the mobile phone 

through Vicool App, single tap the shutter button 

to control the phone to take photos, and double

 tap it to switch between the front and the rear lens 

of the camera, press and hold to control the video 

recording.

Please refer to the chapter "App - Download and 

Connecting" in page 10

Please refer to the chapter "App - Download and

Connecting" in page 10

Single tap

Click on the main interface to switch to

 the phone shooting mode

You can control the horizon angle via the horizontal 

adjustment button.

Switch the volume interface/Click to exit

Long press

(1) 

Achieve the control to the focal length of 

Smartphone, such as follow focus, zoom.

(2) Control the axial angle of the gimbal

Trigger Button

7

Refer to Page 9

Double tap

Reset 

Fast follow mode

Press and hold

02

www.feiyu-tech.com

Main interface of

the display screen

Shooting 

mode

Audio connection

App connection

Bluetooth

Modes

Battery Level

Power on /  Power off

Long press

Summary of Contents for SPG 2

Page 1: ...Guilin Feiyu Technology Incorporated Company Instructions User Manual EN V1 0 3 Axis Stabilized Handheld Gimbal for Smartphone ...

Page 2: ...grade 12 Mobile phone audio connection 12 Setting Button operation 7 Function Button operation 7 Bluetooth shutter operation 8 Swith Smartphone Modes Volume adjustment 8 8 Trigger Button operation 8 Setting Button operation 8 Multifunction Knob Zooming control Follow focus Control 3 Axis 9 App Download and Connecting 10 Gimbal Initialization 12 Vertical Shooting 13 Audio recording with Bluetooth c...

Page 3: ...terface and screws 3 6 8 1 3 3 4 4 2 1 1 4 20 Thread Mount 3 2 Audio Jack Function Button Joystick Shutter Button Display 1 2 3 4 1 Micro USB Port 1 5 Vertical Arm 5 1 Pan Axis 4 1 4 20 Thread Mount 3 2 2 2 1 7 1 Used for charging the gimbal input 5V 2A the gimbal can be used while being charged but it is not available for external power supply 2 Used for firmware upgrade computer please refer to t...

Page 4: ...p Auto rotation Mode Five tap Initialization Refer to Page 7 Refer to Page 8 Connect to the mobile phone APP for use Refer to Page8 Refer to Page 7 Refer to Page 9 Triple tap All Follow Mode Panning Mode Lock Mode Single tap After the gimbal is connected to the mobile phone through Vicool App single tap the shutter button to control the phone to take photos and double tap it to switch between the ...

Page 5: ...he back of the holder It s recommended to remove your smartphone protective case If the phone tilts to left side 1 loose the knob ring and slide the cross arm to opposite side 2 After sliding right to find perfect balance status 3 Tighten the knob ring If the phone tilts to right side 1 loose the knob ring and slide the cross arm to opposite side 2 After sliding left to find perfect balance status 3...

Page 6: ...oting as shown in below picture 90 90 90 90 1 Please mount the smartphone before powering on the gimbal 2 When the battery is low please charge the gimbal 3 When not in use turn off the gimbal and then remove the battery NOTE Power on off Long press the function button the display will show and release it when you hear the beep tone Support clockwise counterclockwise rotation ...

Page 7: ...le self provided to charge the mobile phone and select the corresponding charging adapter cable according to the charging port of the mobile phone Charging connection diagram of the mobile phone Charging connection diagram of the mobile phone Charging the Smartphone Corresponding charging interface of the mobile phone Transfer charging cable of the mobile phone self provided Micro USB charging int...

Page 8: ...us Mode Status HF TF AF Panning Mode All follow mode Follow Mode Lock Mode LK Bluetooth1 is connected Bluetooth2 is connected Bluetooth1 is connected Bluetooth2 is not connected Bluetooth1 is not connected Bluetooth2 is connected Introduction of Display Bluetooth1 is not connected Bluetooth2 is not connected Bluetooth 1 is used for connecting the mobile phone with the gimbal via audio please refer...

Page 9: ...panning mode and lock mode Single tap to check the battery level during charging Under the follow mode single tap to switch to panning mode Function Button Five tap Shutter Button operation Please refer to the chapter App Download and Connecting in page 10 Shooting Shutter Button Switch between the front and the rear lens of the camera Start shooting Stop shooting Up Left Right Down Upward 1 Lens ...

Page 10: ...motion Slow motion Shooting mode Main interface of the display screen Single tap Setting Horizontal Adjustment Button operation You can control the horizon angle via the horizontal adjustment button Press and hold the setting button to switch between the main interface and the volume interface You can adjust the volume by moving the four directional joystick up down this operation requires connect...

Page 11: ...page 10 Long press the multifunction knob Display Introduction Vicool Adjust the camera parameters Single tap to switch the option rotate to adjust the control options and the phone needs to support digital zoom follow focus Trigger Button operation Press and hold Fast follow mode Single tap Answer hang up the phone Press and hold the trigger button in the panning follow follow mode to enter the f...

Page 12: ...rtphone follow on the instructions to connect smartphone to gimbal via bluetooth Connecting App Download and Install Vicool App App Store Google play Or search and download the Vicool App on the following application platform iOS Version Android Version Requires iOS 9 0 or later Android 5 0 or later ...

Page 13: ...ngle tap the function button to record rotation end position The gimbal automatically restores to the start position while the tilt axis and pan axis start rotating at a constant speed according to pre set speed to end position repeat step 2 3 to start again 2 Set rotation start position 3 Set rotation end position 4 Start auto rotation movements 1 Enter auto rotation mode Trigger button Exit the ...

Page 14: ... button to wake up and return to the main interface NOTE If the initialization is not successful for a long time long press the function button to turn off the gimbal restart it and then initialize You can initialize your gimbal when 1 2 1 3 Five tap Single tap Initing Display Initing Display When smartphone is not level If not used for a long period of time In case of extreme temperature variation...

Page 15: ...ooting Reset Double clicks Audio recording with Bluetooth connection Turn on the mobile phone Bluetooth and connect to FY_SPG2AUDID_XX After the connection is successful press the shutter button on the handle If the volume appears on the phone interface as shown in below picture the connection is successful Turn the gimbal on and plug the earphone connector into the audio jack on the right side of...

Page 16: ...autions 1 When using the earphone for recording please note that the audio jack at the SPG2 handle is suitable for American standard earphones to use the Chinese standard earphones you need to use the conversion cable Most of the American standard and Chinese standard earphones can be distinguished by the color of the insulation ring American standard White Chinese standard Black 2 When using a mi...

Page 17: ...0g exclude the battery and smart phone Panning Speed 3 s 150 s Adaption smart phone Operation Time Weight 14Hours Tilting Speed 2 s 75 s Max Tilting Range 320 Max Rolling Range 320 Max Panning Range 360 Product Name SPG2 3 Axis Stabilized Handheld Gimbal for Smartphone 6 Specifications 15 www feiyu tech com ...

Page 18: ... no liability for any risks related to or resulting from the debug and use of this product including the direct indirect or third party losses For any unknown sources of using we will not be at any services The updating and changes of product firmware and program may cause changes in function descriptions in this user manual please read the instructions carefully before upgrading the firmware and us...

Reviews: