


Transport container disposal
The container protects the appliance against damage
during transport. Container materials are usually selected
so as not to harm the environment and dispose them in an
environment-friendly manner.
Returning the container back in the circulation saves raw
materials and reduces waste disposal costs.
Parts of the container (e.g. foils, styropore) can be
dangerous for children.
Risk of suffocation!
Keep parts of the container out of reach of children and
dispose them as quickly as possible.
Operating staff requirements
The operator must carefully read and understand the
Operating Instructions before using the appliance.
Qualification
No special qualification is necessary for using the appliance
apart from detailed instruction by an expert.
Minimum age
The appliance can only be operated by persons over 18
years of age that have been familiarised with its operation
and working. Young people between 16 and 18 years of
age can only work with the appliance under adult
supervision.
An exception includes youngsters operating the appliance
within their professional education to achieve necessary
skills under trainer's supervision.
Training
Using the appliance requires only corresponding instruction
by a professional or reading the Operating Instructions. No
special training necessary.
Transport and storage
•
The appliance must be cleaned thoroughly and kept
out of reach of unauthorised persons when stored for a
longer period of time.
•
Secure the appliance against turnover before every
transport.
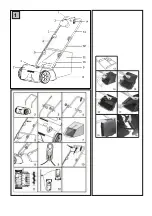
Assembly/first starting up
Some parts are dismantled in the verticutter/aerator supply
to make transport easier. Screws, wheels, plastic hand
wheels, cable clamps and screwdrivers are in a plastic bag.
The appliance can be easily assembled by following the
instructions below:
Handle post assembly
•
Take the verticutter out of the container.
•
Insert the bottom post with the handle in holes on
the verticutter
(pic. 2)
•
Now press the middle connecting post to the
bottom post and screw both parts together using
star screws (included in the supply). You can
choose from three different holes of the middle
connecting post when the required height is
adjusted
(pic. 3)
.
•
Insert the connecting cable pull relief in the upper
part of the post with handle. Then press the upper
connecting post to the middle post and screw
both parts together using star screws (included in
the supply
(pic. 4)
.
•
Fix the cable from the 2-point safety switch to the
engine with the attached cable clamps to the
upper parts of the post with handle
(pic. 5)
.
Verticutter height calibration
•
Adjust the verticutter height by turning the adjusting
screw
(pic. 6).
•
Turn the adjusting screw to the required position and
adjust the appropriate verticutter height.
Collection container assembly
•
Connect the cloth container with the metal frame
(pic.
7, 8) (pic. 13-19)
and fasten tightly with plastic
container clamps on the metal frame.
•
Open the rear cover and hang the collection
container on the holding rod on the cover using two
hooks
(pic. 8) (pic. 13-19)
Connecting cable pull relief
•
To prevent accidental pull-out of the connecting cable
from the 2-point safety switch, please make sure the
connecting cable is correctly fastened to the cable
pull relief
(pic. 9, 10).
Knife shaft change
•
The appliance has two functions. The verticutter knife
is assembled on the appliance. The aerating shaft is
included in the supply. The shaft can be changed by
you. Proceed as follows:
•
Loosen the two screws first
(pic. 11a)
and remove
the existing knife.
•
Insert a new knife and fasten it with screws.
Verticutter starting up
•
Before aerating, make sure the knife or its connecting
elements are not damaged in any way. Replace any
damaged knife if necessary.
•
Switch off the engine and disconnect the electric
cable before inspecting the appliance. To prevent
unintentional verticutter starting up, the 2-point safety
switch is fitted with a safety button
(pic. 10/A)
that
must be pressed before the switch lever is released
(pic. 10/B)
.
•
When releasing the switch lever the button must be in
the original position.
•
Make sure the extension cable is not within reach of
steel springs. Press the safety switch and pull in the
switch lever
(pic. 10).
•
This step needs to be repeated several times before
aerating to make sure everything works properly.
WARNING!!! You must unconditionally wait
until the steel springs stop rotating and are idle for
any adjustment, maintenance or repairs of your
verticutter/aerator. The verticutter must
unconditionally be unplugged before these works.
Operation and adjusting
Adjust the appliance only when the plug is
disconnected otherwise there is a high risk of injury.
Aerating
•
Select the working height suitable for the actual grass
height.
•
Prevent situations when the extension cable cannot
move freely
(pic. 12).
•
Move the appliance at appropriate speed. Do not
move it too fast to prevent the ejection hole from
getting blocked and engine from useless overloading.
•
Never
work with the appliance when raining and on
wet grass.
11
Summary of Contents for 94121
Page 2: ...1 6...


