


C. Pairing your Sensors with a Receiver
3
4
UserManual_Page 1_v5_04.25.14_actual size.indd 3
4/25/2014 4:29:38 PM
1.
Press and hold the “Learn” button
on your receiver until zone 1 starts to
flash.
2.
If pairing your sensor to zone 1,
you can skip this step and continue to
step 3. If pairing a zone other than
zone 1, press “Next” until the zone
you wish to pair your sensor with is
flashing. Each zone can be paired
with up to four (4) sensors.
3.
Press “Melody” to choose the
melody you wish to play when the
sensor is triggered.
There are a total
of 32 melodies to choose from.
Melody select sequence:
Melody 1
Melody 2
...
Melody 32
Melody 1
4.
After you hear the melody you
want, activate the sensor you wish to
pair by slowly walking past or waving
your hand at least one foot from the
eye. The receiver will BEEP when
successfully paired. Once you hear
this beep exit Learn mode by holding
down the “Learn” button until all
zones stop flashing.
NOTE: If you accidentally activated your sensor before step 4 you will have to
reset your zone then repeat section C. See the “Helpful Tips” section on page 6
for directions on resetting your zone.
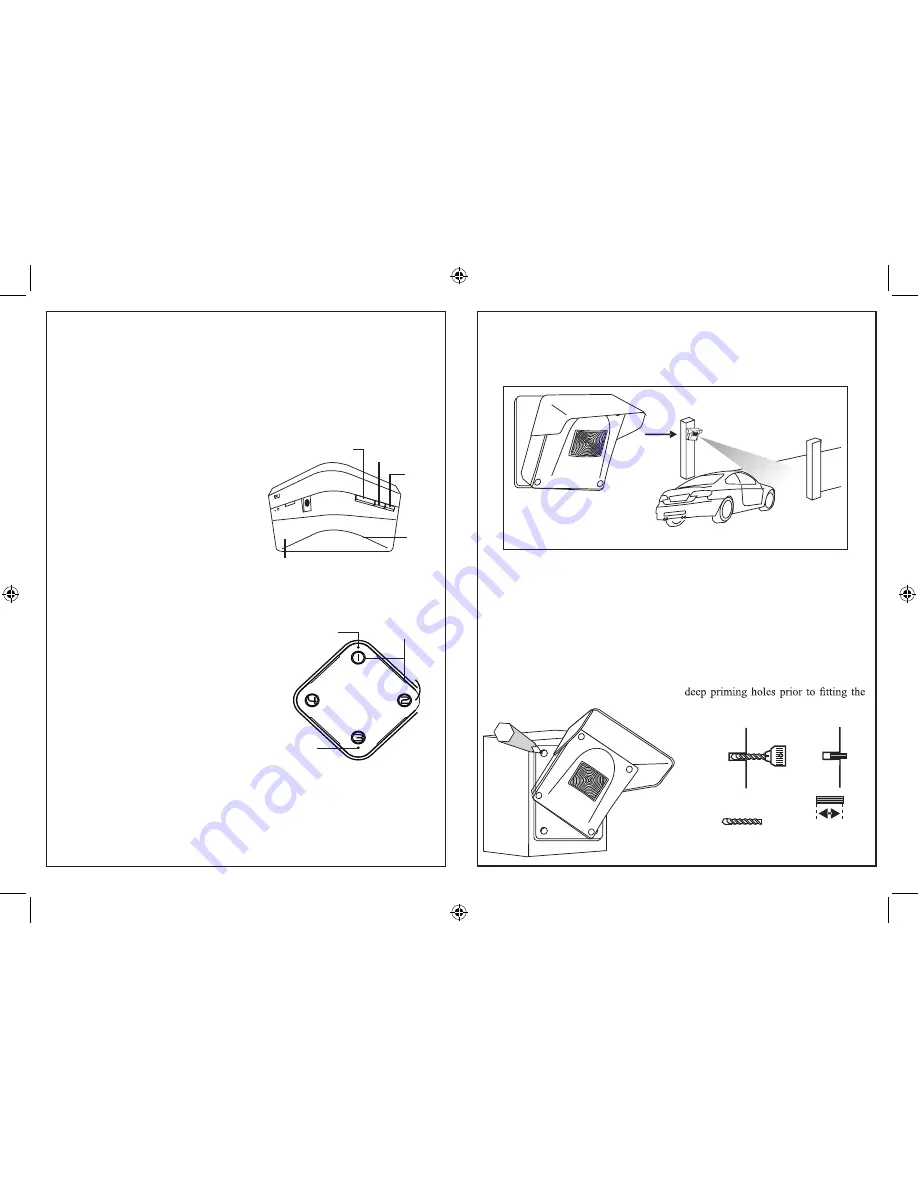
MAIN LED
AC Power On/
Receiver Battery
Low
Zone #
Indicators
Low Sensor
Battery LED
Battery Compartment
Relay
Cable
Learn/
Next
Melody/
Battery Check
Pause/Reset
Example of how to install sensor on a driveway post.
D. Installing your Sensor
It is recommended that the motion sensor be mounted at least 3 feet from
the ground on a sturdy,
non-metal
surface (i.e. a wall or stiff post) with
the “eye” pointed toward and slightly down at the target sensing area.
Your sensor(s) need to be paired with a receiver before your system will
function. Have your sensor and receiver nearby and ensure the sensor is
TURNED AWAY FROM YOU until step 4. Activating your sensor before
step 4 can result in your sensor being paired with the incorrect settings.
Follow the steps below to pair your sensor(s) and receiver.
7mm
drill bit
25mm
hole
1. Mark the mounting surface with a
pencil using the four mounting holes
on the sensor mount as a guide.
2.
Recommended:
Use an electric drill
with a 7mm drill bit to create 25mm
screws. This will help prevent stripping
of the screws.
To install your sensor(s), follow the instructions below.
Tools you will
need for installation:
- a pencil
- a Phillips screwdriver
- electric drill & 7mm electric drill bit (
recommended
)