background image

VIDEO OUT


Power Source

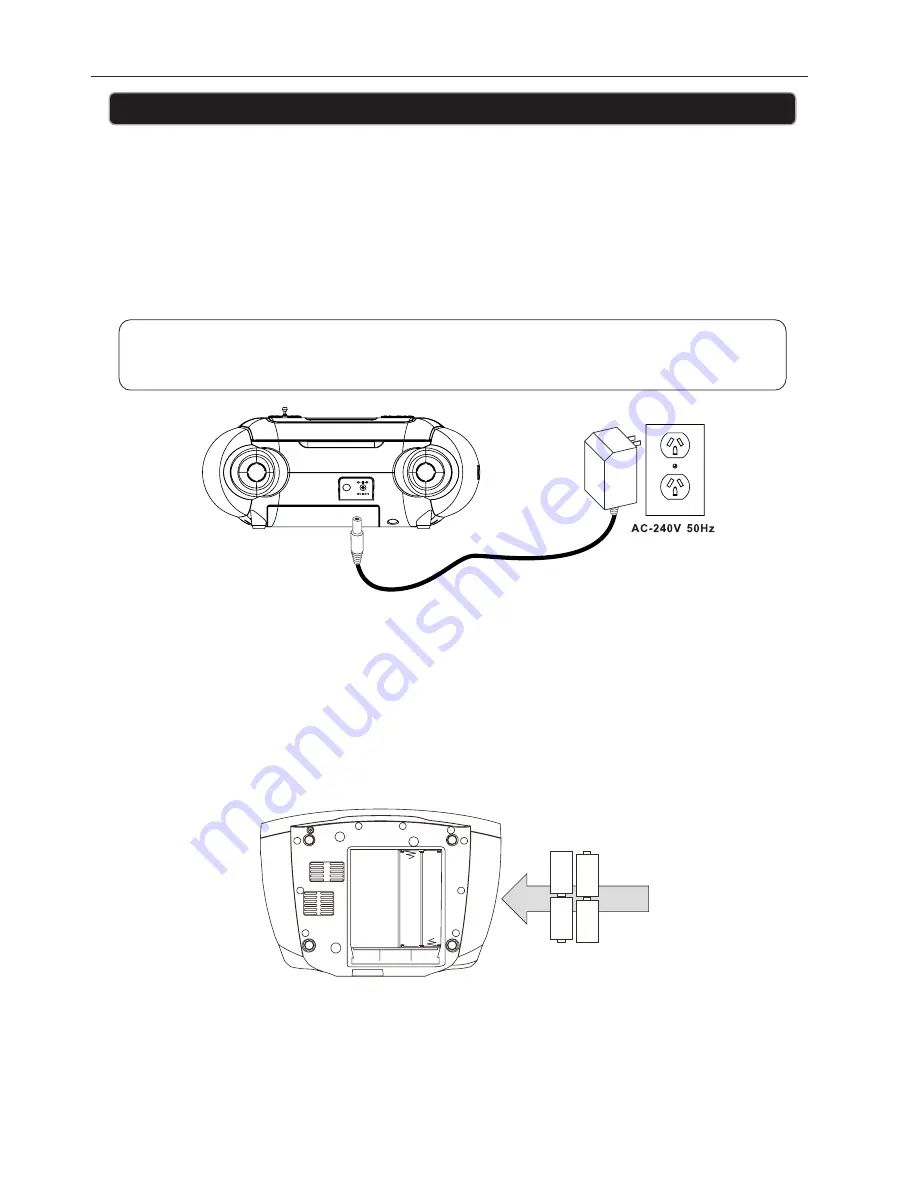
This unit comes with an AC Power Adaptor. Please follow the steps below on how to connect the 
power adaptor.

1.
2.

3.

Connect the AC Adaptor plug to the rear of the unit. 
Then connect the AC Adaptor to your mains power outlet. Make sure you turn the power on 
at the wall outlet before turning on the unit.
To turn the unit on or off you will need to press the Power Button. To turn the unit off 
completely you must turn the power off at the wall outlet.  

1.
2.

Please disconnect the power if you plan to not operate the unit for a long period of time. 
Do not connect the power or operate this unit with wet or damp hands.

CAUTION

Battery Operation


Before installing the batteries (not included), ensure that the mains power is disconnected. 
Then remove the battery compartment cover on the back of the unit by carefully pushing the 
batteries cover off. Then insert 4 x 1 .5V C-size batteries (not included) by matching the polarity 
markings outlined inside the battery compartment.  Then replace the cover. 

Power

7

GBB106IP

Summary of Contents for GBB106IP

Page 1: ......

Page 2: ...nt Your safety and the safety of others is important Please therefore ensure you read the Important Notes before you operate this unit Warranty In the unlikely event that your product fails to work no...

Page 3: ...he unlikely event of the product requiring repair Boombox with Dock for iPhone CONTENTS Introduction What s in the box Important Notes Location of Controls Control Definitions Power Setting the Time S...

Page 4: ...les with items such as tablecloths or curtains etc This may cause the unit to overheat No naked flame sources such as candles should be placed on or near the unit Do not place objects filled with liqu...

Page 5: ...Location of Controls 1 10 7 3 8 11 2 9 5 6 12 13 4 VIDEO OUT 5 GBB106IP AUX IN...

Page 6: ...usic devices line in cable not included DC POWER INPUT Allows to connect the unit to the power adapter ROTATING DOCK FOR iPod and iPhone Allows you to rotate the view of your iPod or iPhone so you can...

Page 7: ...ompletely you must turn the power off at the wall outlet 1 2 Please disconnect the power if you plan to not operate the unit for a long period of time Do not connect the power or operate this unit wit...

Page 8: ...Cable not included 1 2 3 4 Connect a 3 5mm Auxiliary Cable to the Audio Input on the unit and to the Audio Output on the audio device you wish to play Press the IPOD AUX IN FM Button to select Aux In...

Page 9: ...ou would like to set Press and hold the MEM CLOCK Button and the first preset number will be displayed on screen P01 Press the SKIP SEARCH Buttons to scroll through the preset numbers Then press the M...

Page 10: ...Video Output Select and turn on the TV OUT option on your iPhone iPod Insert your iPhone iPod on to the dock and turn the unit on Select the Video Input option on your TV or Monitor You will now be a...

Page 11: ...one is not connecting Disconnect the unit from the power supply for a Makes sure your Headphones are not connected Check the volume level and adjust few minutes Reconnect it and try again Make sure th...

Page 12: ...the failure does not amount to a major failure the Grundig warranty number 1800 509 394 Australia or 0800 450 259 New Zealand and have your receipt of purchase on hand This warranty is subject to the...

Page 13: ...PO BOX6287 Silverwater NSW1811 www grundig net au GBB106IP...

Reviews: