Grundig DMS601 IP Instruction Manual Download Page 18

The OSD on a connected TV shows system information and allows you to 
interact with the system in a variety of ways. In particular it allows you to easily 
navigate devices with large numbers of files, folders different file types, and to 
control system settings. In order to use the OSD you must have a TV connected 
to the system. Please refer to page 12 for details of connecting a TV.

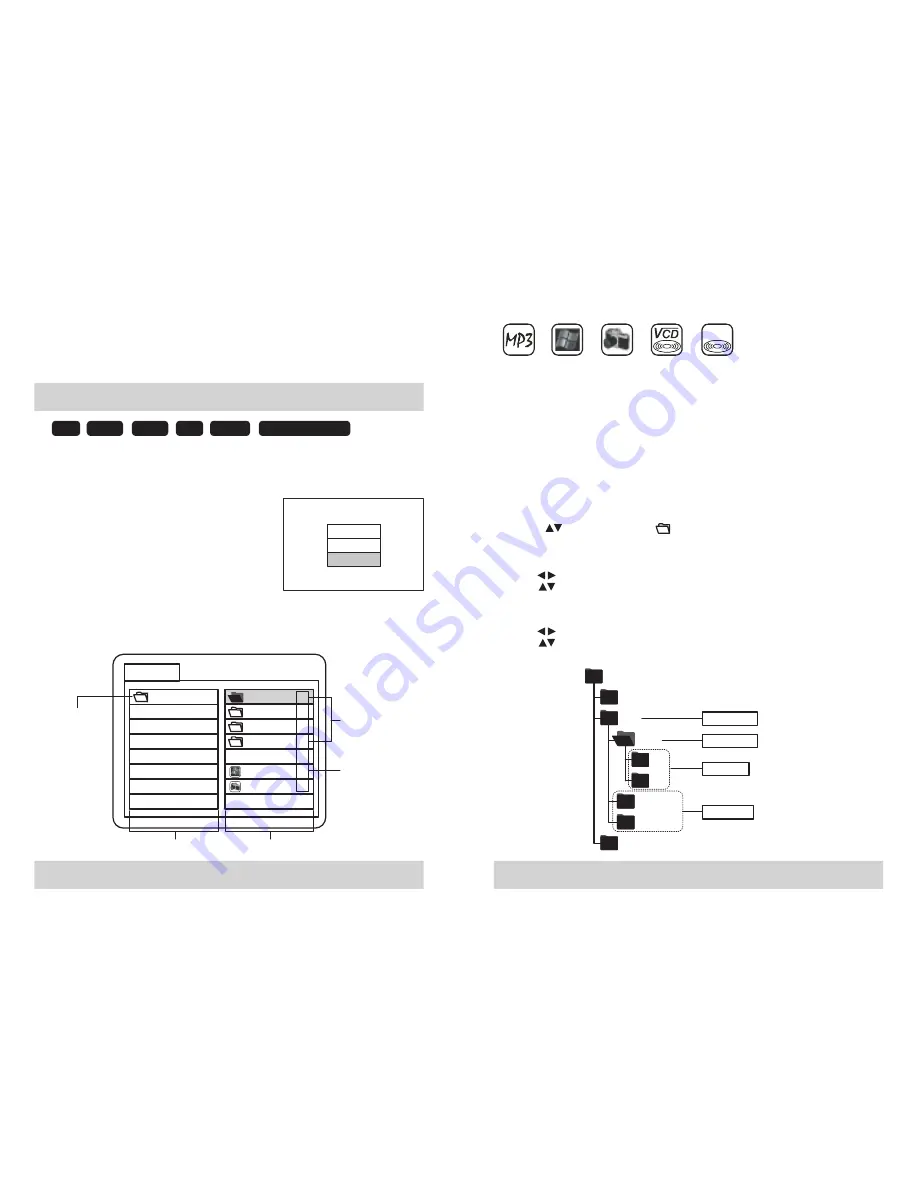
NAVIGATING DISCS AND FLASH DEVICES

CD

DVD

USB

SD

MMC

Memory


Stick

DVD


DRIVE

SD


CARD

USB


DEV

USB


DEV

DIRECTORY

LEFT


WINDOW

RIGHT


WINDOW

FOLDERS

ROOT

Mp3

IMAGES

WMA

0

1

2

3

4

5

6

TRACK
NUMBERS

Mp3


FILE01

FILE02

FILE03

Selecting a Device

If only one device is inserted it will be automatically detected. If more than one 
device is inserted you may select which device to access: 
•  Make sure this disc tray is closed
•  Press STOP
•  Press GOTO/TU MODE. A list of connected 

devices is shown on the connected TV.

•  Use the arrows to select the device you wish to 

access.

•  Press ENTER to select.

Folder and File Navigation

Once a storage device is installed and selected, you will see a folder structure on 
the screen, similar to that below.

Mp3

Windows

Media

Audio

/

Video

JPEG
Image

VCD

DVD

MPEG

 2

The system cannot recognise file types other than those listed above.

Note:

•  File names can be any length but only the first 8 characters will display.
•  Only letters of the alphabet and numbers will display properly.

To move about within the OSD, follow the steps below. Folder selections can only 
be made in stop mode.

To select the parent folder:

Press the           buttons to select        ..
Press 

ENTER

.

To select the peer folder:

Use the            buttons to highlight left window.
Use the            buttons to select the desired folder.
Press 

ENTER

.

To select the sub folder:

Use the            buttons to highlight right window.
Use the            buttons to select the desired folder.
Press 

ENTER

.

Root

JPEG

Mp3

Parent


folder

Music

Current


folder

1st

2nd

Song


File 1

Song


File 2

Sub


folders

Peer


folders

Song


File 3

This unit uses different icons to represent different file types:

32

33

Summary of Contents for DMS601 IP

Page 1: ...DMS601 IP The Gold Technical Support Line 1902 215 258 Personal Product Support Charges will apply at 2 95 per minute DVD Micro System with Universal Dock for iPod...

Page 2: ...ors and found to be in perfect working order before it left our factory However there is always the chance that some problems may occur because of rough handling during shipment If after reading this...

Page 3: ...amp lifiers that produce heat CAUTION HAZARDOUS LASER RADIATION WHEN OPEN AND INTERLOCK FAILED OR DEFEATED AVOID EXPOSURE TO BEAM CLASS 1 LASER PRODUCT CAUTION TO PREVENT FIRE OR SHOCK HAZARD DO NOT U...

Page 4: ...use damage to the memory card or the unit Do not attempt to insert these unsupported cards Compact Flash Type I and Type II MicroDrive Smart Media xD Picture Card Discs that this system cannot play Su...

Page 5: ...mpliant and physically compatible devices cannot be guaranteed in all situations This is not an indication of a problem with your player If you wish to play back songs stored on an iPod shuffle please...

Page 6: ...ckers from the front panel of the unit Do not remove any labels or stickers that may be affixed to the back panel of the main unit of the speakers Insert two AAA batteries into the remote control whil...

Page 7: ...the display Set video out to S VIDEO using on screen setup 1 Press SETUP 2 Use to select PREFERENCES 3 Press ENTER 4 Use to select VIDEO OUTPUT 5 Press ENTER 6 Use to select S VIDEO 7 Press ENTER Bes...

Page 8: ...fine wooden furniture Consult your TV User Manual to find out if your TV supports Progressive Scan If Progressive Scan is supported follow the TV User Manual instructions to enable Progressive Scan i...

Page 9: ...ER 0 9 10 4 SUBTITLE 5 NAVIGATION ENTER 6 ANGLE P SCAN 7 STEP 8 VOLUME 9 TUNER BAND 10 PROGRAM A MEMO 11 A B PRESET UP 12 RANDOM 13 REPEAT FM MODE 14 SLOW 15 FUNCTION 16 PRESET EQ 17 DBBS 18 PRESET SE...

Page 10: ...s may be useful when you are trying to locate a specific song but you do not remember the track number AUDIO CONTROLS Volume Controls To increase or decrease the system volume Press the VOLUME or VOLU...

Page 11: ...ory Stick flash memory card devices and from USB flash memory devices Playback of media from USB connected devices such as MP3 players that generally require drivers for interaction with a PC is not s...

Page 12: ...red Failure to use the correct adapter may cause damage to the memory card or the unit Only one type of memory card can be inserted at one time ACCESSING DISCS AND FLASH DEVICES CD DVD USB SD MMC Memo...

Page 13: ...anced controls require use of the OSD and are discussed in detail in section On Screen Display To begin playback Press the PLAY PAUSE button Press again to resume normal playback Note This unit will n...

Page 14: ...s 1 Press the ZOOM V MODE button to select ZOOM 2 2 Use the buttons to move the enlarged picture up down left or right 3 To resume normal playback press the ZOOM V MODE button again To play a track re...

Page 15: ...ave a large number of files on one storage device using the OSD will help you navigate more easily Please refer to section On Screen Display JPEG PLAYING MPEG4 VIDEO FILES This unit can play a variety...

Page 16: ...ophone ON adjust the volume control to a reasonable level and begin singing into the microphone Playback controls are the same as any other media format CHOOSING THE CORRECT ADAPTER When connecting an...

Page 17: ...t or remote The music playback will start You can control all of the iPod s functions including menu navigation from the remote control and to select tracks play pause and stop and from the main unit...

Page 18: ...arrows to select the device you wish to access Press ENTER to select Folder and File Navigation Once a storage device is installed and selected you will see a folder structure on the screen similar to...

Page 19: ...next track in your playlist There is no need to press any other key to advance to the next position in the program 5 Continue entering track numbers until your playlist is complete For example to prog...

Page 20: ...on or use the numbered buttons to enter the memory location of the preset station 1 Press TUNER BAND repeatedly to select the MW or FM band 2 Press the A MEMO button on the remote twice AUTO MEM will...

Page 21: ...n press the button to select volume level 15 Press the ENTER button again to complete the source and volume setting 16 Press the TIMER SNOOZE button to activate the timer and TIMER ON appears on the d...

Page 22: ...tting is ON GENERAL PAGE PIC MODE ANGLE MARK OSD LANG CAPTIONS SCREEN SAVER GENERAL SETUP AUTO FILM VIDEO SMART SUPER SMART MAIN PAGE SETUP MENU MAIN PAGE GENERAL SETUP AUDIO SETUP VIDEO SETUP PREFERE...

Page 23: ...lects the type of television MULTI SYSTEM Automatic self selecting television sets NTSC If the connected TV uses NTSC system select this mode It will change the video signal of a PAL disc to output in...

Page 24: ...system s speakers Line Output Jacks This system includes a pair of line outputs on the rear panel labeled LINE OUT You may connect an external amplifier or recording device as shown below Connect as s...

Page 25: ...Output 3 Tuner FM Tuning range MW Tuning range Preset memory stations Semiconductor 60 dB 1 KHz 0 dB 0 5 1 KHz 0 dB Immeasurable CD CD R CD RW DVD DVD R DVD R DVD RW DVD RW VCD SVCD PCM MP3 WMA Dolby...

Page 26: ...New Zealand and have your receipt of purchase on hand This guarantee is subject to the following provisions It is only valid within boundaries of the country of purchase The product must be correctly...

Reviews: