background image

­49

ENGLISH

SPECIAL­SETTINGS

­----------------------------------------------------------------------------------------------------------

Searching­for­digital­television­

channels­from­a­satellite­manu-

ally

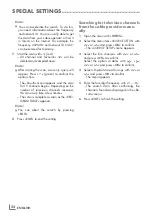
If you know the parameters of a new  television 

channel,  you  can  also  search  for  it  manually. 

 Current  transponder  data  can  be  found  in  the 

teletext,  in  satellite  TV  magazines  or  on  the  

Internet.

1

  Open the menu with »

MENU

«.

2

  Select the menu item »SOURCE SETUP« with 

»

V

« or »

Λ

« and press »

OK

« to confirm.


–  The »SOURCE SETUP« menu appears.

3

  Select the line »Digital Manual Tuning « with 

»

V

« or »

Λ

« and press »

OK

« to confirm.


–  The menu appears.

4

  Select  the  line  required  for  the  parameters 

with »

V

« or »

Λ

«.


–  »Frequency  (MHz)«:  Enter  the  five-digit 

 frequency with »

1­...­0

« .


–  »Symbol  Rate  (kS/s)«:  Enter  the  five-digit 

symbol rate with »

1­...­0

« .


–  »Polarization«: Use »

<

« or »

>

« to set the 

polarisation to »Horizontal« or »Vertical«.


–  »Network Search«: use »

<

« or »

>

« to se-

lect the option »On« or »Off«.


–  »Scan  Mode«:  Use  »

<

«  or  »

>

«  to  select 

whether you want to search for unencrypt-

ed (Unencrypted) channels only, encrypt-

ed (Encrypted) channels only, or for both 

(Unenc Encrypted).


–  »Service Type«: Use »

<

« or »

>

« to select 

whether you want to search for television 

channels  only  (TV),  radio  stations  only 

 (Radio), or both (Radio + TV).

5

  Start the scan with »

« (red).


–  The »Results« menu appears, and the scan 

for TV channels begins.

Note:

7  

You  can  abort  the  search  by  pressing 

»

EXIT

«.

6

  Press »

EXIT

« to end the setting.

LNB­settings

Notes:

7  

The following description about the LNB 

settings premise a substantial expertise 

about the satellite systems. Ask your 

specialist dealer.

7  

Your TV supports SCR system (Satellite 

Channel Router). If you are using SCR 

satellite system, follow the steps described 
in »LNB Type« section.

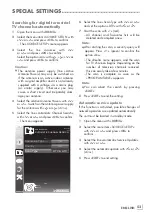
1

  Open the menu with »

MENU

«.

2

  Select the menu item »SOURCE SETUP« with 

»

V

« or »

Λ

« and press »

OK

« to confirm.


–  The »SOURCE SETUP« menu appears.

3

  Select the line »Antenna Settings« with »

V

« 

or »

Λ

« and press »

OK

« to confirm.


–  The  »ANTENNA  SETTINGS«  menu  ap-

pears.

4

  Select  the  line  required  for  the  parameters 

with »

V

« or »

Λ

«.


–  »Satellite«:  »Press 

OK

«,  select  a  satellite 

with  »

<

«,  »

>

«,  »

V

«  or  »

Λ

«  and  press 

»

OK

« to confirm.


–  »Transponder«: »Press 

OK

«, select a tran-

sponder with »

<

«, »

>

«, »

V

« or »

Λ

« and 

press  »

OK

«  to  confirm.  Use  »

«  (red)  to 

add  a  transponder,  use  »



«  (green)  to 

delete it, or use »



« (yellow) to change 

transponder data.


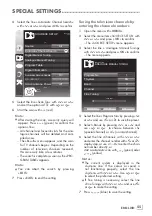
–  »LNB Power«: Set the LNB power supply 

(depending on the type of LNB) to »Off« 

»13/18 V« or »14/19 V« with »

<

« or »

>

«.


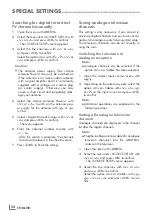
–  »LNB Type«: Select the LNB type used 

in the satellite system with »

<

« or »

>

«. If 

you are using a satellite antenna with an 

Single Cable Distribution multiswitch, select 

the setting »Grundig SCR«. After it, please 

perform the »User Band«, »KB Frequency« 

and »LNB Selection« settings in the 

submenus. The necessary parameters you 

will get from the operator of the satellite 

antenna. Use only this specification!


–  »LNB Selection«: If more than one 

satellites are used in the current SCR 

system, select »1/2« to»2/2« for the 

satellite corresponding to the relevant 

positions using »

<

« or »

>

« buttons.

Summary of Contents for 40 VLE 565 BG

Page 1: ...EN 40 VLE 565 BG ...

Page 2: ...pping function 26 Electronic TV guide 27 Changing the picture format 28 USB OPERATION 28 File formats 29 Connecting external data media 29 Removing the external data media 30 The file browser 30 Settings in the USB setup menu 31 Basic playback functions 32 Additional playback functions 34 TELETEXT OPERATION 34 TOP text or FLOF text mode 34 Additional functions 35 CONVENIENCE FUNCTIONS 35 Opening t...

Page 3: ...motorised antennas DiSEqC 1 2 53 Searching for digital terrestrial TV channels automatically 54 Searching for digital terrestrial TV channels manually 54 Tuning analogue television channels 56 Changing stored analogue channels 57 Displaying signal information 58 INFORMATION 58 Product Fiche 58 Other information 59 Service information for dealers 59 Environmental note 59 Note for the Product Packag...

Page 4: ...ime to time 7 Never open the television under any circum stances Warranty claims are excluded for damage resulting from improper handling 7 Make sure the power cord or the power sup ply unit if provided are not damaged 7 Only operate the television with the power supply power cord provided 7 Thunderstorms are a danger to all electrical devices Even when the television is switched off it can be dam...

Page 5: ...er 7 Only replace the exhausted batteries with those having the same model value and prop erties 7 By ensuring proper disposal of these batteries you will have contributed in prevention of po tential hazards on the environment and human health that may arise from inappropriate dis posal of the batteries 7 This is a Class A product During operation the device could cause radio interference In this ...

Page 6: ...ION Receiving digital channels 7 You require a satellite antenna to receive digital satellite channels DVB S S2 7 You require a digital roof antenna or indoor antenna passive or active indoor antenna with its own power supply to receive digital television channels DVB T 7 If you wish to receive digital television chan nels via your cable system DVB C the an tenna cable for your cable operator must...

Page 7: ...or timer func tions 7 The television set uses less energy when the brightness is reduced Notes on still images Watching the same image for a long time on the screen may cause a still image remains feebly on the background Feeble image s on the back ground is originated from LCD LED technology and does not require any action under guaran tee To avoid such cases and or minimize the impact you may ob...

Page 8: ...op antenna to the antenna socket ANT IN on the television set or 2c To receive analogue TV channels connect the cable for the rooftop antenna to the an tenna socket ANT IN on the television set Note 7 When connecting an indoor antenna you may have to try it out at different positions until you get the best reception 3 Plug the power cord of the power adapter into a wall socket Notes 7 Before plugi...

Page 9: ...ronmental note 7 This symbol on recharge able batteries batteries or on the packaging indicates that the rechargeable bat tery battery may not be disposed of with regular household rubbish For certain rechargeable batteries batteries this sym bol may be supplemented by a chemical symbol Symbols for mercury Hg or lead Pb are provided if the rechargeable batter ies batteries contain more than 0 0005...

Page 10: ...cket for audio output optical for PCM AC3 signals For connecting digital AV amplifiers or AV receivers Audio Socket for audio input for a PC Sockets for audio input YUV signal PC IN VGA socket video input for PC Sockets for video input YUV signal USB2 USB socket for external data media HDMI3 HDMI socket audio video input HDMI2 HDMI socket audio video input ...

Page 11: ...B1 USB socket for external data media without a power supply of their own HDMI1 HDMI socket audio video input CI Common Interface Slot Controls on the television set 8 I Switches the television on and back into standby mode Adjusts the volume Selects channels in steps V P Pre selection for volume or chan nel selection Switches the television on from standby Adjusts the volume Selects channels in s...

Page 12: ...hannel in steps Adjusts the volume Navigation in the menus Moves the cursor up and down in the menus Moves the cursor to the left and right in the menus Activates various functions and save functions settings Exit the menu Opens the channel list Switches on from standby Selects channel directly Selects the channel list All FAV 1 to FAV 4 Opens the HDMI CEC De vice List Opens the selection menu to ...

Page 13: ...ile browser 3 Stops scrolling through pages in teletext starts a fast reverse search in the file browser 4 Reveals answers in teletext starts a fast forward search in the file browser 8 Starts playing a programme from an external data medium Freeze frame if no external data medium is connected playback pause 7 Ends playback of a programme from an external data medium splits the screen in teletext ...

Page 14: ...nels in the chapter Special functions starting on page 54 7 Further settings for digital television chan nels after the initial set up can also be found in the chapter Special Settings starting on page 48 Note 7 Make the language and country selection for all types then continue reading the respective chapter Selecting language country and operating mode 1 Switch on the television set from standby...

Page 15: ...sion channels received this can easily take a few minutes The scan is complete as soon as the PRO GRAM TABLE appears Note 7 You can abort the scan by pressing EXIT Advanced installation 1 In the Source Setup menu in the Connec tion Type line select the option Satellite with or 2 Select the line Advanced Installation with V or Λ and press OK to confirm The menu appears Satellite ASTRA 19 2 E Transp...

Page 16: ...h Radio TV Note 7 It is possible that some TV channels tran sponders cannot be found This is caused by a change in satellite parameters made by the broadcaster e g new channels have been added Set the Network Search op tion to On 11 Start the scan with red The Results menu appears and the scan for TV channels begins Depending on the number of television channels received this can easily take a few...

Page 17: ...channels from the cable provider DVB C 1 In the Source Setup menu in the Connec tion Type line select the option Cable with or 2 Select the line Scan Type with V or Λ Use or to set the required scan type DTV scan for digital television channels ATV scanforanaloguetelevision channels ATV DTV scan for analogue and digital television channels 3 Select the line Cabel Scan Type with V or Λ Select the p...

Page 18: ...ith V or Λ and press OK to confirm The SOURCE SETUP menu appears 3 Select the line Programe Table with V or Λ and press OK to confirm The menu PROGRAM TABLE appears Important 7 Programe table and favourites lists are saved separately according to the different input sources satellite cable air 7 When opening the program table the respec tive channel list for the current input signal appears Notes ...

Page 19: ...o gram table according different criteria 1 In the PROGRAM TABLE menu select the Sort mode by pressing blue 2 Select the sort criteria for satellite channels with red green or yellow or sort digital television channels from the cable provider with blue 3 Quit the program table with EXIT Skipping channels You can mark television channels which should be skipped when selecting with Λ or V It is stil...

Page 20: ...epeat steps 2 and 3 if you would like to change other channels within the same favourites list 7 Repeat steps 1 to 3 if you would like to change channels in a different favourites list 4 Exit the current favourites list with blue The entire programe table will appear again 5 Quit the program table with EXIT SETTINGS Enter own names for the favourites lists max 6 characters You can enter own names ...

Page 21: ...s OK to confirm Notes 7 You can only select the Mpeg NR function on digital and AV presets Mpeg NR reduces any interference from artefacts pixel blocks from digital programmes due to MPEG compression such as from DVB T receivers or DVD players 7 The Film Mode detects and processes feature films automatically for all channel sources This means you will always receive an optimal picture This functio...

Page 22: ...he same when you switch between channels 1 Select the line AVL with V or Λ and select the option On with or Note 7 If the SRS TSHD setting has been selected in the Audio Mode line the AVL line can not be selected Stereo two channel sound mono If the device receives two channel sound pro grammes e g a film with the original soundtrack on audio channel B display Dual II and the dubbed version on sou...

Page 23: ...ound Medium as User 1 Select Equalizer with V or Λ and press OK to confirm The EQUALIZER menu appears Note 7 If the SRS TSHD setting has been selected in the Sound Mode line the Equalizer line will not indicate 2 Select the frequency bandwidth 120Hz with V or Λ Set the preferred value with or 3 Set the next frequency bandwidth with V or Λ and repeat the setting 4 Press to save the setting Audio de...

Page 24: ...f pro grame tables The overview is displayed 2 Select a channel list with Λ or V and open it with OK 3 Select a television channel with V Λ or and press OK to confirm 4 Press EXIT to exit the channel list Selecting a preset AV channel 1 Open the Select Source menu with 2 Select an AV preset with V Λ or and press OK to confirm 3 Use 1 0 to switch back to the television channel Adjusting the volume ...

Page 25: ...n the selection menu with 2 Select the subtitles with V or Λ and press OK to confirm TELEVISION OPERATION Zoom function This function allows you to enlarge the picture as required 1 Open the Tools menu with TOOLS 2 Select the menu item Zoom with V or Λ 3 Press OK repeatedly to enlarge the display in three steps Eco mode This function allows you to reduce the power consumption 1 Open the Tools menu...

Page 26: ...urrent schedule but do not offer detailed descrip tions 7 There are broadcasters which do not pro vide any information at all 2 Press V or Λ to select a television channel Today s programmes on the television channel selected are displayed 3 Switch to the information about the current programme with Notes 7 You can open and switch off the extensive programme information with 7 You can can added th...

Page 27: ...t The picture is shown in 4 3 format LetterBox format The letterbox format is especially suitable for programmes in 16 9 format The black borders which are usually at the top and bottom of the screen are eliminated 4 3 pic tures fill the screen The transmitted pictures are enlarged but are slightly cropped at the top and bottom The pic ture geometry remains unchanged Subtitle format If you cannot ...

Page 28: ...Level 3 and is based on the MPEG 1 standard which was developed by the MPEG Motion Picture Expert Group AAC stands for Advanced Audio Coding and was also developed by MPEG AAC provides better sound quality at an identical data rate These formats allow audio files to be recorded and played which sound as good as a CD while taking up only a fraction of the memory space File name extensions which are...

Page 29: ...e disconnect ed from the television set while files on the data medium are being accessed 7 A bi directional data transfer as defined for ITE Information Technology Equipment devices in EN 55022 EN 55024 is not possible 7 USB transfer is not in itself an operating mode It is only an additional function 1 Press 8 1 0 or P or P to switch on the television from standby mode 2 Connect the USB1 socket ...

Page 30: ...item SOURCE SETUP with V or Λ and press OK to confirm The SOURCE SETUP menu appears Note 7 Additional functions are explained in the following sections Switching on automatic preview If this function is switched on a preview of the selected file then appears in the file browser 1 Select the line Auto Preview with V or Λ 2 Switch on the function with or On 3 Press EXIT to end the setting Selecting ...

Page 31: ...ic playback functions 1 Select the data medium by pressing use V Λ or to select the option USB and press OK to confirm The file browser appears 2 Select the file format video files audio files picture files with V or Λ 3 Switch to the folder file list with OK Note 7 USB data medium with several partitions is connected to the USB sockets the letter for the respective drive e g C appears behind the ...

Page 32: ...I format are sup ported The names of the subtitle and film files must be identical Otherwise no subtitles will be shown Additional playback functions Depending on the file format the following additional functions are available Selecting chapters on DivX files only video files 1 During playback select the next chapter with 2 During playback select the previous chapter with Note 7 You can also sele...

Page 33: ...files only You can select different speeds 2 fold 4 fold 8 fold 16 fold and 32 fold forwards and back wards 1 Select the playback speed during playback with 3 or 4 2 Press 8 to resume normal playback Rotating pictures picture files only You can rotate pictures by 90 1 During playback press or to rotate the pictures by 90 Repeat functions Options One Repeat the current track will be repeated All Re...

Page 34: ...soon as the page is found the page number is displayed 2 Press 6 to switch to the teletext page Enlarging the character height If you have difficulty reading the text on the screen you can increase the character height 1 To enlarge the character height of a teletext page keep pressing 5 Page hold A multiple page may contain several sub pages which are automatically scrolled by the broad casting st...

Page 35: ...and press OK to confirm The Select Audio Language menu appears 2 Select the audio language with V or Λ and then use red to set it as the primary audio language or use green to set it as the secondary audio language The primary and secondary language is display at the top right in the menu 3 Press EXIT to end the setting Changing the subtitle language and subtitle mode only for digital television c...

Page 36: ...tive broadcaster However different channels may also use time bases which are different to those of your country e g foreign broadcasters In these cases reminders and planned recordings may be annulled due to the time difference Timer functions Entering the switch off time sleep timer In the Sleep Timer menu you can enter a time for the television to switch off After this time has elapsed the tele...

Page 37: ...ng CONVENIENCE FUNCTIONS Parental control settings Authorising programmes There are films which may be wholly or partially unsuitable for children These programmes contain information which marks the content or scenes with access levels of 4 to 18 You can select one of the access levels thereby authorising playback 1 Select the line Parental Guidance with V or Λ and press OK to confirm 2 Enter the...

Page 38: ...UP with V or Λ and press OK to confirm 3 Select the line Program Table with V or Λ and press OK to confirm The PROGRAM TABLE menu is dis played 4 In the PROGRAM TABLE menu switch over to the list view with yellow 5 Select the channel to be locked with V or Λ 6 Select the column Lock with or and press OK to lock the channel 7 Enter the PIN code 1234 with 1 0 The channel is marked using Note 7 To re...

Page 39: ...nd use or to select the option On The software will be updated automati cally as far as possible 2 Press EXIT to end the setting Restoring the television to the default settings This function allows you to delete the channel lists and all custom settings 1 In the SETTINGS menu select the line Restore Factory Defaults with V or Λ and press OK to confirm 2 Press green to confirm the warning message ...

Page 40: ...itched on and you then switch on the external device e g DVD player the appropriate HDMI preset on the television will be selected Selecting the menu language The television menu language is automatically selected on the external device e g DVD player The external device must support this function Switching off the external device automatically If you switch your television to standby the ex terna...

Page 41: ... device which has been connected 7 Try out which type of remote control opera tion the external device reacts to the best 7 Read about the scope of functions of the DIGILINK compatible device in the respec tive operating manual 6 Press EXIT to end the setting Switching the device to standby This option switches the external device to standby 1 Press use V Λ or to select the preset HDMI1 to HDMI3 a...

Page 42: ...epends on the sockets the external device is equipped with and the signals which are available 7 Please note With many external devices the resolution of the video signal must be adjusted to the input sockets of the television see the operating manual of the external device You can find out which values you need to set by referring to the guidelines in the sections about the various connection opt...

Page 43: ...on to the corresponding sockets of the external device with a suitable cable audio signal OPERATION USING EXTERNAL DEVICES using the SCART socket CVBS RGB signal 7 Suitable devices Digital satellite receiver DVD player recorder set top box games con sole video recorder decoder 7 Video signal CVBS RGB 7 Audio signal stereo analogue 7 AV1 preset 1 Connect the AV1 S VHS socket on the television and t...

Page 44: ...adphone jack 3 5 mm ø jack plug into the headphone socket on the left side of the television Changing the headphone volume 1 Open the menu with MENU 2 Select the menu item SOUND SETTINGS with V or Λ and press OK to confirm The SOUND SETTINGS menu appears 3 Select the menu item Audio Output Setup with V or Λ and press OK to confirm The Audio Output Setup menu appears 4 Select the line Headphone wit...

Page 45: ...em 1 Connect the U socket on the television to the corresponding socket of the AV receiver with an cable digital audio signal Note 7 If this function is not activated the audio sig nal is transmitted to the HiFi system AV re ceiver connected to U 3 5 mm ø jack plug into the headphone socket on the left side of the television 1 Open the menu with MENU 2 Select the menu item SOUND SETTINGS with V or...

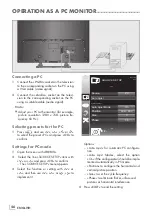
Page 46: ...h MENU 2 Select the line SOURCE SETUP item with V or Λ and press OK to confirm The SOURCE SETUP menu appears 3 Select the function or setting with V or Λ and then use V Λ or to implement it OPERATION AS A PC MONITOR Options Auto Ajust for automatic PC configura tion Auto Ajust Mode select the option On if the configuration should be imple mented automatically in PC mode Position to configure the h...

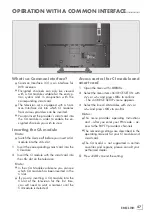
Page 47: ...ule with the smart card into the CI slot on the television Note 7 In the CA Module sub menu you can see which CA module has been inserted in the CI slot 7 If you are inserting a CA module into the CI slot of the television for the first time you will need to wait a moment until the CA module is detected Access control for CI module and smart card 1 Open the menu with MENU 2 Select the menu item SO...

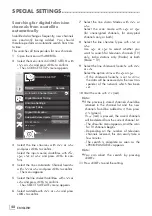
Page 48: ...K to confirm The SELECT SATELLITE menu appears 6 Select a satellite with V or Λ and press OK to confirm 7 Select the line Scan Mode with V or Λ Select the scan mode with or for unencrypted channels for encrypted channels only or both 8 Select the line Service Type with V or Λ Use or to select whether you want to search for television channels TV only radio stations only Radio or both Radio TV 9 Se...

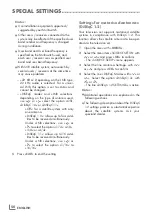
Page 49: ...tings Notes 7 The following description about the LNB settings premise a substantial expertise about the satellite systems Ask your specialist dealer 7 Your TV supports SCR system Satellite Channel Router If you are using SCR satellite system follow the steps described in LNB Type section 1 Open the menu with MENU 2 Select the menu item SOURCE SETUP with V or Λ and press OK to confirm The SOURCE S...

Page 50: ... to be received simultaneously Under LNB selection use or to select the option 1 4 2 4 3 4 or 4 4 DiSEqC 1 1 allows up to 16 satel lites to be received simultaneously Under LNB selection use or to select the option 1 16 to 16 16 5 Press EXIT to end the setting SPECIAL SETTINGS Settings for motorised antennas DiSEqC 1 2 Your television set supports motorised satellite systems in compliance with DiS...

Page 51: ...on Store Stored Position The current anten na alignment is saved Limit Position Defines the range in which the antenna may move Use to set the western limit use to set the eastern limit Reset DiSEqC 1 2 Limit Resets the limit position of the antenna 3 Press EXIT to end the setting Searching for television chan nels from the cable provider automatically 1 Open the menu with MENU 2 Select the menu i...

Page 52: ...ision channels received this can easily take a few minutes The scan is complete as soon as the PRO GRAM TABLE appears Note 7 You can abort the search by pressing EXIT 8 Press EXIT to end the setting Searching for television channels from the cable provider manu ally 1 Open the menu with MENU 2 Select the menu item SOURCE SETUP with V or Λ and press OK to confirm The SOURCE SETUP menu appears 3 Sel...

Page 53: ...Back SOURCE SETUP AUTOMATIC CHANNEL SEARCH 20 09 2010 15 46 Start Search Scan Type Country Connection Type U K Air DTV ATV 6 Select the line Scan Typ with V or Λ and set the option DTV with or 7 Start the scan with red All channel and favourites lists will be deleted and compiled anew Note 7 After starting the scan a security query will appear Press green to confirm the option Yes The Reults menu ...

Page 54: ...he Results menu 7 Press EXIT to finish the setting Tuning analogue television channels This setting is only necessary if you cannot re ceive any digital channels and you have not car ried out an analogue search during initial setup The television channels can be set directly or using the scan Switching the television to analogue reception Note 7 Analogue channels can be selected if the option Air ...

Page 55: ...properly select the line System with V or Λ Use or to select the preferred setting 7 If fine tuning is necessary select the line Fine Tuning with V or Λ and use or to make the setting 7 Press blue to save the setting 4 Select the line Automatic Channel Search with V or Λ and press OK to confirm Automativ Channel Search Source Automatic Service Update CA Modul Active Antenna Power Analogue Manual T...

Page 56: ...column Skip with or and use OK to mark the channel The channel is marked using Note 7 Channels can also be reactivated Select the channel with V or Λ then select the column Skip and reactivate the channel with OK Note 7 If you wish to remedy other television channels repeat steps 4 to 7 8 Press EXIT to end the setting Changing stored analogue channels If channels were stored with the automatic cha...

Page 57: ...stem but also on the channel which is currently active Remember this when aligning your antenna based upon the signal level display 4 Press EXIT to close the menu SPECIAL SETTINGS Creating lists of favourites You can select your favourite channels and save them in up to four favourites lists Fav 1 to Fav 4 1 In the PROGRAME TABLE menu switch over to the list view with yellow 2 Select the preferred...

Page 58: ...2 750 MHz Modulation DVBS QPSK DVBS2 QPSK 8 PSK IF band 950 MHz 2 150 MHz Signal level 25dBm to 65 dBm Cable Overall band 110 MHz 862 MHz Modulation 16QAM 32QAM 64QAM 128QAM and 256QAM Symbol rate 4 0 Msym s to 7 4 Msym s Terrestrial DVB T VHF UHF band Bandwidth 7 MHz and 8 MHz FFT Size 2k 8k Modulation 16QAM 64QAM QPSK Guard Interval 1 4 1 8 1 16 1 32 Terrestrial DVB T2 VHF UHF band Bandwidth 7 M...

Page 59: ... 65 EU Restriction of the use of certain hazardous substances in electrical and elec tronic equipment Environmental note This product has been made from high quality parts and ma terials which can be re used and recycled Therefore do not dispose of the product along with normal household waste at the end of its service life Take it to a collection point for the recycling of electrical and electron...

Page 60: ...erent position Ghosting reflection Channel setting Automatic or manual tuning fine tuning Antenna Have antenna cable or system checked No colour Colour intensity too low Turn up the colour Adjust TV standard if setting option is available Select the correct colour standard Problem at station Try a different channel Picture but no sound Volume is set to a minimum Turn up or switch on the volume Tel...

Reviews: