


Initial Start-Up
Now that the Braising Pan has been installed, you should
test it to ensure that the unit is operating correctly.
1. Remove all literature and packing materials from the
interior and exterior of the unit.
2. Turn on the electrical power to the unit.
3. Put enough water into the pan to cover its bottom to a
depth of ” to ” (6 to 13 mm). With the pan body in
the horizontal position, note how the water covers the
pan bottom. This is a good method to use for
confirming that the unit is properly leveled.
4. Set the thermostat to 235
o
F. The heating indicator
light should come on to show that the pan is heating.
Heating should continue until the water boils.
5. To shut the unit down, turn the thermostat dial to “OFF.”
WARNING
WATER IS EXTREMELY HOT AND CAN CAUSE
SEVERE BURNS. AVOID CONTACT WITH HOT
WATER WHEN EMPTYING UNIT.
6. Turn the tilting handwheel clockwise to pour out the
water and to confirm that the pan body can be tilted
smoothly from horizontal to vertical. For BPP models,
push the UP/DOWN switch to confirm operation of
tilting system.
If the unit functions as described above, it is ready for use.
If it does not, contact your local Groen Authorized Service
Agency.
Operation
IMPORTANT:
BE SURE ALL OPERATORS READ, UNDERSTAND AND FOLLOW THE OPERATING INSTRUCTIONS,
CAUTIONS, AND SAFETY INSTRUCTIONS CONTAINED IN THIS MANUAL.
A. Controls
Operator controls for the Braising Pans are:
1. Power ON Switch and Power ON indicator
located on the control console.
2. The thermostat dial, located on the control
console to the right of the pan body. This dial is
used to turn the thermostat on or off and to set
the thermostat for pan temperatures between
175° and 400°.
3. Heating indicator light located on the control
console, lights when the burners have ignited.
4. A handwheel controls the worm and gear
mechanism that smoothly tilts the pan body and
holds it in the desired position.
5. For BPM-30E and BPM-40E models a power tilt
switch is located on the control panel. It is used
to raise and lower the pan body.
CAUTION
KEEP FLOORS IN BRAISING PAN WORK
AREA CLEAN AND DRY. IF SPILLS OCCUR,
CLEAN IMMEDIATELY TO AVOID THE
DANGER OF SLIPS OR FALLS.
B. Operating Procedure
1. To Tilt Pan Body
a. Manual Tilt Model -
Turn the tilting handwheel
clockwise to tilt the pan body, or counterclockwise to
return the pan body to horizontal. 23 complete turns
of the hand-wheel will tilt the body 90 degrees to
vertical.
b. Power Tilt Model -
(1) Press the power tilt switch marked “up” to raise
the pan or “down” to lower the pan.
(2) The spring loaded switch will return to the OFF
(middle) position when you release it.
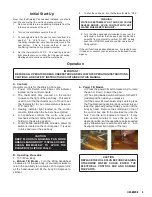
(3) If the power tilt mechanism stops working (see
the Troubleshooting section) and you must raise or
lower the pan body without delay, you can tilt the
body by hand. Remove the small plug on top of
the control box and fit the provided tool into the
hole. Turn the tool clockwise to lower it. It may
take several minutes to move the pan to the
desired position, but the operation can be speeded
up by substituting a reversible drill with a inch
hexagonal driver bit in place of the tool.
CAUTION
REPLACE THE HOLE PLUG BEFORE CLEANING
OTHERWISE WATER COULD ENTER THE
ELECTRICAL CONTROL BOX AND DAMAGE
THE PARTS.
OM-BMP-E 9
Summary of Contents for Eclipse BPM-30E
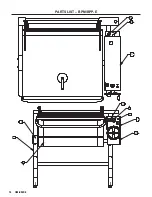
Page 18: ...18 OM BMP E PARTS LIST BPM BPP E 8 9 17 1 2 3 5 13 18 20 21 ...
Page 19: ...OM BMP E 19 PARTS LIST BPM BPP E 4 6 7 10 11 12 19 22 23 14 15 16 ...
Page 24: ...24 OM BMP E WIRING DIAGRAM BPM 30E ...
Page 25: ...OM BMP E 25 WIRING DIAGRAM BPP 30E ...
Page 26: ...26 OM BMP E WIRING DIAGRAM BPM 40E ...
Page 27: ...OM BMP E 27 WIRING DIAGRAM BPP 40E ...
Page 30: ...30 OM BMP E ...
Page 31: ...OM BMP E 31 ...
Page 32: ...32 OM BMP E ...
Page 33: ...NOTES OM BMP E 33 ...
Page 34: ...NOTES 34 OM BMP E ...
Page 35: ...NOTES OM BMP E 35 ...


