


-34-
Model G1014Z/G1014ZX (Mfd. Since 08/22)
1. Use quick release tension lever to tension
sanding belt.
2. Make sure the belt tracking is correctly set
(see
Tracking Belt on Page 41).
3. Turn the sander ON.
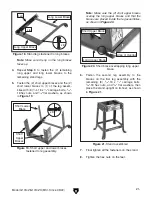
2. Loosen the sanding frame rotation lock nuts
(behind the sanding disc cover), rotate the
frame to the horizontal position, as shown in
Figure 53, then tighten the rotation lock nuts.
3. Insert the table support rod into the hole in
the base under the sanding disc, and position
the work table
1
⁄
16
" away from the sanding
disc, as shown in
Figures 36–37 on Page 25.
4. Check that the miter gauge slot-sanding disc
distance is correct (see instructions on
Page
48 for further detail).
5. Install the back stop so it is square with and
1
/
16
" above the sanding belt (see
Figure 44 on
Page 27).
Figure 53. Table tilted to horizontal position.
Rotation Nut (Hidden)
Sanding Disc
Cover
Rotation
Lock Nut
(1 of 2)
Performing Horizontal and Edge
Sanding
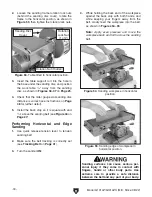
4. While holding the back end of the workpiece
against the back stop with both hands, and
while keeping your fingers away from the
belt, slowly feed the workpiece into the belt,
as shown in
Figures 54–55.
Note:
Apply even pressure and move the
workpiece back and forth across the sanding
belt.
Figure 54. Sanding workpiece in horizontal
position.
Figure 55. Sanding edge of workpiece in
horizontal position.
Sanding surfaces can cause serious per-
sonal injury if they come in contact with
fingers, hands or other body parts. Use
extreme care to provide a safe distance
between the belt and any part of your body.


