


To maintain accurate and consistent jointing
results, we do not recommend sharpening
knives yourself. Instead, replace dull knives
or have them professionally sharpened.
Cutterhead knives are very sharp and can
easily cut your hands. ALWAYS use caution
when handling these parts to reduce risk of
personal injury.
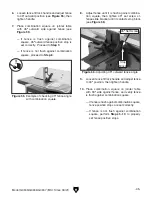
Figure 35. Cutterhead insert and Torx screw.
Model G0945/G0946/G0947 (Mfd. Since 06/21)
-37-
6. Remove cutterhead Torx screw and insert
(see
Figure 35), then carefully clean away all
dust and debris from insert and insert surface
on cutterhead.
IMPORTANT: This step is critical for achiev-
ing a smooth finish with cutting operations. Dirt
or dust trapped under insert during installation
will slightly raise insert in cutterhead, which will
leave marks on workpiece after jointing.
Tip: Use low-pressure compressed air or a
vacuum nozzle to clean cutterhead surface.
7. Install insert with a sharp cutting edge facing
outward. Make sure insert is properly seated
on cutterhead before securing.
— If both insert cutting edges have been
used, replace insert with a new one.
Always position reference dot in same
position when installing a new insert to aid
in rotational sequencing.
8. Lubricate Torx screw threads with a small
amount of light machine oil, wipe excess off,
and torque screw to 48–50 inch/pounds.
IMPORTANT: If too much oil is applied to the
threads, excess will attempt to squeeze out of
threaded hole as you install insert and force it
to raise slightly, making it out of alignment.
9. Install cutterhead guard removed in Step 3
on
Page 36.
Torx
Screw
Cutterhead
Insert
Checking/Setting
Knives (G0945)
Setting the knives correctly is crucial to the proper
operation of the jointer, and it plays an important
role in keeping the knives sharp. If one knife is
higher than the others, it will do the majority of the
work, and thus, become dull much faster.
The cutterhead in this jointer is equipped with
jack screws that allow for careful positioning of
the knives. When replacing knives, clean the knife
clamp and inside the cutterhead slot to remove all
pitch or sawdust, then coat the knife and clamp
with a metal protectant.
For best results, tables must be parallel with
each other (see
Checking/Adjusting Table
Parallelism on Page 39).
Items Needed
Qty
Heavy Leather Gloves ................................1 Pair
Straightedge 24" ................................................ 1
Hex Wrench 4mm .............................................. 1
Replacement Knives ......................... As Needed
Light Machine Oil............................... As Needed
Clean Shop Rags .............................. As Needed
Summary of Contents for G0945
Page 60: ......


