


To reduce risk of shock or
accidental startup, always
disconnect machine from
power before adjustments,
maintenance, or service.
The indexable inserts are very sharp and can
easily cut your hands. ALWAYS use caution
when handling these parts to reduce risk of
personal injury.
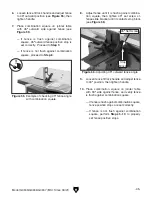
Figure 33. Insert rotating sequence.
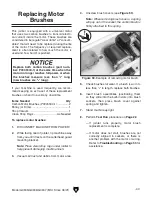
Figure 34. Cutterhead area cleaned.
-36-
Model G0945/G0946/G0947 (Mfd. Since 06/21)
Rotating/Replacing
Inserts
(G0946/G0947)
The spiral cutterhead is equipped with 2-sided
indexable inserts. Each insert can be removed,
rotated, and re-installed to use either of its two
cutting edges. If one cutting edge becomes dull
or damaged, simply rotate it 90° (see
Figure 33)
to use a sharp cutting edge.
The inserts have a reference dot on one corner.
The position of the reference dot on installed
inserts can be used to track which edges are
sharp/unused and which edges are dull or dam-
aged. Replace inserts once the reference dot has
been rotated back to its original position.
Items Needed
Qty
Heavy Leather Gloves ................................1 Pair
Indexable Inserts 14 x 14 x 2mm ...... As Needed
Torx Head Screws T-25 10-32 x
1
⁄
2
" .. As Needed
T-Handle Torx Driver T-25 ................................. 1
Hex Wrench 4mm .............................................. 1
Torque Wrench 0–50 in.-lb ................................ 1
Degreaser .......................................... As Needed
Light Machine Oil............................... As Needed
Clean Shop Rags .............................. As Needed
To rotate or replace cutterhead inserts:
1. DISCONNECT MACHINE FROM POWER!
2. Put on heavy leather gloves, move fence all
the way back, and lower infeed table to pro-
vide access to cutterhead inserts.
3. Loosen (2) button head cap screws secur-
ing cutterhead guard to jointer base, then
remove cutterhead guard.
4. Insert included Torx driver in the cutterhead
rotation guide on front of jointer, and rotate
cutterhead as needed to make inserts acces-
sible for rotation/removal.
5. Carefully clean away all sawdust or debris
from top of insert, Torx screw, and surround-
ing area (see
Figure 34).
Reference Dot
Summary of Contents for G0945
Page 60: ......


