background image

3

7

6

7a
2a

2

2

4

17

11

11a

8

8b

8a

9

7

Summary of Contents for AHS 1845 T Lion

Page 1: ...orová nůžky na živý plot s teleskopickou rukojetí Akumuliatorinės sodo žirklės su teleskopiniu kotu Originalbetriebsanleitung Translation of the original instructions for use Vertaling van de originele gebruiksaanwijzing Traduction de la notice d utilisation originale Traducción del manual de instrucciones original Tłumaczenie oryginalnej instrukcji obsługi Překlad originálního návodu k obsluze Ve...

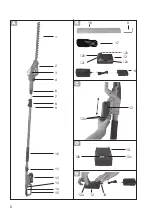
Page 2: ...2 1 2 3 4 6 7 8 9 11 10 12 13 14 15 16 17 18 9 12 12b 12c 12a 12a 12 18 12a 12a 12c 12b 12 12 ...

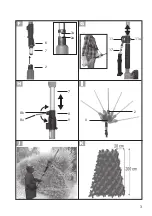
Page 3: ...3 7 6 7a 2a 2 2 4 17 11 11a 8 8b 8a 9 7 ...

Page 4: ...originele gebruiksaanwijzing 38 Traduction de la notice d utilisation originale 55 Traducción del manual de instrucciones original 72 Tłumaczenie oryginalnej instrukcji obsługi 88 Překlad originálního návodu k obsluze 105 Vertimas iš originalių eksploatavimo instrukcijoje 121 DE GB NL FR ES PL LT CZ ...

Page 5: ...enschen oder deren Eigentum verantwortlich Der Hersteller haftet nicht für Schäden die durch bestimmungswidrigen Gebrauch oder falsche Bedienung verursacht wur den Die Messer sind regelmäßig auf Abnutzung zu kontrollieren und nachschleifen zu lassen Stumpfe Messer überlasten die Maschine Daraus resultierende Schäden un terliegen nicht der Garantie Inhalt Verwendungszweck 5 Sicherheitshinweise 6 Bi...

Page 6: ...ragen Sie eine Schutzbrille oder ei nen Gesichtsschutz 9 Tragen Sie einen Schutzhelm 10 Tragen Sie Gehörschutz 11 Tragen Sie schnittsichere Handschuhe 12 Tragen Sie rutschfeste Sicherheits schuhe Angabe des Schallleistungspegels Lwa in dB Elektrogeräte gehören nicht in den Hausmüll 410 mm Schnittlänge 15 mm Zahnabstand Bildzeichen auf dem Akku Werfen Sie den Akku nicht in den Haus müll ins Feuer o...

Page 7: ...er Allgemeine Sicherheitshinwei se für Elektrowerkzeuge WARNUNG Lesen Sie alle Si cherheitshinweise und Anwei sungen Versäumnisse bei der Einhaltung der Sicherheitshinweise und Anweisungen können elekt rischen Schlag Brand und oder schwere Verletzungen verursachen Bewahren Sie alle Sicherheitshinweise und Anweisungen für die Zukunft auf Der in den Sicherheitshinweisen verwen dete Begriff Elektrowe...

Page 8: ...rzeit das Gleichgewicht Dadurch können Sie das Elektrowerkzeug in unerwarteten Situationen besser kon trollieren Tragen Sie geeignete Kleidung Sie keine Adapterstecker gemein sam mit schutzgeerdeten Elektro werkzeugen Unveränderte Stecker und passende Steckdosen verringern das Risiko eines elektrischen Schla ges Vermeiden Sie Körperkontakt mit geerdeten Oberflächen wie von Rohren Heizungen Herden ...

Page 9: ...ht klemmen ob Teile gebrochen oder so beschädigt sind dass die Funktion des Elek trowerkzeuges beeinträchtigt ist Lassen Sie beschädigte Teile vor dem Einsatz des Gerätes reparieren Viele Unfälle haben ihre Ursache in schlecht gewarteten Elektrowerkzeu gen Halten Sie Schneidwerkzeuge scharf und sauber Sorgfältig gepfleg te Schneidwerkzeuge mit scharfen Schneidkanten verklemmen sich weni ger und si...

Page 10: ... im In nenbereich auf weil das Ladegerät nur dafür bestimmt ist Gefahr durch elektrischen Schlag Um das Risiko eines elektrischen Schlags zu reduzieren ziehen Sie den Stecker des Ladegeräts aus der Steckdose heraus bevor Sie es rei nigen Setzen Sie den Akku nicht über län gere Zeit starker Sonneneinstrah lung aus und legen Sie ihn nicht auf Heizkörpern ab Hitze schadet dem Akku und es besteht Expl...

Page 11: ...tigt oder bezüglich des sicheren Gebrauchs des Gerätes unterwiesen wurden und die daraus resultierenden Gefahren verstehen Kinder dürfen nicht mit dem Gerät spielen Reinigung und Benutzer Wartung dürfen nicht von Kindern ohne Beaufsichtigung durchgeführt werden Verwenden Sie zum Laden des Ak kus ausschließlich das mitgelieferte Ladegerät Es besteht Brand und Explosionsgefahr Überprüfen Sie vor jed...

Page 12: ...heitsschäden die aus Hand Arm Schwingungen resultieren falls das Gerät über einen längeren Zeitraum verwendet wird oder nicht ordnungsgemäß geführt und gewartet wird Allgemeine Beschreibung Die Abbildungen für die Bedienung des Gerätes finden Sie auf den Sei ten 2 3 Lieferumfang Packen Sie das Gerät aus und kontrollie ren Sie ob es vollständig ist Akku Teleskopstiel Heckenschere zweiteilig Messers...

Page 13: ... sauber und trocken sein bevor Sie das Ladegerät an schließen Es besteht die Gefahr von Verletzungen durch Strom schlag Laden Sie nur mit beiliegendem Ladegerät auf Achten Sie darauf dass das Gerät nicht länger als 3 5 Stunden ununterbrochen aufge laden wird Der Akku und das Gerät könnten beschädigt werden und bei längerer Ladezeit verbrauchen Sie unnötig Energie Bei Überladung erlischt der Garant...

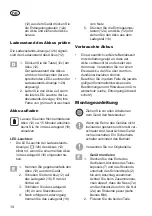
Page 14: ...Nach erfolgtem Ladevorgang trennen Sie das Ladegerät 18 vom Netz 5 Drücken Sie die Entriegelungs tasten 12a am Akku 12 und ziehen Sie den Akku aus dem Ladegerät 18 Verbrauchte Akkus Eine wesentlich verkürzte Betriebszeit trotz Aufladung zeigt an dass der Akku verbraucht ist und ersetzt wer den muss Verwenden Sie nur einen Ersatz Akku den Sie über den Kun dendienst beziehen können Beachten Sie in j...

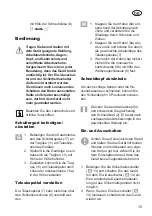
Page 15: ...schluss 8 verstellt wer den 1 Klappen Sie den Hebel 8a ent sprechend der Abbildung nach vorne und verändern Sie die Stiellänge durch Schieben und Ziehen 2 Klappen Sie den Hebel 8a wie der zurück und fixieren Sie damit die gewünschte Arbeitslänge des Teleskopstieles 7 3 Wenn sich der Hebel 8a lockert ziehen Sie die Innensechs kantschraube 8b mit Hilfe des Werkzeugschlüssels 9 fest Schneidkopf abwin...

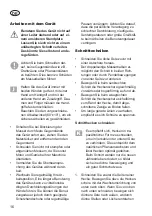
Page 16: ...sdauer jedoch durch geeignete Schutzhandschuhe oder regelmäßige Pausen verlängern Achten Sie darauf dass die persönliche Veranlagung zu schlechter Durchblutung niedrige Au ßentemperaturen oder große Greifkräf te beim Arbeiten die Benutzungsdauer verringern Schnitttechniken Schneiden Sie dicke Äste zuvor mit einer Astschere heraus Der doppelseitige Messerbalken er möglicht den Schnitt in beiden Ric...

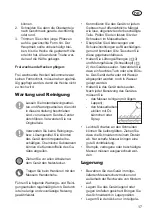
Page 17: ...e lange und zuverlässige Nutzung gewährleistet Kontrollieren Sie das Gerät vor jedem Gebrauch auf offensichtliche Mängel wie lose abgenutzte oder beschädigte Teile Prüfen Sie den festen Sitz der Schrauben im Messerbalken Überprüfen Sie Abdeckungen und Schutzeinrichtungen auf Beschädigun gen und korrekten Sitz Tauschen Sie diese gegebenenfalls aus Halten Sie Lüftungsöffnungen 3 und Motorgehäuse Sch...

Page 18: ... zum Ver gleich eines Elektrowerkzeugs mit einem anderen verwendet werden Der angegebene Schwingungsemissi onswert kann auch zu einer einleitenden Einschätzung der Aussetzung verwendet werden Warnung Der Schwingungsemissionswert kann sich während der tatsächlichen Benutzung des Elektrowerkzeugs von dem Angabewert unterscheiden abhängig von der Art und Weise in der das Elektrowerkzeug ver wendet wi...

Page 19: ...vice Center Die Entsorgung Ihrer defekten einge sendeten Geräte führen wir kostenlos durch Führen Sie Schnittgut der Kompostie rung zu und werfen Sie dieses nicht in die Mülltonne Garantie Für dieses Gerät gewähren wir 24 Monate Garantie Bei gewerblichem Einsatz er lischt die Garantie Schäden die auf natürliche Abnutzung Überlastung oder unsachgemäße Bedie nung zurückzuführen sind bleiben von der ...

Page 20: ...mit sonstiger Sonderfracht eingeschickte Ge räte werden nicht angenommen Eine Entsorgung Ihres defekten eingesendeten Gerätes führen wir kostenlos durch Ersatzteile Zubehör Ersatzteile und Zubehör erhalten Sie unter www grizzly shop de oder www grizzly service eu Sollten Sie kein Internet haben so wenden Sie sich bitte telefonisch an das Service Center siehe Grizzly Service Center Halten Sie die u...

Page 21: ... Center Gerät arbeitet mit Unterbrechungen Interner Wackelkontakt Reparatur durch Service Center Ein Ausschalter 14 defekt Messer werden heiß Messer stumpf Sicherheitsmesserbalken 1 schleifen oder austauschen Service Center Messer hat Scharten Sicherheitsmesserbalken 1 überprüfen oder austauschen Service Center Zu viel Reibung wegen feh lender Schmierung Sicherheitsmesserbalken 1 ölen Teleskopstie...

Page 22: ...your own safety and for the safety of others Keep the manual in a safe place and pass it on to any subsequent owner to en sure that the information contained therein is available at all times Intended Use The equipment is specified for use only for the cutting and trimming of hedges bushes and ornamental shrubs in the do mestic environment The telescopic handle allows the cutting of high hedges fr...

Page 23: ...tection 9 Wear a safety helmet 10 Wear ear protection 11 Wear cut resistant gloves 12 Wear cut protection safety boots with anti slip soles Information of the acoustic power level LWA in dB Machines are not to be place with domestic waste 410 mm Cutting length 15 mm Cutting capacity Symbols on the battery Do not dispose of bat teries in household waste fire or water Do not subject the battery to s...

Page 24: ...instructions can cause electrical shock fire and or severe injuries Retain all safety directions and instruc tions for future use The term Power Tools used in the safety instructions refers to mains operated power tools with power cord and to bat tery operated power tools without power cord Work area safety Keep work area clean and well lit Cluttered or dark areas invite acci dents Do not operate ...

Page 25: ...nal starting Ensure the switch is in the off po sition before connecting to power source and or battery pack picking up or carrying the tool Carrying power tools with your finger on the switch or energising power tools that have the switch on invites accidents Remove any adjusting key or wrench before turning the power tool on A wrench or a key left at tached to a rotating part of the power tool m...

Page 26: ...f a charger that is suitable for a specific type of bat tery is used with other batteries In the power tools use only the bat teries designed for the purpose The use of other batteries may result in inju ries and risk of fire Keep the unused battery away from paper clips coins keys nails screws and other small metal ob jects which could cause bridging of the contacts A short circuit between the ba...

Page 27: ... the hedge trimmer correctly e g with both hands on the handles if there are two handles Loss of control of the equipment may result in injuries Wear suitable clothing and work clothes when working with the equipment Do not hold the equip ment by the cutting blade or lift it on the cutting blade Contact with the cutting blade can cause injuries Correct handling of the battery charger This applianc...

Page 28: ... the unit is not held or maintained properly Warning During operation this electric tool generates an electro magnetic field which under certain circumstances may impair the functionality of active or passive medical implants To reduce the risk of serious or lethal injuries we rec ommend that persons with medical implants consult their doctor and the manufacturer of their medical im plant before o...

Page 29: ...an and dry There is a risk of injury due to electric shock Only use the original charger from the package to charge the battery Mind not to charge the appliance for more than 3 5 hours at a time If you do the battery and the appli ance may be damaged and longer charging times would be a waste of energy Excessive charging will void the warranty Charge the battery before the first time of use Do not...

Page 30: ...charger 18 from the mains supply 5 Press the release keys 12a on the battery 12 and pull the bat tery out of the charger 18 Used batteries If a fully recharged battery lasts for considerably shorter operating times the battery is used up and needs to be replaced Only use an OEM battery pack replacement available from our Customer Service Always take heed of the applicable safety instructions as we...

Page 31: ...ack and set the desired working length of the telescopic arm 7 3 If the lever 8a loosens tighten the hexagon socket screw 8b with the help of the wrench 9 Angling the Cutting Head To cut sloping edges or the top of the hedge the cutting head can be swivelled into 5 positions Press the lock button 4 and swivel the cutting head 2 at the same time It clicks into the desired position when the lock but...

Page 32: ...rehand using a branch clippers The double sided cutter bar enables cutting in both directions or with a swinging action from one side to the other In case of vertical cutting move the hedge trimmer uniformly forward or up and down in an arc movement In case of horizontal cutting move the hedge trimmer in a sickle shaped move ment to the edge of the hedge so that cut branches fall to the ground In ...

Page 33: ...ment it is im perative to Clean the blade with an oily cloth Oil the blade shaft with an oil can or spray Slight notches on the blades can be evened out For this sand down the blades with an oil stone Only sharp blades can cut properly Blunt bent or damaged blades must be changed Storage Keep the trimmer in the blade guard supplied in a dry place and out of reach of children Store the unit horizon...

Page 34: ...Recharger DKYC2200400G Nominal consumption 12 W Voltage input 100 240 V 50 60 Hz 0 3 A Voltage output 22 V 0 4 A Protection class II Protection category IPX0 Noise and vibration values have been de termined according to the standards and regulations mentioned in the declaration of conformity Technical and optical changes may be undertaken in the course of further de velopment without notice All di...

Page 35: ...ing faults will be made good free of charge by replacement delivery or repair This requires that the appliance is returned to to the dealer undismantled and with proof of purchase and guar antee Repairing Service Repairs which are not covered by the guarantee can be carried out for charge by our service center Our ser vice center will be glad to provide you with a cost estimate We can only process...

Page 36: ...ntioned below ready Pos Pos Description Product No Instruction Exploded Manual Drawing 1 set8 Safety blade complete mounted 9110 3808 8 set5 Quick release fastener 9110 3805 9 30 Wrench 9110 3801 12 set2 Rechargeable battery 9109 9411 13 set4 Safety switch 9110 3804 14 set3 On off switch 9110 3803 17 26 Shoulder strap 9110 3800 18 set1 Battery Charger EU 9109 9412 set6 Gear 9110 3806 set7 Engine 9...

Page 37: ... Service Centre for repair Device runs with in terruptions Internal loose electrical connection Repair by Service Centre On Off switch 14 defective Blades become hot Blades are blunt Have the blades 1 sharpened or replaced Service Centre Blades are notched Have the blades 1 checked or replaced Service Centre Too much friction due to lack of lubrication Oil the blades 1 Telescopic arm 7 cannot be f...

Page 38: ...iligheid en die van anderen Bewaar de handleiding goed en geef deze door aan de volgende gebruiker van deze soldeerbout zodat iedere gebruiker te allen tijde kan beschikken over de informatie Toepassingsgebied De machine is enkel voor het knippen en maaien van heggen struiken en sierhees ters op privégebied geschikt De telescopische steel maakt het snoeien van hoge heggen vanop de grond mo gelijk ...

Page 39: ...ligheidsbril of een veilig heidsmasker 9 Draag een veiligheidshelm 10 Draag een gehoorbescherming 11 Draag tegen snijdwonden bescher mende handschoenen 12 Draag snijvaste veiligheidslaarzen met anti slip zolen Aanduiding van het geluidsvolume LWA in dB Machines horen niet bij huishoude lijk afval thuis 410 mm Snijlengte 15 mm Tandafstand Symbolen op de accu Werp de accu s niet in het huisvuil het ...

Page 40: ...tuk Foutopsporing of contacteer ons servicecenter Algemene veiligheidsinstruc ties voor elektrisch gereed schap WAARSCHUWING Lees alle veiligheidsinstructies en aanwij zingen Verzuim bij de naleving van de veiligheidsinstructies en aanwij zingen kan een elektrische schok brand en of ernstige verwondingen veroorzaken Bewaar alle veiligheidsinstructies en aanwijzing voor de toekomst Het in de veilig...

Page 41: ...ar is maakt u gebruik van een aardlekschakelaar Het gebruik van een aardlekschakelaar verlaagt het risico op een elektrische schok Sluit het apparaat als het mogelijk is enkel aan op een lekstroom schakelaar met een afslagstroom van maximaal 30 mA Als het netsnoer van dit apparaat be schadigd wordt moet het door de fabrikant of door zijn klantenservice afdeling of door een gelijkwaardig ge kwalifi...

Page 42: ...trouwd zijn of deze aanwijzingen niet gelezen heb ben het apparaat niet gebruiken Elektrisch gereedschap is gevaarlijk als het door onervaren personen ge bruikt wordt Onderhoud het elektrische gereed schap met zorg Controleer of beweegbare onderdelen foutloos functioneren en niet klemmen of er onderdelen gebroken of zodanig be schadigd zijn dat de werking van het elektrische gereedschap in negatie...

Page 43: ...atterijen uitsluitend bin nenshuis op omdat het laadtoestel enkel daarvoor bestemd is Om het risico voor een elektrische schok te verminderen trekt u de stekker van het laadtoestel uit het stopcontact voordat u het reinigt Stel de accu het elektrowerktuig het toestel niet gedurende lange tijd bloot aan bezonning en leg ze niet op radiatoren Hitte beschadigt de accu en er bestaat explosiegevaar Laa...

Page 44: ...erhoud mogen niet door kinderen zonder toezicht doorgevoerd worden Gebruik voor het laden van de accu uitsluitend de meegeleverde accula der Er bestaat brand en explosiegevaar Controleer voor elk gebruik de accu lader de kabel alsook de stekker en laat alleen door gekwalificeerde ge schoold personeel en met originele reservedelen herstellen Gebruik een defecte acculader niet en open deze niet zelf...

Page 45: ...en te verminderen adviseren wij personen met medische implan taten hun arts en de fabrikant van het medische implantaat te raadple gen voordat de machine bediend wordt Algemene beschrijving De afbeeldingen voor de bediening van het apparaat vindt u op de pa gina s 2 3 Omvang van de levering Pak het apparaat uit en controleer of de inhoud volledig is Accu telescopische steel haagschaar tweedelig Be...

Page 46: ...langer dan 3 5 uur ononderbroken opgeladen wordt De accu en het apparaat zouden beschadigd kunnen wor den en bij een langere laadtijd verbruikt u onnodig energie Bij een overdreven lading komt de garan tieclaim te vervallen Laas de accu vóór het eerste gebruik op De accu niet meermaals na elkaar even opladen Laad de accu bij wanneer het appa raat te langzaam draait Een beduidende kortere werkingst...

Page 47: ...veiligheidsinstructies en ook de bepalingen en aanwijzingen met betrekking tot de bescherming va het milieu in acht zie Verwerking en mi lieubescherming Montagehandleiding Trek alvorens u aan het apparaat gaat werken de stekker uit het stop kontakt Wanneer de buizen van het ap paraat niet in elkaar gestoken en correct vastgeschroefd zijn kan het apparaat niet ingeschakeld worden Een veiligheidssch...

Page 48: ...e bovenzijde van de heg te snoeien kunt u de snoeikop in 5 posities zwenken Druk de vergrendelknop 4 in en zwenk gelijktijdig de snoeikop 2 Na het loslaten van de vergrendel knop klikt hij in de gewenste posi tie vast Aan en uitschakelen Zorg dat u stevig staat en houd het apparaat met twee handen goed vast Bewaar voldoende afstand tot uw eigen lichaam Let voor u het apparaat inschakelt op dat het...

Page 49: ...t met een snoei schaar af Het tweezijdig mesblad maakt het mogelijk in beide richtingen te knippen of met pendelbewegingen von de ene kant naar de andere Bij vertikaal knippen de heggenschaar gelijkmatig voorwaarts bewegen of boogvormig op en neer Bij horizontaal knippen de heggen schaar sikkelvormig tot de rand van de heg bewegen zodat afgeknipte takken naar beneden kunnen vallen Om lange rechte ...

Page 50: ... afgesproeid noch in water gelegd worden Houdt u het toestel steeds schoon Telkens na gebruik van het apparaat moet u het mes reinigen met olieachtige vod de mesbalk met oliekannetje of spray oliën Lichte kerven aan de lemmeten kunt u zelf gladmaken Trekt u hiervoor de lemmeten met een oliesteen af Alleen scherpe messen zorgen voor een goede snijprestatie Bewaren Bewaar de heggenschaar buiten be r...

Page 51: ...t gesteld Technische en optische veranderingen kunnen in het kader van ontwikkelingen zonder aankondiging worden uitgevoerd Alle maten richtlijnen en gegevens van deze gebruiksaanwijzing zijn daarom onder voorbehoud Wettelijke aansprake lijkheid die op basis van de gebruiksaan wijzing wordt gesteld kan daardoor niet geldig worden gemaakt De aangegeven trillingemissiewaarde werd volgens een genorma...

Page 52: ...staan zijn worden gratis door schadeloosstelling of door een herstelling verholpen De vereiste voorwaarde is dat het niet gedemonteerde apparaat met aankoopbewijs en garantiekaart bij de handelaar gereclameerd wordt Reparatieservice Herstellingen die niet onder de garan tie ressorteren kunt u tegen facturatie door ons servicecenter laten doorvoe ren Ons servicecenter maakt graag voor u een bestek ...

Page 53: ... bestelnummers klaar Pos Pos Benaming Artikel Nr Gebruiks Explosie aanwijzing tekening 1 set8 Veiligheidsmesbalk gemonteerd 9110 3808 8 set5 Snelsluiter 9110 3805 9 30 Werktuigsleutel 9110 3801 12 set2 Accu 9109 9411 13 set4 Veiligheidsschakelaar 9110 3804 14 set3 Aan uitschakelaar 9110 3803 17 26 Schouderriem 9110 3800 18 set1 Lader EU 9109 9412 set6 Versnelling 9110 3806 set7 Motor 9110 3807 45 ...

Page 54: ...fect Reparatie door servicecenter Toestel werkt met onderbrekingen Intern loszittend contact Reparatie door het servicecenter Aan uitschakelaar 14 defekt Messen worden heet Mesbalk stomp Laat de mesbalk 1 slijpen of ver vangen servicecenter Mesbalk is beschadigd Controleer de mesbalk 1 of laat deze vervangen servicecenter Te veel wrijving wegens ontbrekende smering Mesbalk 1 oliën Telescopische st...

Page 55: ...ructeur décline toute responsabili té en cas de dommages qui seraient occa sionnés par une utilisation non conforme ou une manipulation inappropriée de l appareil N utilisez jamais l appareil avec des lames épointées Faites réaffûter les lames régulièrement pour ne pas perdre le droit à la garantie Content Domaine d utilisation 55 Instructions de sécurité 56 Symboles 56 Instructions de sécurité gé...

Page 56: ...ou du visage 9 Portez un casque 10 Portez une protection pour les oreilles 11 Portez des gants de protection contre les coupures 12 Portez des chaussures de sécurité antidérapantes Indication du niveau garanti de puis sance sonore maximale LWA en dB Les machines n ont pas leur place dans les ordures ménagères 410 mm Longueur de coupe 15 mm Capacité de coupe Symboles sur l accumulator Ne jetez pas ...

Page 57: ...teur Appliquez les premiers soins et consultez un médecin Pour l élimi nation des pannes lisez le chapitre correspondant Recherche des pannes ou contactez notre ser vice après vente Consignes de sécurité géné rales pour outils électriques AVERTISSEMENT Lisez toutes les consignes de sécurité et les instructions Des omissions lors de l observation des consignes de sécurité et des instructions peuven...

Page 58: ...ez l appareil à une prise d alimentation secteur pourvue d un interrupteur de protection contre les courants de courts circuits R C D avec un courant d intensité de 30 mA maximum Si le remplacement du câble d ali mentation est nécessaire cela doit être réalisé par le fabricant ou par son agent pour éviter un danger Contrôler le câble et le faire remplacer le cas échéant par notre Centre de service...

Page 59: ...outil Conserver les outils à l arrêt hors de la portée des enfants et ne pas permettre à des personnes ne connaissant pas l outil ou les pré sentes instructions de le faire fonc tionner Les outils sont dangereux entre les mains d utilisateurs novices Observer la maintenance de l outil Vérifier qu il n y a pas de mauvais alignement ou de blocage des par ties mobiles des pièces cassées ou toute autr...

Page 60: ...chement d un accumulateur sur un appareil électrique en marche peut entraîner des accidents Chargez vos batteries uniquement à l intérieur d un local car le char geur n a été conçu que pour ce type d utilisation Pour réduire le risque d une dé charge électrique retirez la fiche du chargeur de la prise de courant avant de le nettoyer Ne laissez pas l accumulateur exposé pendant une longue durée aux...

Page 61: ...s et par des personnes ayant des capacités physiques sensorielles ou mentales réduites ou un manque d expérience et de connaissances à condition qu elles aient reçu une supervision ou des instructions concernant I utili sation de I appareil en toute sécurité et qu elles comprennent les dangers encourus Les enfants ne doivent pas jouer avec l appareil Le nettoyage et I entretien par I usager ne doi...

Page 62: ...nt son fonctionnement cet outil électrique produit un champ électromagné tique qui dans certaines circons tances peut perturber des implants médicaux actifs ou passifs Pour diminuer le risque de blessures graves ou mortelles nous recom mandons aux personnes portant des implants médicaux de consul ter leur médecin et le fabricant de l implant médical avant d utiliser cette machine Description génér...

Page 63: ...es yeux rincez avec de l eau les parties concer nées ou un neutralisateur et consultez un médecin Ne chargez l accumulateur que dans des locaux secs La surface extérieure de l ac cumulateur doit être propre et sèche avant que vous ne connectiez le chargeur Il existe un danger de blessures par décharge électrique Ne procédez à la charge qu avec le chargeur original ci joint Faites attention à ce qu...

Page 64: ... passe du vert au rouge Recharger l accumulator Laissez refroidir un accu 11 qui est tout juste déchargée pendant environs 15 minutes avant de l insérer dans le chargeur 22 LED Les LED de l affichage de la charge 12b de l accumulator 12 cli gnotent en rouge lorsque vous avez inséré l accumulator chaude sur le chargeur 18 1 Les cas échéant retirez l accu mulator 12 de l appareil 2 Insérez l accumul...

Page 65: ...l ne faut pas que l interrupteur de marche arrêt et l interrupteur de sécurité soient bloqués Ils doivent arrêter le moteur dès qu ils ont été lâchés Si un interrupteur est endomma gé il ne faut plus travailler avec l appareil Veuillez observer les normes de protection contre les nuisances acoustiques ainsi que les pres criptions et directives locales en vigueur Fixation la bande d épaule 1 Fixez ...

Page 66: ...ls que fils de grillage ou tuteurs de plantes Ceci peut conduire à des dom mages sur la lame Tenez toujours l appareil à deux mains avec une main sur la poi gnée arrière et une sur la poignée avant Vos pouces et vos doigts doivent être enroulés autour de la poignée et la tenir fermement Faites attention à respecter l angle de travail prescrit 60 10 pour ga rantir des travaux en toute sécurité Trav...

Page 67: ...roits peu fournis ou des trous 2 Taillez ensuite le bord supérieur comme vous le désirez droit en forme de toit ou en arrondi 3 Taillez déjà les jeunes plantes à la forme que vous désirez Il est pré férable que la pousse principale ne soit pas endommagée jusqu à ce que la haie ait atteint la hauteur pré vue Toutes les autres pousses sont réduites de moitié Soin des haies poussant librement Les hai...

Page 68: ...itez froid ou chaleur extrêmes pour que l accu mulateur ne perde pas ses capacités Elimination de l appareil et protection de l environ nement Retirez l accumulateur de l appareil et dépo sez l appareil l accumulateur les acces soires et l emballage dans un centre de recyclage écologiquement Les machines n ont pas leur place dans les ordures ménagères Ne jetez pas les accumulateurs dans les ordure...

Page 69: ...t être utilisée pour comparer un outil à un autre L indication du fait que la valeur totale de vibrations déclarée peut également être utilisée pour une évaluation préliminaire de l exposition Avertissement L émission de vibration au cours de l utilisation réelle de l outil élec trique peut différer de la valeur totale déclarée selon les méthodes d utilisation de l outil Il est nécessaire de fixer...

Page 70: ...fran chissement marchandises encom brantes express ou autres envois exceptionnels ne sont pas accep tés Nous exécutons gratuitement l élimi nation des déchets de vos appareils renvoyés défectueux Pièces de rechange Accessoires Vous obtiendrez des pièces de rechange et des accessoires à l adresse www grizzly service eu Si vous ne disposez d aucun accès Internet veuillez contacter le centre de SAV v...

Page 71: ...ntre de services L appareil fonc tionne avec des interruptions Mauvais contact interne Réparation par le Centre de ser vices Interrupteur Marche Arrêt 12 défectueux Les lames chauffent Lame non aiguisée Aiguiser le bloc porte lames 1 ou le faire remplacer Centre de services Lame ébréchée Contrôler le bloc porte lames 1 ou le faire remplacer Centre de services Frottement trop important car lubrific...

Page 72: ... uso previsto o en caso de un uso equivocado No utilice la máquina con una lama excesivamente gastada Hay que afilar la lama regularmente Disposi tivos de corte sin filo pueden sobre cargar la máquina Daños causa dos por lamas demasiado gastadas no están cubiertos por la garantía Contenido Uso previsto 72 Instrucciones de seguridad 73 Símbolos gráficos 73 Instrucciones generales de seguridad 74 In...

Page 73: ... oídos 12 Porte botas con protección contra cor tes con suela antideslizante Indicación del nivel de la intensidad acústica Lwa en dB Máquinas no deben ir a la basura doméstica Entregue su aparato a un centro de reciclaje Clase de protección II 410 mm Longitud de corte 15 mm Anchura de corte Símbolos gráficos en la batería No bote las baterías en la basura doméstica ni en el fuego o el agua No exp...

Page 74: ...Center Instrucciones generales de seguridad para herramientas eléctricas ADVERTENCIA Lea todas las instrucciones de seguridad y de procedimiento Si se incumplen las instrucciones de seguridad o de procedimiento puede sufrirse una descarga eléctrica un incen dio o graves lesiones Guarde todas las instrucciones de seguridad y de procedimiento para po derlas consultar en un momento dado El concepto d...

Page 75: ...uridad de personas Esté atento observe lo que hace y utilice la sierra eléctrica de ca dena con esmero No utilice la sierra eléctrica de cadena cuando esté cansado o se encuentra bajo los efectos de drogas alcohol o medicamentos Un momento de distracción al utilizar la sierra eléctrica de cadena puede producir graves ac cidentes Lleve un equipo protector personal y siempre unas gafas protectoras A...

Page 76: ...su origen en herramientas eléctricas mal mantenidas Mantener las herramientas cortantes afiladas y limpias Las herramientas cortantes bien cuidadas con un borde afilado se atascan menos y son más fáciles de dirigir Utilizar la sierra eléctrica de cadena los accesorios las herramientas correspondientes etc según estas instrucciones Tener en cuenta tam bién las condiciones de trabajo y la actividad ...

Page 77: ...de desperfecto mecánico Existe peli gro de cortocircuito y pueden emanar gases que son irritantes para las vías respiratorias Procure hacer llegar aire fresco y solicite además ayuda médica si tuviese alguna dolencia No intente utilizar nunca baterías no recargables Instrucciones de seguridad para cizallas cortasetos Mantener cualquier parte del cuerpo alejada de la cuchilla cortante No in tente e...

Page 78: ...e características del cargador Existe peligro de sufrir una descarga eléctrica Desconecte el cargador de la co rriente antes de cerrar o abrir cone xiones que vayan hacia la pila recar gable la herramienta eléctrica o el aparato Mantenga el cargador siempre limpio y alejado de la humedad y la lluvia No utilice el cargador jamás al aire libre Si se ensuciase o penetrase agua aumentaría el riesgo de...

Page 79: ... una puesta a tierra Como dis positivo de corte la recortasetos está equi pada con una barra de corte de seguridad de dos lados En el proceso de corte los dientes de corte ejecutan un movimiento de ida y vuelta Para la protección del usuario el equipo puede accionarse exclusivamente con el interruptor de seguridad pulsado El funcionamiento de los componentes de mando se explica a continuación en l...

Page 80: ...o de servicio considerable mente corto a pesar de estar cargado señala que el acumulador está gas tado y tiene que ser sustituido Utilice sólo un acumulador de repuesto ori ginal que puede adquirir a través del servicio de postventa En todo caso observe las respectivas indicaciones de seguridad válidas así como las normas e indicaciones con respecto a la protección del medio ambiente Los defectos ...

Page 81: ...ciones relativas a la protección del medio ambiente ver Eliminación y protección del medio ambiente Instrucciones de montaje Retire siempre el enchufe de red antes de realizar trabajos en el apa rato Si los tubos del aparato no es tán encajados mutuamente y atornillados correctamente el aparato no se dejará arrancar Un interruptor de seguridad im pide el servicio Utilice exclusivamente las piezas ...

Page 82: ...7 a la longitud de trabajo que desea 3 Cuando se afloja la palanca 8a vuelva a apretar el tornillo de cabeza con hexágono interior 8b con la llave inglesa 9 Acodar la cabeza de corte Para cortar también cantos oblicuos o la parte superior del seto usted puede acodar la cabeza de corte en cinco posiciones Pulse el botón de bloqueo 4 y mueva simultáneamente la cabeza de corte 2 Después de soltar el ...

Page 83: ...ha ciendo pausas regulares podrá alar gar el tiempo de uso Tenga en cuenta su predisposición personal a la mala circulación las bajas temperaturas externas o grandes fuerzas prensoras al trabajar pueden reducir el tiempo de uso Técnicas de poda Corte las ramas gruesas previamente con una tijera de ramas La barra de cuchilla bilateral posibilita una poda en ambas direcciones o bien de un lado hacia...

Page 84: ...iento firme de los tornillos en la barra de cuchilla Controle las cubiertas y los dispo sitivos de seguridad por eventuales daños y su asiento correcto En caso dado deben reemplazarse Mantenga las rejillas de ventilación 3 y la carcasa del motor cabeza de corte 2 del aparato en esta do limpio Utilice para esto un paño húmedo o un cepillo El aparato no debe rociarse con agua ni colocarse en agua No...

Page 85: ...s pilas recargables en un punto de recogida de pilas usadas para que así se puedan volver a reciclar de forma ecológica Consulte en este sentido al servicio de recogida de basura local o a nuestro Service Center Los aparatos defectuosos que nos envíe se los evacuaremos de forma gratuita Lleve el material cortado al lugar de compostaje y no lo tire nunca al cubo de la basura Datos técnicos Aparato ...

Page 86: ...nadas piezas están sometidas a un desgaste normal y están excluidas de la garantía A esto pertenecen par ticularmente las barras de cuchilla el excéntrico y las escobillas de carbón a medida que las reclamaciones no tengan referencia a defectos del ma terial Un requisito imprescindible para que se pueda prestar la garantía es que se cumplan las instrucciones de lim pieza y de mantenimiento Los dañ...

Page 87: ...eros de pedido Part Part Denominación No artículo Instrucciones Plano de de uso explosión 1 set8 Barra de corte de seguridad montado 9110 3808 8 set5 Cierre rápido 9110 3805 9 30 Llave inglesa 9110 3801 12 set2 Batería 9109 9411 13 set4 Interruptor de seguridad 9110 3804 14 set3 Interruptor CON DESC 9110 3803 17 26 Bandolera 9110 3800 18 set1 Cargador EU 9109 9412 set6 Engranaje 9110 3806 set7 Mot...

Page 88: ... trabaja con interrupciones Interruptor CON DESC 14 defectuoso Reparación por nuestro Service Center Contacto intermitente in terno Reparación por el Centro de Servicio Cuchillas se calientan Cuchilla despuntada Afilar o reemplazar la barra de corte 1 Centro de Servi cio Cuchilla tiene mellas Controlar o reemplazar la barra de corte 1 Centro de Ser vicio Demasiada fricción debido a lubricación fal...

Page 89: ...e ich własno ści Producent nie odpowiada za szkody które wynikły na skutek użytkowania nie zgodnego z przeznaczeniem lub niewłaści wej obsługi Noże należy regularnie kontrolować pod względem zużycia i ostrzyć Tępe noże powodują przeciążenie maszyny Wynikające z tego powo du szkody nie podlegają gwarancji Spis tresci Cel zastosowania 88 Zasady bezpieczeństwa 89 Symbole i piktogramy 89 Ogólne zasady...

Page 90: ...ewodów elek trycznych 8 Nosić okulary ochronne lub ochronę twarzy 9 Nosić kask ochronny 10 Nosić ochronniki słuchu 11 Noś odporne na przecięcie rękawice 12 Noś nieślizgające obuwie Podanie poziomu hałasu Lwa w dB Urządzeń elektrycznych nie należy wyrzucać razem z odpadami domo wymi 410 mm Długość cięcia 15 mm Grubość cięcia Symbole na baterii Nie wyrzucaj akumula torów do śmieci do mowych nie wrzu...

Page 91: ...dzi elektrycznych zasilanych z baterii bez ka bla sieciowego Bezpieczeństwo miejsca pracy Zapewnij porządek i wystarczające oświetlenie w miejscu pracy Niepo rządek lub nieoświetlone miejsce pracy może spowodować wypadek Nie pracuj narzędziem elektrycznym w atmosferze potencjalnie wybu chowej w której znajdują się palne ciecze gazy lub pyły Narzędzia elek tryczne wytwarzają iskry które mogą zapali...

Page 92: ... mocy Nigdy nie używaj narzędzia elek trycznego z uszkodzonym wyłączni kiem Narzędzie elektryczne którego porażenia prądem Nie używaj kabla do przenoszenia narzędzia elektrycznego do jego za wieszania ani do wyciągania wtyczki z gniazdka Chroń kabel przed go rącem olejem ostrymi krawędziami i ruchomymi częściami urządzenia Uszkodzone i splątane kable zwięk szają ryzyko porażenia prądem Pracując na...

Page 93: ...nej pracy Używanie narzędzia elektrycznego do celów niezgodnych z ich przeznaczeniem może prowadzić do niebezpiecznych sytuacji Starannie przejrzyj powierzchnię prze znaczoną do przycięcia i usuń wszyst kie druty oraz inne przedmioty UWAŻNE OBCHODZENIE SIĘ Z URZĄ DZENIAMI NAPĘDZANYMI AKUMULA TORAMI I ICH STOSOWANIE Ładuj akumulatory tylko przy użyciu zaleconych przez producenta łado warek Używanie...

Page 94: ...ządzenia Specjalne zasady bezpieczeń stwa dotyczące przycinarek do żywopłotów Trzymaj wszystkie części ciała w bezpiecznej odległości od noża Nie próbuj usuwać ani przytrzymywać ciętego materiału przy pracującym nożu Usuwaj zakleszczony materiał tylko przy wyłączonym urządzeniu Chwila nieuwagi podczas używania przycinarki do żywopłotów może do prowadzić do poważnych zranień Przenoś przycinarkę do ...

Page 95: ... odłączaj ładowarkę od sieci Utrzymuj urządzenie w czystości nie wystawiaj go na działanie wil goci i deszczu Nigdy nie używaj ładowarki na dworze Zabrudzenie ładowarki i dostanie się wody do jej wnętrza zwiększa ryzyko porażenia prądem Ładowarkę wolno stosować wyłącz nie z oryginalnymi akumulatorami Ładowanie innych akumulatorów może prowadzić do zranień i pożaru Unikaj mechanicznych uszkodzeń ła...

Page 96: ... tę i z powrotem W celu zapewnienia bezpieczeństwa użyt kownika urządzenie można uruchamiać przy naciśniętym łączniku bezpieczeństwa Funkcja poszczególnych elementów obsłu gi opisana została w poniższych opisach Przegląd elementów Urządzenie 1 Zabezpieczona belka nożowa 2 Głowica tnąca 3 Szczeliny wentylacyjne 4 Przycisk blokady odchylanej gło wicy tnącej 6 Tuleja gwintowanawysięgnik tele skopowy ...

Page 97: ...kodzenia wynikłe z nieprawidłowe go użytkowania nie są objęte gwaran cją Wkładanie i wyjmowanie aku mulatora 1 Aby włożyć akumulator 12 do urządzenia wsuń akumulator do urządzenia po prowadnicy Musi się on słyszalnie zablokować 2 Aby wyjąć akumulator 12 z urządzenia naciśnij zwalniacz 12a akumulatora i wyciągnij akumulator z urządzenia Sprawdzanie stanu naładowa nia akumulatora Wskaźnik stanu nała...

Page 98: ...niec trzonka poniżej głowicy tnącej 2 Podczas składania tych obu ele mentów uważaj na to aby no sek 7a na sześciokątnej rurce aluminiowej został wpasowany w rowek 2a na końcu trzonka patrz mały rysunek 2 Zamocuj oba elementy przy po mocy tulei gwintowanej 6 Obsługa Podczas prac wykonywanych tym urządzeniem noś zawsze bezpieczną odzież roboczą i rę kawice robocze Zawsze przed rozpoczęciem użytkowan...

Page 99: ...kowanie przełącznika w położe niu pracy ciągłej 2 Po puszczeniu przełącznika WŁ WYŁ 14 urządzenie wyłączy się Praca przy pomocy elektrycz nych nożyc do żywopłotów Nie używaj okrzesywarki stojąc na drabinie albo w niestabilnym miejscu Przemyśl każdy ruch nie wyko nuj nieprzemyślanych cięć Może to zagrozić Tobie i innym Podczas ciecia uwazaj aby nie do tykac zadnych przedmiotów takich jak plot z dru...

Page 100: ...drośla W ten sposób tworzy się gęste rozgałęzienia i dobrą osłonę przed wzrokiem osób trzecich 1 Przytnij najpierw boki żywopłotu W tym celu przesuwaj nożyce do żywo płotów w kierunku wzrostu od dołu ku górze Jeśli będziesz prowadził nożyce z góry ku dołowi wówczas mniejsze gałązki będą przesuwać się na ze wnątrz w wyniku czego powstaną przewężenia lub dziury 2 Górną krawędź przytnij następnie we ...

Page 101: ...uteczne i dokładne przycinanie Tępe wygięte lub uszkodzone noże muszą być wymieniane Przechowywanie Przechowuj urządzenie w dostarczonej osłonie noża w suchym i niedostęp nym dla dzieci miejscu Przechowuj urządzenie w pozycji leżącej lub zabezpieczonej przed prze wróceniem Ustaw mechanizm tnący w pozycji przechowywania Akumulator przechowywać tylko w stanie częściowo naładowanym Podczas dłuższego ...

Page 102: ...400G Znamionowy pobór prądu 12 W Napięcie wejściowe Input 100 240 V 50 60 Hz 0 3 A Napięcie wyjściowe Output 22 V 0 4 A Klasa zabezpieczenia II Typ zabezpieczenia IPX0 Podana wartość emisji drgań została zmie rzona metodą znormalizowaną i może być wykorzystywana do porównań urządzenia elektrycznego z innymi urządzeniami Podana wartość emisji drgań może też służyć do szacunkowej oceny stopnia eks p...

Page 103: ...ez dostarczenie zastępczego urządzenia bądź przez naprawę Warunkiem skorzystania z gwarancji jest przekazanie nieroz montowanego urządzenia z dowodem zakupu i gwarancji sklepowi w którym zostało ono kupione Serwis naprawczy Naprawy nie objęte gwarancją można zlecać odpłatnie naszemu centrum serwisowemu Nasze Centrum Ser wisowe chętnie sporządzi kosztorys naprawy Przyjmujemy tylko urządzenia które ...

Page 104: ...katalogowe Poz Poz Oznaczenie Nr artykułu instrukcja Rysunek samo obsługi rozwijający 1 set8 Zabezpieczona belka nożowa montowane 9110 3808 8 set5 Złącze zatrzaskowe 9110 3805 9 30 Klucz 9110 3801 12 set2 Akumulator 9109 9411 13 set4 Wyłącznik bezpieczeństwa 9110 3804 14 set3 Włącznik wyłącznik 9110 3803 17 26 Pas naramienny 9110 3800 18 set1 Ładowarka EU 9109 9412 set6 Przekładnia 9110 3806 set7 ...

Page 105: ...cz nik 14 Naprawa w Centrum serwisowym Urządzenie pra cuje z przerwami Luźny styk wewnątrz urzą dzenia Naprawa w Centrum serwisowym Uszkodzony włącznik wyłącz nik 14 Noże nagrzewają się Tępe noże Przeszlifować albo wymienić belkę nożową 1 Centrum Serwi sowe Noże są wyszczerbione Sprawdzić albo wymienić belkę nożową 1 Centrum Serwi sowe Zbyt duże tarcie na skutek braku smarowania Naoliwić listwę no...

Page 106: ... nesprávnou obsluhou Ostrost nožů se musí pravidelně kontrolovat a nože se musí pravi delně ostřit Tupé nože způsobují přetížení přístroje Na poškození z těchto důvodů se záruka nevzta huje Obsah Účel použití 105 Bezpečnostní pokyny 106 Symboly a piktogramy 106 Všeobecné bezpečnostní pokyny 107 Všeobecné bezpečností pokyny pro elektrické nářadí 107 Bezpečnostní pokyny pro nůžky na živé ploty 110 S...

Page 107: ...Noste zásadně ochranné brýle nebo obličejovou ochranu 9 Noste zásadně ochrannou helmu 10 Noste zásadně ochranu sluchu 11 Noste rukavice které jsou bezpečné proti pořezání 12 Noste protiskluzovou bezpečnostní obuv Údaj o hladině hluku Lwa v dB Elektrické přístroje nepatří do do mácího odpadu 410 mm Délka řezu 15 mm Průměr řezaných větví Grafické značky na akumulátoru Nevyhazujte akumu látory do dom...

Page 108: ...e svůj pracovní úsek čistý a dobře osvětlený Nepořádek anebo neosvětlené pracovní oblasti mohou vést k nehodám Nepracujte s elektrickým nástrojem v okolí ohroženém výbuchem v kterém se nachází hořlavé tekutiny plyny anebo prachy Elektrické ná stroje vytváří jiskry které mohou zapá lit prach anebo páry Během používání elektrického nástroje udržujte děti a jiné osoby vzdáleně od sebe Při nepozornost...

Page 109: ...tivní bezpečnostní opatření zabrání neúmyslnému startu elektrické ho nástroje Uložte nepoužívaný elektrický ná trického úderu Když pracujete s elektrickým ná strojem pod širým nebem pak po užívejte pouze prodlužovací kabely které jsou vhodné i pro venkovní oblast Použití prodlužovacího kabelu vhodného pro venkovní oblast zmen šuje riziko elektrického úderu Když nejde vyhnout se provozu elektrickéh...

Page 110: ...s jinými aku mulátory V elektrických nástrojích používejte pouze pro ně určené akumulátory Použití jiných akumulátorů může vést k poraněním a k nebezpečí požáru Udržujte nepoužívané akumulátory vzdáleně od kancelářských sponek mincí klíčů hřebíků šroubů anebo jiných malých kovových předmětů které by mohly zapříčinit přemos tění kontaktů Zkrat mezi kontakty akumulátoru může mít za následek popáleni...

Page 111: ...zdáleně od oblasti řezání V průběhu pracovního postupu může být kabel v křoví zakrytý a nedo patřením protnutý Před prováděním prací prohledejte živý plot zda se v něm nenacházejí skryté objekty např drát atd Držte nůžky na živý plot správně např oběma rukama za rukojeti v případě že jsou k dispozici dvě ru kojeti Ztráta kontroly nad přístrojem může vést ke zranění Při práci s nástrojem noste vhod...

Page 112: ...ní nízkých kapacit může poškodit články baterie Zbývající rizika I když toto elektrické nářadí obsluhujete v souladu s předpisy stále existují zbývající rizika V souvislosti s technologií a kon strukcí tohoto elektrického nářadí se mo hou vyskytovat následující rizika a zranění pořezáním b poškození sluchu pokud není nasaze na vhodná ochrana sluchu c poškození zdraví plynoucí z vibrací ruky a paže...

Page 113: ...xtrém ním podmínkám jako teplu a ná razům Hrozí nebezpečí poranění vytékajícím roztokem elektroly tu Při kontaktu s očima kůží posti žená místa omyjte vodou nebo neutralizačním prostředkem a vyhledejte lékaře Akumulátor nabíjejte jen v su chých prostorech Před připojením nabíječky musí být vnější plocha akumulátoru čistá a suchá Hrozí nebezpečí poranění elek trickým proudem Nabíjejte jen přiloženo...

Page 114: ... akumulátor 12 z přístroje 2 Zasuňte akumulátor 12 do nabíječky 18 Slyšitelně za klapne 3 Nabíječku 18 zapojte do síťové zásuvky 4 Po úspěšném dokončení nabíjení odpojte nabíječku 18 od sítě 5 Stiskněte uvolňovací tlačítka 12a na akumulátoru 12 a vyjměte akumulátor z nabíječky 18 Podstatně kratší doba provozu na vzdory nabití indikuje že je akumulátor opotřebovaný a je nutno jej vyměnit Používejte...

Page 115: ...nění inbusového šroubu 11a Upravte teleskopickou násadu Teleskopickou násadu 7 lze plynule upra vovat pomocí rychlouzávěru 8 1 Sklopte páku 8a dopředu podle obrázku a změňte délku násady posunem a tažením 2 Opět sklopte páku 8a zpět a její pomocí upevněte požadova nou pracovní délku teleskopické násady 7 3 Když se páka 8a uvolní utáh něte Allenův šroub 8b pomocí nářaďového klíče 9 Nastavení úhlu s...

Page 116: ...louhodobé používání zaří zení může vést k poruchám prokrvení rukou vyvolaných vibracemi Dobu používání můžete však prodloužit no šením vhodných ochranných rukavic nebo pravidelnými přestávkami Mějte však na paměti že osobní náchylnost ke špatnému prokrvení nízké vnější teploty nebo vysoké síly záběru při práci sníží dobu použití Techniky střihání Silné větve vyřízněte před prací něja kými nůžkami ...

Page 117: ...é opotřebené anebo po škozené části Ověřte pevné dotažení šroubů nožové lišty Zkontrolujte celistvost a správné osa zení všech krytů a ochranných zaříze ní V případě potřeby je vyměňte Větrací štěrbiny 3 a kryt motoru střihací hlava 2 udržujte v čisto tě Na to použijte vlhký šátek anebo nějaký kartáč Na přístroj se nesmí stříkat voda a přístroj se ani nesmí klást do vody Přístroj udržujte vždy čis...

Page 118: ...být provedeny v rámci dalšího vývoje bez předchozího ohlášení Všechny míry po kyny a údaje tohoto návodu k obsluze jsou proto bez záruky Právní nároky které bu dou vznešeny na základě tohoto návodu k obsluze nelze proto uplatnit Uvedená hodnota emisí vibrací byla změ řena podle normovaného zkušebního postupu a může se použít ke srovnání jed noho elektrického nářadí s jiným Uvedená hodnota emisí vi...

Page 119: ...ento přístroj poskytujeme záruku 24 měsíců Při komerčním použití zá ruka zanikne Škody které lze odvodit z přirozeného opotřebování přetížení nebo neod borné manipulace jsou ze záruky vyloučeny Určité konstrukční části podléhají běžnému opotřebení a jsou proto ze záruky vyloučeny Zejména to jsou nožové lišty výstředníky a uhlí kové kartáčky Předpokladem poskytnutí záručního plnění je také dodržová...

Page 120: ... níže uvedená čísla objednávky Pol Pol Označení Č artiklu Návod k Rozvinuté obsluze náčrtky 1 set8 Bezpečnostní nožová lišta namontované 9110 3808 8 set5 Rychlouzávěr 9110 3805 9 30 Nářaďový klíč 9110 3801 12 set2 Akumulátor 9109 9411 13 set4 Bezpečnostní spínač 9110 3804 14 set3 Zapínač vypínač 9110 3803 17 26 Ramenní pás 9110 3800 18 set1 Nabíječka EU 9109 9412 set6 Převodovka 9110 3806 set7 Mot...

Page 121: ...cuje přerušovaně Uvolněný vnitřní kontakt nutná oprava v servisním středisku Defekt zapínače vypínače 12 Nože jsou horké Nožová lišta je tupá nechte nabrousit nebo vyměnit nožo vou lištu 2 servisní středisko Nerovnosti na ostří nožové lišty nechte překontrolovat nebo vyměnit no žovou lištu 2 servisní středisko Velké tření v důsledku ne dostatečného mazání Nožovou lišto 2 naolejovat Teleskopickou n...

Page 122: ...nt įrenginį Reguliariai tikrinkite ar peiliai nesu sidėvėję ir paveskite juos pagaląs ti Atšipus peiliams perkraunamas įrenginys Su tuo susijusiems pa žeidimams garantija netaikoma Turinys Naudojimas pagal paskirtį 121 Saugos nurodymai 122 Paveikslėliai simboliai 122 Bendrieji saugos nurodymai 123 Bendrieji saugos nurodymai dėl darbo su elektriniais įrankiais 123 Saugos nuorodos sodo žirklėms 126 ...

Page 123: ...snio nei 10 m atstumo 8 10 Dėvėkite apsauginius akinius arba veido apsaugą apsauginį šalmą ir klausos apsaugą 11 Mūvėkite atsparias įpjovimams piršti nes 12 Avėkite apsauginius batus su neslys tančiais padais Garso galios lygio Lwa nurodymas dB Elektros prietaisų negalima išmesti kartu su buitinėmis atliekomis 410 mm Pjovimo ilgis 15 mm Atstumas tarp dantų Simboliai ant akumuliatoriaus Nemeskite a...

Page 124: ...paieška arba susisiekite su mūsų techninės priežiūros centru Bendrieji saugos nurody mai dėl darbo su elektriniais įrankiais ĮSPĖJIMAS PERSKAITYKITE VISUS SAUGOS NURODYMUS IR INSTRUKCIJAS Nesilaikant saugos nurodymų ir instrukcijų kyla pavojus patirti elektros smūgį gali kilti gaisras ir arba pavojus sun kiai susižaloti Išsaugokite saugos nurodymus ir ins trukcijas ateičiai Saugos nurodymuose naud...

Page 125: ...riniu įrankiu nurodytame galios diapazone dirbsite geriau ir saugiau Nenaudokite elektrinio įrankio kurio jungiklis sugedęs Elektri fikuokite Nenaudokite adapterinių kištukų kartu su įžemintais elek triniais įrankiais Esant nemodifi kuotiems kištukams ir tinkamiems kištukiniams lizdams mažėja elektros smūgio rizika Venkite kūno sąlyčio su įžemintais paviršiais pvz vamzdžiais šildytuvais viryklėmis...

Page 126: ...lti pavojingų situacijų Atidžiai patikrinkite plotą kurį reikia nukarpyti ir pašalinkite visas vielas bei kitus pašalinius daiktus Laikykite elektrinį įrankį tik už izoliuotų rankenų nes pjovimo peiliai gali kli udyti paslėptus elektros laidus arba įrenginio tinklo laidą Pjovimo peiliui prisilietus prie įtampingojo laido įtampa gali būti perduodama į metali nes įrenginio dalis todėl galimas elek t...

Page 127: ...nt transportuojamų ar laikomų gyvatvo rių žirklių uždėkite peilių apsaugą Rūpestingai elgiantis su prietaisu suma žėja pavojus susižeisti dėl peilių Elektrinį įrankį laikykite tik už izo liuotų laikymo paviršių kad peilis negalėtų prisiliesti prie sulenkto srovės tiekimo laido Peiliui prisilietus prie įtampą tiekiančio laido metalinėms prietaiso dalims gali būti perduota įtam pa todėl kyla elektro...

Page 128: ...alifikuotas asmuo Kroviklyje neįkraukite neįkraunamų baterijų Prietaisas gali būti pažeistas Liekamoji rizika Net jei šis elektrinis įrankis naudojamas pagal nurodymus visada galima tikėtis lie kamosios rizikos Dėl šio elektrinio įrankio modelio ir konstrukcijos gali kilti toliau nu rodyti pavojai a pavojus įsipjauti b pavojus pažeisti klausos organus jei nenaudojama klausos organų apsau ga c kyla...

Page 129: ...ntų veikimą rasite tolesniuose aprašymuose Įkrovimo procesas Nepalikite akumuliatoriaus eks tremaliose sąlygose pvz šilu moje ir saugokite nuo smūgio Gresia pavojus susižeisti ište kančiu akumuliatoriaus skysčiu Patekus į akis arba ant odos plaukite tas vietas vandeniu arba neutralizatoriumi ir kreipkitės į gydytoją Akumuliatorių įkraukite tik sau sose patalpose Prieš prijungdami kroviklį įsi tiki...

Page 130: ...sos diodų LED lemputės Akumuliatoriaus 12 įkrovimo lygio in dikacijos šviesos diodų LED lemputė 12b mirksi raudonai jei įstatėte įkaitusį akumuliatorių į kroviklį 18 1 Jei reikia išimkite akumuliatorių 12 iš prietaiso 2 Įstumkite akumuliatorių 12 į kroviklį 18 Jis girdimai užsifik suoja 3 Įjunkite kroviklį 18 į elektros lizdą 4 Pasibaigus įkrovimo procesui atskirkite kroviklį 18 nuo tinklo 5 Paspa...

Page 131: ...virtinimas nustatymas 1 Pritvirtinkite per petį dėvimo dir žo 17 karabino kablį už nešimo kilpos 11 ant įrenginio koto 2 Pasirinkite tokį diržo ilgį kad per petį dėvimo diržo karabino ka blys būtų Jūsų klubų aukštyje 3 Papildomai atlaisvinę varžtą su vidiniu šešiabriauniu 11a galite reguliuoti nešimo kilpos 17 ant teleskopinio koto aukštį Teleskopinio koto reguliavimas Teleskopinis kotas 7 gali bū...

Page 132: ...s arba nudi lusiais peiliais nes kitaip perkrausite savo įrenginio variklį ir pavarų dėžę Dirbdami stenkitės įrenginio neper krauti Reguliariai keiskite savo darbinę padėtį Ilgai naudojant prietaisą dėl vi bracijos gali sutrikti rankų kraujotaka Vis dėlto darbo trukmę galite pailginti naudodami tinkamas apsaugines pirštines arba darydami reguliarias pertraukas Atkreipkite dėmesį kad asmeninis blog...

Page 133: ... naudojimas Kiekvieną kartą prieš naudodami sodo žirkles patikrinkite ar nėra akivaizdžių defektų pvz nepritvirtintų susidėvė jusių arba pažeistų dalių Patikrinkite art tvirtai priveržti varžtai peilių sijoje Patikrinkite uždangalus ir apsauginius įtaisus ar jie nepažeisti ir tinkamai pri tvirtinti Prireikus juos pakeiskite Įrenginio ventiliacinės angos ir variklio korpusas turi būti švarūs Tam na...

Page 134: ... naudotų akumuliatorių surinkimo vietą kur jis bus perduotas aplinką tausojančiai atliekų utilizavimo įstaigai Apie tai teiraukitės vietos atlie kų išvežimo įmonėje arba mūsų techni nės priežiūros centre Jei mums atsiųsite savo sugedusį prie taisą mes jį utilizuosime nemokamai Nupjautas šakas nuvežkite į kompos tavimo vietą nemeskite jų į šiukšlių konteinerius Techniniai duomenys Prietaisas Varikl...

Page 135: ...ės apkrovos arba netinkamo valdymo Tam tikros konstrukcinės dalys natūraliai dėvisi todėl joms ga rantija nesuteikiama Tokioms dalims priskiriami peilių juosta ekscentrikas ir angliniai šepetėliai jei nusiskundimai nėra susiję su medžiagos defektais Kad būtų suteikta garantija turėjo būti laikomasi valymo ir techninės priežiū ros nurodymų Jei pastebimi medžiagos arba gamy bos defektai pristatomas ...

Page 136: ...cija Pozicija Aprašymas Straipsnio numerį Eksploatavimo Trimatis instrukcija vaizdas 1 set8 Apsauginė peilių sija pilnai surinkta 9110 3808 8 set5 Greitasis užraktas 9110 3805 9 30 Raktas 9110 3801 12 set2 Akumuliatorius 9109 9411 13 set4 Apsauginis jungiklis 9110 3804 14 set3 Įjungimo išjungimo jungiklis 9110 3803 17 26 Per petį dėvimas diržas 9110 3800 18 set1 Kroviklis EU 9109 9412 set6 Pavara ...

Page 137: ... Įrenginys veikia su pertrūkiais Vidinis atsipalaidavęs kontaktas Paveskite suremontuoti techninės priežiūros centrui Sugedęs įjungimo išjun gimo jungiklis 14 Peiliai tampa karšti Atšipę peiliai Pagaląskite arba pakeiskite peilių siją 2 paveskite tai atlikti tech ninės priežiūros centrui Peiliai grublėti Patikrinkite arba pakeiskite peilių siją 2 paveskite tai atlikti tech ninės priežiūros centrui...

Page 138: ...ird entsprechend der Ge räuschemissionsrichtlinie 2000 14 EG bestätigt Schallleistungspegel Garantiert 100 dB A Gemessen 96 7 dB A Angewendetes Konformitätsbewertungs verfahren entsprechend Anh V 2000 14 EG Nous certifions également conformément à la directive sur les émissions de bruit 2000 14 EC que Niveau de puissance sonore garanti 100 dB A mesuré 96 7 dB A Procédé d évaluation de la conformit...

Page 139: ...ccordance with the 2000 14 EC emissions guideline Sound power level guaranteed 100 dB A measured 96 7 dB A Compliance evaluation process carried out in accordance with Appendix V 2000 14 EC Bovendien wordt in overeenstemming met de geluidsemissierichtlijn 2000 14 EC bevestigd Akoestisch niveau gegarandeerd 100 dB A gemeten 96 7 dB A Toegepaste conformiteitbeoordelingspro cedure in overeenstemming ...

Page 140: ...s se confirma en conformidad con la Directriz de emisión de ruidos 2000 14 CE Nivel de potencia acústica garantizado 100 dB A medido 96 7 dB A Procedimiento de evaluación de conformi dad aplicado según indicación en anexo V 2000 14 CE Ponadto potwierdzono zgodnie z dyrektywą w sprawie emisji hałasu 2000 14 EC poziom mocy akustycznej gwarantowany 100 dB A zmierzony 96 7 dB A Zastosowana procedura o...

Page 141: ...souhlase se směrnicí pro emisi hluku 2000 14 EC potvrzuje Úroveň akustického výkonu zaručená 100 dB A měřená 96 7 dB A Použitý postup konformitního ohodnocení dle dodatku V 2000 14 EC Remiantis 2000 14 EB dėl valstybių narių įstatymų reglamentuojančių lauko sąly gomis naudojamos įrangos į aplinką sklei džiamą triukšmą suderinimo papildomai patvirtinama Garso galingumo lygis Numatyta 100 dB A Išmat...

Page 142: ...loded Drawing Explosietekening Vue éclatée Plano de explosión Rysunek samorozwijający Rozvinuté náčrtky Trimatis vaizdas AHS 1845 T Lion informativ informative informatief informatif informatívo pouczający informační informatyvus ...

Page 143: ...142 ...

Page 144: ...hoten Tel 0900 8724357 0597 413753 Fax 0597 420632 e mail itsw planet nl ITSw bv BE Tel 03 54 13760 Fax 03 54 15651 e mail forteam esther skynet be 92 S A c Bristol 32 34 Parque Empresarial Europolis 28232 Las Rozas Madrid Tel 91 6409 950 Fax 91 6407 135 e mail comercial 92sa com Biuro Handlowo Uslugowe Andrzej Krysiak ul Rolna 6 62 081 Baranowo Tel 061 650 75 30 Fax 061 650 75 32 e mail krysiak k...

Page 145: ......

Reviews: