background image

G-SWA

Assembly and Operating Manual

1 Operation

NOTICE! Do not use tools that overload the axis!

Recommended torque values:
SWA050: 16 Nm
SWA063: 16 Nm
SWA080: 16 Nm
SWA100: 24 Nm
SWA125: 36 Nm
SWA160: 40 Nm

2

Do not use any tools, that increase the torque effect of the lever. Make sure that the 

allen key is in good working condition and fully inserted into the axis. 

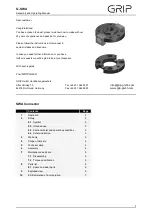
To operate the SWA Connector, use an allen key . To open, turn the allen key counter-clockwise till the stop. 

This opens the flanges and releases the lower assembly. The upper and lower assembly can now be pulled 

apart.

To assemble, ensure the flanges are open, when joining the upper and lower assembly. Turn the allen key 

clockwise till stop to close the flanges. Due to the wedge profile, this locks the upper and lower assemblies 

together. Be sure to use the predetemined tightening torque to ensure proper locking.

Image 1

Image 2

NOTICE!

In dynamic applications, it is important that the axis is correctly 

torqued with the recommended torque values! 

Note, even with proper torqueing a loosening of the axis can not be 

ruled out. 

Summary of Contents for G-SWA

Page 1: ...h best regards Your GRIP GmbH GRIP GmbH Handhabungstechnik Alter Hellweg 70 Tel 49 231 96450 01 info grip gmbh com 44379 Dortmund Germany Fax 49 231 96450 50 www grip gmbh com SWA Connector 1 6 7 4 5 6 5 5 5 8 Warranty 7 2 Torque specification Parts list Assembly Maintenance and care 7 1 Disassembly Page 2 3 3 3 3 2 3 Environmental and operating conditions 2 4 Safety indication Scope of delivery T...

Page 2: ...er clockwise till the stop This opens the flanges and releases the lower assembly The upper and lower assembly can now be pulled apart To assemble ensure the flanges are open when joining the upper and lower assembly Turn the allen key clockwise till stop to close the flanges Due to the wedge profile this locks the upper and lower assemblies together Be sure to use the predetemined tightening torq...

Page 3: ...ceptions are units designed especially for the respective conditions Everyone who is responsible for assembly commissioning and maintenance must read and understand the complete operating instructions Improper use which affects the function und operational safety of the SWA Connector is prohibited In order to prevent damage to the connector as well as injuries to the operator the lower assembly or...

Page 4: ...er the centering pin The angular orientation is determined by a fitting bore The lower assembly is mounted on grippers measuring instruments or other tools Again a centering should be generated If the SWA Connector can not be installed due to space limitations adapter flanges can be used Use screws according to DIN 912 ISO 4762 during mounting The screw in depth of the screws must be observed We r...

Page 5: ...embly reverse the order 7 2 Torque specifications M6 8 5 Nm M8 20 6 Nm M10 41 Nm M12 71 Nm 8 Parts list 8 1 Spare and wear parts depending on size 5 Quantity Description Upper assembly Axis Flange Screw nut 4 5 2 Axis Setscrew 1 1 2 2 1 Order No EG SWA A Locking ring Lower assembly 7 7 Index pin 1 Pos Description 2 3 Pos 1 1 1 The SWA is virtually maintenance free Check the semi cylindrical bolt i...

Page 6: ...G SWA Assembly and Operating Manual 9 Exploded view 6 Image 4 Image 5 Upper assembly Lower assembly ...

Page 7: ...design Part 2 Technical principles ISO 12100 2 2003 Safety of Machinery Basic concepts general principles for design Part 1 Basic terminology and methodology ISO 12100 1 2003 In the case of reasoned requests the specific documents shall be sent to the national authorities as follows Post The product mentioned above may only be put into operation if it has been established applicable that the unit ...

Reviews: