IN-GE-RPCXXXBAC-01-02 03/19
Page 1
Copyright © Greystone Energy Systems, Inc. All Rights Reserved Phone: +1 506 853 3057 Web: www.greystoneenergy.com
INTRODUCTION
The room pressure transmitter is used to measure differential pressure
in the range of 0.125 to 1"wc or 30 to 250 Pa. It combines precision high
sensitivity silicon sensing capabilities and the latest ASIC technology
to substantially reduce offset errors due to changes in temperature,
stability to warm up, long term instability and position sensitivity. It
is ideal for monitoring pressure for air or other clean inert gas. The
device has an on-board auto-zero function, backlit LCD and alarm
function with silence switch plus a native BACnet® RS-485 MS/TP
network connection.
BEFORE INSTALLATION
Read these instructions carefully before installing and commissioning the room pressure transmitter.
Failure to follow these instructions may result in product damage. Do not use in an explosive or hazardous
environment, with combustible or flammable gases, as a safety or emergency top device or in any other
application where failure of the product could result in personal injury. Take electrostatic discharge
precautions during installation.
Do not exceed the device ratings.
MOUNTING
The room pressure transmitter mounts directly on a wall or onto an electrical wall box. For the most
accurate results, units should be mounted on an inside wall to a wall box five feet from the floor. Do not
mount the sensor near doors, opening windows, supply air diffusers, or other known air disturbances.
Avoid areas where the sensor is exposed to vibrations or rapid temperature changes. To prevent erroneous
readings due to air disturbances within the wall cavity, seal the conduit leading to the junction box.
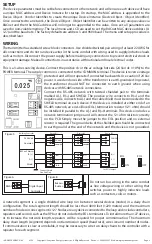
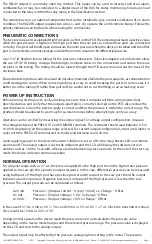
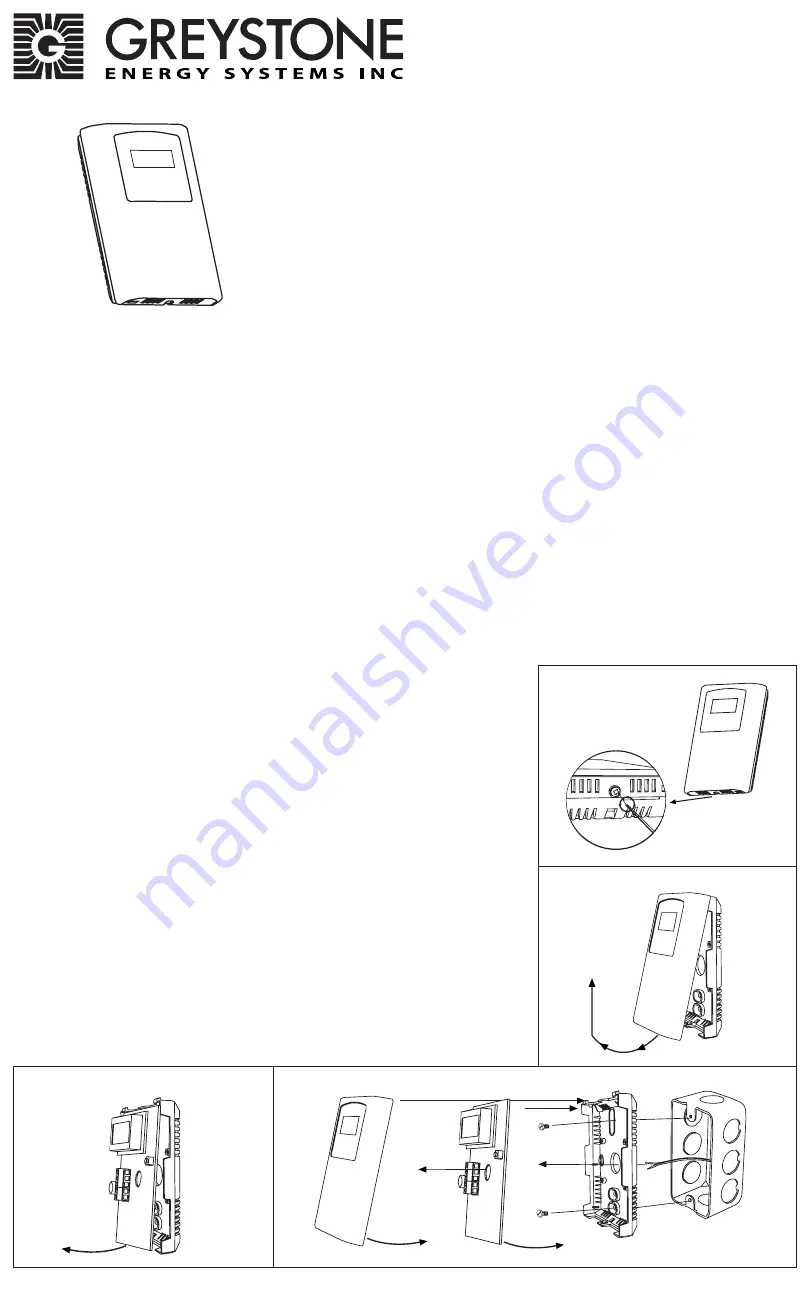
The cover is hooked to the base at the top edge and must be removed from the bottom edge first. Use
a small Phillips screwdriver to loosen the security screw as shown in Figure 1. (Complete removal is not
required). Use a screw driver to carefully pry each bottom corner if necessary. Tip the cover away from the
base and sit it aside as shown in Figure 2.
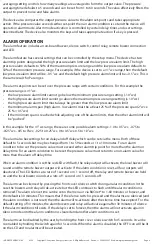
The PCB must be removed from the base to access the mounting
holes. Follow usual anti-static procedures when handling the PCB and
be careful not to touch the sensors. The PCB is removed by pressing
the enclosure base to unsnap the latch near the bottom edge, then
the PCB can be lifted out of the base as shown in Figure 3.
Set the PCB aside until the base is mounted on the wall. For added
protection, place the PCB in the supplied anti-static bag.
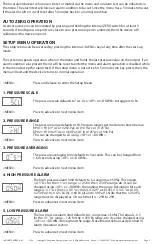
Mount the base by screwing it to an electrical box or directly to the
wall as shown in Figure 4.
After the base is screwed to an electrical box or the wall using the
appropriate holes, remove the PCB from the anti-static bag, feed
connection wires through center hole and place the top of the PCB
into the PCB holders on the backplate and snap the bottom of the
PCB into place as shown in Figure 4.
Make wire connections as per the Wiring Illustrations on Page 2 and
install decorative cover by placing the top of the cover into the cover
holder on the top of the backplate and snapping the bottom into
place as shown in Figure 4. Tighten security screw with a screwdriver.
Network Room
Pressure Transmitter
RPC Series - Installation Instructions
Figure 1
Figure 4
Figure 3
Figure 2
Cover
PCB
Backplate


