background image

13

SOLUCIÓN DE PROBLEMAS

Problema

Posible causa

Solución

La máquina no se pone en
marcha cuando aprieta el
gatillo.

No hay contacto eléctrico entre la máqui-
na y la batería.

1. Retire la batería.

2. Compruebe el contacto e instale de nuevo la batería.

La batería se ha agotado.

Cargue la batería.

El botón de desbloqueo y el gatillo no se
presionan al mismo tiempo.

1. Pulse el botón de desbloqueo y manténgalo pulsado.

2. Apriete el gatillo para poner en marcha la máquina.

La máquina se detiene
cuando corta.

La protección no está fijada a la máqui-
na.

Retire la batería y fije la protección a la máquina.

Se utiliza un hilo de corte pesado.

Utilice únicamente con el hilo de corte de nylon de
0.095" / 0.080" (2.4 mm / 2.0 mm) de diámetro.

La hierba se enrolla alrededor del eje del
motor o del cabezal de corte.

1. Detenga la máquina.

2. Retire la batería.

3. Retire la hierba del eje del motor y del cabezal de
corte.

El motor se ha sobrecargado.

1. Retire el cabezal de corte de la hierba.

2. El motor se recuperará para funcionar en cuanto se
retire la carga.

3. Cuando corte, mueva el cabezal de corte hacia dentro
y fuera de la hierba que va a cortar y quite no más de 8"
(20 cm) en cada pasada.

La batería o la máquina está demasiado
caliente.

1. Deje enfriar la batería hasta que el funcionamiento
vuelva a la normalidad.

2. Deje enfriar la máquina durante aproximadamente 10
minutos.

La batería se ha desconectado de la her-
ramienta.

Instale de nuevo la batería.

La batería se ha agotado.

Cargue la batería.

El hilo no avanza.

No hay suficiente hilo en el carrete.

Instale más hilo.

Los hilos se desgastan y son demasiado
cortos.

Avance el hilo de corte.

Los hilos están enredados en el carrete.

1. Retire los hilos del carrete.

2. Enrolle los hilos.

El hilo se rompe continua-
mente.

La máquina se está utilizando incorrecta-
mente.

1. Corte con la punta del hilo, evite piedras, paredes y
otros objetos duros.

2. Avance el hilo de corte periódicamente para manten-
er el ancho de corte completo.

28

Español

ES

Summary of Contents for ULTRAPOWER 60V ST60L04

Page 1: ...STC404 ST60L04 ST60L254 www greenworkstools com EN OPERATOR MANUAL STRING TRIMMER ES MANUAL DEL OPERADOR CORTABORDES ...

Page 2: ......

Page 3: ...he machine 8 9 2 Stop the machine 8 9 3 Adjust the length of the cutting line 8 9 4 Adjust the cutting diameter 9 9 5 Line cut off blade 9 9 6 Attach machine to shoulder strap 9 9 7 Operation tips 9 9 8 Cutting tips 10 10 Maintenance 10 10 1 General information 10 10 2 Clean the machine 10 10 3 Remove excess line 10 10 4 Install the cutting line 11 10 5 Replace the spool 12 10 6 Remove the trimmer...

Page 4: ...r entering a power tool will increase the risk of electric shock Don t use in rain Keep all bystanders children and pets at least 50 ft away Dress Properly Do not wear loose clothing or jewelry They can be caught in moving parts Use of rubber gloves and substantial footwear is recommended when working outdoors Wear protective hair covering to contain long hair Use right Appliance Do not use applia...

Page 5: ...plosion Do not dispose of the batteries in a fire The cells may explode Check with local codes for possible special disposal instructions Do not open or mutilate the batteries Released electrolyte is corrosive and may cause damage to the eyes or skin It may be toxic if swallowed Exercise care in handling batteries in order not to short the battery with conducting materials such as rings bracelets ...

Page 6: ...s do not recharge it and do not use Discard it and replace with a new battery pack DO NOT TRY TO REPAIR IT To prevent injury and risk of fire explosion or electric shock and to avoid damage to the environment Cover the terminals of the battery with heavy duty adhesive tape DO NOT try to remove or destroy any of the battery pack components DO NOT try to open the battery pack If a leak develops the ...

Page 7: ...er head 3 Align the screw holes on the guard with the screw holes on the trimmer head 4 Tighten the screws 8 3 ASSEMBLE THE SHAFT 1 Loosen the screw on the coupler 2 Push in the release button on the lower shaft 9 3 Align the release button with the positioning hole and slide the two shafts together 8 6 Release button Positioning hole 4 Turn the lower shaft until the button locks into the position...

Page 8: ...the battery pack from the machine 9 OPERATION IMPORTANT Before you operate the machine read and understand the safety regulations and the operation instructions WARNING Be careful when you operate the machine 9 1 START THE MACHINE 1 Push the lock out button 3 and pull the trigger 4 3 4 5 2 Push the speed switch 5 to the desired operating speed Push the speed switch to position 1 for low speed or p...

Page 9: ...ne whenever you hear the motor running faster than normal or when trimming efficiency diminishes This will maintain best performance and keep line long enough to advance properly 9 6 ATTACH MACHINE TO SHOULDER STRAP 1 Attach the carabiner to the carrying ring on the drive tube 2 Put on the shoulder strap 3 Adjust the length of the strap so that the carabiner is about a hand s width below your righ...

Page 10: ...ANT Use only the replacement parts and accessories of the initial manufacturer 10 1 GENERAL INFORMATION IMPORTANT Only your dealer or approved service center can perform maintenance that is not given in this manual Before the maintenance operations Stop the machine Remove the battery pack Cool the motor Store the machine in cool and dry place Use correct clothing protective gloves and safety glass...

Page 11: ...tting line on the spool 2 Line up the slots on the spool cover with the slots a on the trimmer head a b 3 Insert the line into the mounting hole which is located inside the eyelet b Push the cutting line until it exits the opposite hole Mounting Hole inside the Eyelet 4 Pull the cutting line through until there is an equal quantity of cutting line on each side 5 Rotate the spool cover clock wise i...

Page 12: ...ng and slot covert onto the spool cover b and then put the spool onto the slot covert to the disired position 6 Tigthen with the screws e d f b g 10 6 REMOVE THE TRIMMER HEAD 1 Put the metal rod a in the specified angle transmission hole b to fix the trimmer head b a 2 Turn the trimmer head clockwise to loosen it Do not remove the spacer from the shaft 10 7 ASSEMBLE THE TRIMMER HEAD 1 Put the meta...

Page 13: ... 60V Brushless No load speed 6000 5000 RPM Cutting line diameter 0 095 0 080 2 4 mm 2 0 mm Cutting path diameter 14 in 16 in 35 6 cm 40 6 cm Feed Type Bump Feed Weight without battery pack 7 9 lbs 3 6 kg Battery model LB602 LB6025 LB603 LB604 LB605 LB606 and other BAC series Charger model CAC801 CH60DP01 60DPC10A CH60R00 and other CAC series The recommended ambient temperature range Item Temperatu...

Page 14: ...r to work as soon as the load is removed 3 When you cut move the trimmer head in and out of the grass to be cut and remove no more than 8 in pass The battery pack or machine is too hot 1 Cool the battery pack until its function returns to nor mal 2 Cool the machine for approximately 10 minutes The battery pack is disconnected from the tool Install the battery pack again The battery pack is deplete...

Page 15: ...upplied with the product from new ITEMS NOT COVERED BY WARRANTY 1 Any part that has become inoperative due to misuse commercial use abuse neglect accident improper maintenance or alteration or 2 The unit if it has not been operated and or maintained in accordance with the owner s manual or 3 Normal wear except as noted below 4 Routine maintenance items such as lubricants blade sharpening 5 Normal ...

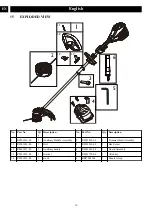
Page 16: ...01836 00 1 Auxiliary Handle Assembly 2 R0201834 00 1 Trimmer Head Assembly 1 1 R0201826 00 1 Bolt 3 R0201830 00 1 Hex Screw 1 2 R0201827 00 1 Auxiliary handle 4 R0201881 00 1 Guard Assembly 1 3 R0201828 00 1 Bracket 5 R0201770 00 1 Allen key 1 4 R0201833 00 1 Knob 6 RB37902144 1 Shouler strap 16 English EN ...

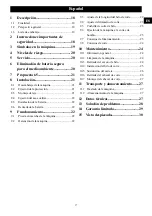
Page 17: ...2 9 2 Detención de la máquina 22 9 3 Ajuste de la longitud del hilo de corte 22 9 4 Ajuste del diámetro de corte 23 9 5 Cuchilla de corte de hilo 23 9 6 Fijación de la máquina a la correa de hombro 23 9 7 Consejos de funcionamiento 23 9 8 Consejos de corte 24 10 Mantenimiento 24 10 1 Información general 24 10 2 Limpieza de la máquina 24 10 3 Retirada del exceso de hilo 24 10 4 Instalación del hilo...

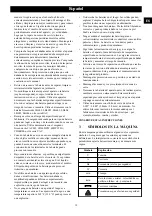
Page 18: ... esta regla reducirá el riesgo de lesiones oculares Utilice máscara facial si trabaja en espacios de trabajo con polvo Evite los entornos peligrosos No exponga las herramientas eléctricas a condiciones de humedad Si penetra agua en una herramienta eléctrica aumentará el riesgo de descarga eléctrica No utilice bajo la lluvia Mantenga a todos los transeúntes niños y mascotas al menos a 15 m Lleve in...

Page 19: ...os ojos acuda también al médico El líquido despedido de la batería puede provocar irritación o quemaduras No utilice una batería o un aparato que haya sufrido daños o modificaciones Las baterías dañadas o modificadas pueden exhibir un comportamiento impredecible que puede dar lugar a un incendio una explosión o un riesgo de lesiones No exponga una batería o un aparato al fuego ni a temperaturas ex...

Page 20: ...CENTRO DE SERVICIO AUTORIZADO más cercano para su reparación Utilice únicamente accesorios y piezas de repuesto idénticos del fabricante 6 ELIMINACIÓN DE BATERÍA SEGURA PARA EL MEDIO AMBIENTE Los materiales tóxicos y corrosivos que figuran a continuación se encuentran en las baterías utilizadas en esta máquina Ion de litio un material tóxico AVISO Deseche todos los materiales tóxicos de una manera...

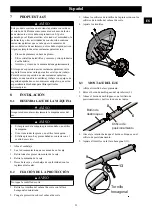
Page 21: ...segúrese de montar correctamente la máquina antes del uso AVISO Si las piezas de la máquina presentan daños no utilice la máquina Si no tiene todas las piezas no utilice la máquina Si faltan piezas o hay piezas dañadas contacte con el centro de servicio 1 Abra el embalaje 2 Lea la documentación que se encuentra en la caja 3 Retire todas las piezas sin montar de la caja 4 Retire la máquina de la ca...

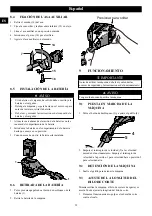
Page 22: ...c la batería está instalada 1 8 6 RETIRADA DE LA BATERÍA 1 Pulse y mantenga pulsado el botón de desbloqueo de la batería 1 2 Retire la batería de la máquina Presionar para soltar 9 FUNCIONAMIENTO IMPORTANTE Antes de utilizar la máquina debe leer y entender las normas de seguridad y las instrucciones de funcionamiento AVISO Tenga cuidado cuando utilice la máquina 9 1 PUESTA EN MARCHA DE LA MÁQUINA ...

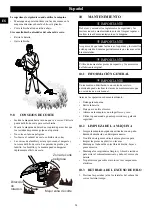
Page 23: ...e corte de hilo 17 en la protección La cuchilla de corte de hilo recorta continuamente el hilo para garantizar un diámetro de corte uniforme y eficaz Avance el hilo cada vez que escuche que el motor funciona más rápido de lo normal o cuando la eficiencia del corte disminuya Esto mantendrá el mejor rendimiento y mantendrá el hilo el tiempo suficiente para avanzar adecuadamente 9 6 FIJACIÓN DE LA MÁ...

Page 24: ...uina IMPORTANTE Asegúrese de que todas las tuercas los pernos y los tornillos estén apretados Examine periódicamente que las asas estén bien instaladas IMPORTANTE Utilice únicamente las piezas de repuesto y los accesorios del fabricante original 10 1 INFORMACIÓN GENERAL IMPORTANTE Únicamente un distribuidor o un centro de servicio autorizado puede realizar las tareas de mantenimiento que no se ind...

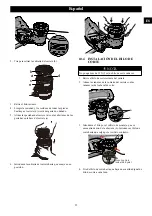
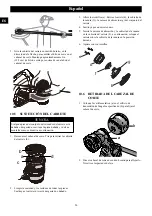
Page 25: ...e en su posición 10 4 INSTALACIÓN DEL HILO DE CORTE NOTA No ponga más de 15 ft 5 m de hilo de corte cada vez 1 Retire el hilo de corte restante del carrete 2 Alinee las ranuras de la cubierta del carrete con las ranuras a del cabezal de corte a b 3 Introduzca el hilo por el orificio de montaje que se encuentra dentro de la abertura b Introduzca el hilo de corte hasta que salga por el orificio cont...

Page 26: ...ad y los residuos de todas las piezas Sustituya el carrete d si está desgastado o dañado 3 Afloje los tornillos e Retire el carrete d la cubierta de la ranura f y la carcasa de ubicación g del conjunto del carrete 4 Sustituya por un carrete nuevo 5 Inserte la carcasa de ubicación y la cubierta de la ranura en la cubierta del carrete b a continuación coloque el carrete sobre la cubierta de la ranur...

Page 27: ...daños o lesiones Limpie y examine si hay daños en la máquina 12 DATOS TÉCNICOS Tipo Inalámbrico con funciona miento a batería Motor 60V Sin escobillas Velocidad sin carga 6000 5000 RPM Diámetro de hilo de corte 0 095 0 080 2 4 mm 2 0 mm Diámetro de recorrido de corte 14 in 16 in 35 6 cm 40 6 cm Tipo de alimentación Avance por sacudida Peso sin batería 7 9 lbs 3 6 kg Modelo de batería LB602 LB6025 ...

Page 28: ...abezal de corte El motor se ha sobrecargado 1 Retire el cabezal de corte de la hierba 2 El motor se recuperará para funcionar en cuanto se retire la carga 3 Cuando corte mueva el cabezal de corte hacia dentro y fuera de la hierba que va a cortar y quite no más de 8 20 cm en cada pasada La batería o la máquina está demasiado caliente 1 Deje enfriar la batería hasta que el funcionamiento vuelva a la...

Page 29: ...o alquiladas para uso industrial comercial y cuyo mantenimiento se ha realizado de acuerdo con las instrucciones del manual del propietario suministrado con el producto nuevo ARTÍCULOS NO CUBIERTOS POR LA GARANTÍA 1 Cualquier pieza que no funcione debido a mal uso uso comercial abuso negligencia accidente mantenimiento inadecuado o alteración o 2 La unidad si no ha sido utilizada o mantenida de ac...

Page 30: ...1 Conjunto de asa auxiliar 2 R0201834 00 1 Conjunto de cabezal de corte 1 1 R0201826 00 1 Perno 3 R0201830 00 1 Tornillo hexagonal 1 2 R0201827 00 1 Asa auxiliar 4 R0201881 00 1 Conjunto de protección 1 3 R0201828 00 1 Soporte 5 R0201770 00 1 Llave Allen 1 4 R0201833 00 1 Mando 6 RB37902144 1 Correa de hombro 30 Español ES ...

Page 31: ......

Page 32: ......

Reviews: