background image

Laboratory Exhaust System

12

®

Maintenance

Once the fan has been put into operation, a periodic maintenance program should be set up to preserve the 
reliability and performance of the fan. Items to be included in this program are:
 

•  Belts 

•  Removal of dust and dirt 


•  Fasteners  

•  Fan shaft bearings 


•  Set Screws 

•  Vektor-HS nozzle bearings 

  • Motors 

• Relubrication schedule

Belts

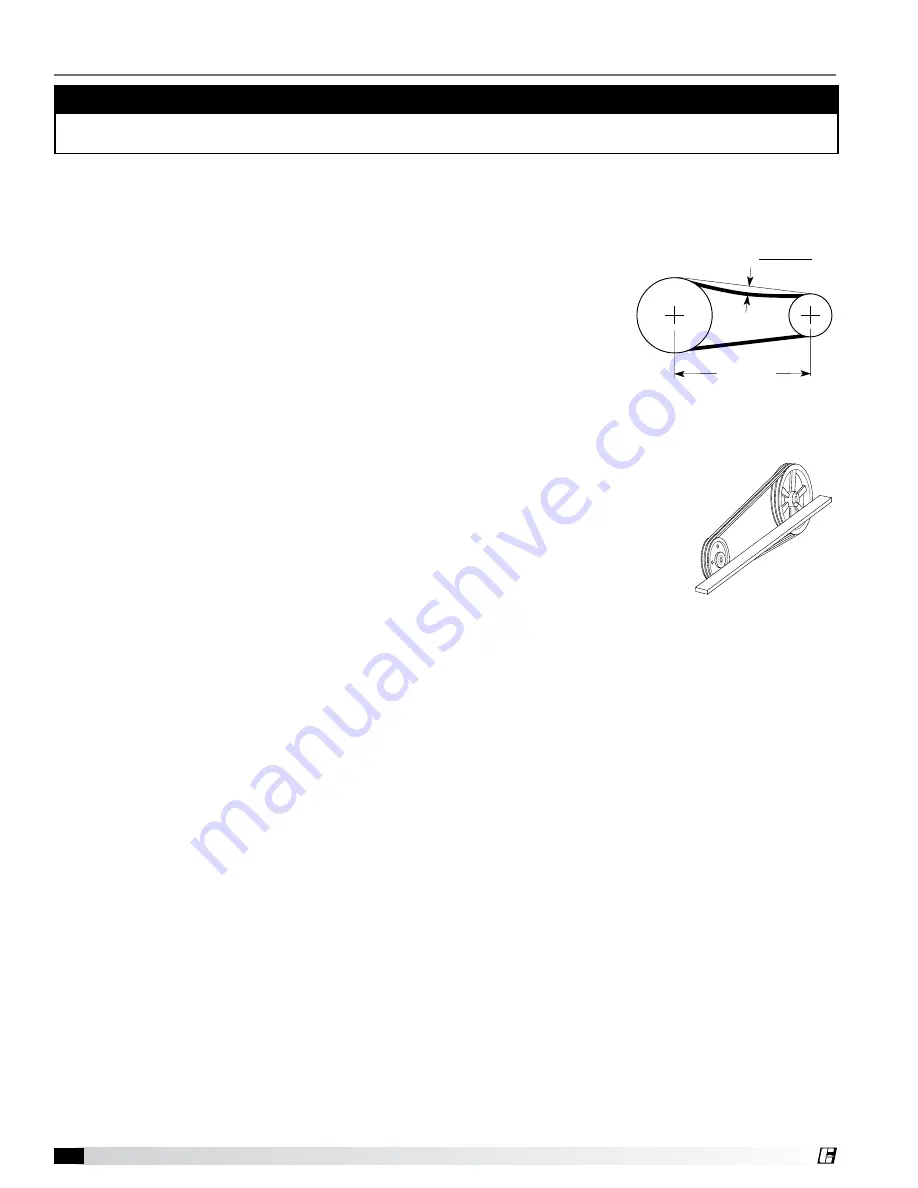
Premature belt failures are frequently caused by improper belt tension (either too 
tight or too loose) or misaligned pulleys. The proper tension for operating a V-belt is 
the lowest tension at which the belts will not slip at peak load conditions. For initial 
tensioning, the proper belt deflection half-way between pulley centers is 1/64-inch for 
each inch of belt span. For example, if the belt span is 64 inches, the belt deflection 
should be one inch using moderate thumb pressure at midpoint of the drive.
Check belt tension two times during the first 24 hours of operation and periodically thereafter. To adjust belt tension, 
simply loosen four fasteners (two on each side of the motor plate) and slide the motor plate away from the fan shaft 
until proper belt tension is attained. On some fans, fasteners attaching the motor to the motor plate 
must be loosened in order to adjust the belt.
It is very important that the drive pulleys remain in proper alignment after adjustments are made. 
Misalignment of pulleys will result in premature belt wear, noise, vibration and power loss.

Fasteners and Set Screws

A periodic inspection should include checking all fasteners and set screws for tightness. 
Particular attention should be paid to set screws attaching the wheel to the shaft.

Motors

Belt Drive:

Many fractional horsepower motors installed on the smaller fans are lubricated for life and require no further 
attention. Motors supplied with grease fittings should be greased according to directions printed on the motor.

Direct Drive:

Motor bearings are lubed for life, with no maintenance required.
If motor or wheel needs to be serviced or replaced, use the lifting lugs to pull assembly cartridge out.

Removal of Dust and Dirt

Dirt clogs cooling openings on the motor housing, contaminates bearing lubricant, and collects on the impeller 
causing severe imbalance if left unchecked. The exterior surface of the motor and impeller should be thoroughly 
cleaned periodically. Use caution and do not allow water or solvents to enter the motor or bearings. Under no 
circumstances should motors or bearings be sprayed with steam or water.

Fan Shaft Bearings

The bearings for Greenheck fans are carefully selected to match the maximum load and operating conditions of 
the specific class, arrangement, and fan size. The instructions provided in this manual and those provided by the 
bearing manufacturer will minimize any bearing problems. Bearings are the most critical moving part of the fan; 
therefore, special care is required when mounting them on the unit and maintaining them. Locking collars and set 
screws, in addition to fasteners attaching the bearing to the bearing plate must be checked for tightness. Greenheck 
Fan Corporation recommends bearings to be relubricated quarterly at a minimum. All Vektor-H and Vektor-HS fans 
use Mobil Mobilith SHC 100 synthetic grease conforming to NCGI Grade 2. Never mix greases made with different 
bases as this will cause a breakdown of the grease and possible failure of the bearing. For specific information, 
contact the factory representative or the fan system submittals.
•  For conditions including temperatures, moisture, dirt or excessive vibration, consult the factory for a specific 

lubrication interval for your application.

•  Lubricant should be a high quality lithium complex synthetic grease conforming to NLGI Grade 2.

WARNING

Disconnect all electrical power to the fan and secure to the ‘OFF’ position prior to inspection or servicing. Failure to 
comply with this safety precaution could result in serious injury or death.

Belt 

Alignment

Deflection  =  Belt Span

 64

Belt Span

Belt Tension

Summary of Contents for Vektor-HS

Page 1: ...instructions and should be aware of general safety precautions Improper installation can result in electric shock possible injury due to coming in contact with moving parts as well as other potential hazards Other considerations may be required if high winds or seismic activity are present If more information is needed contact a licensed professional engineer before moving forward 1 Follow all loc...

Page 2: ...eratures should be evenly maintained between 30 F and 110 F 1 C and 43 C Wide temperature swings may cause condensation and sweating of metal parts All accessories must be stored indoors in a clean dry atmosphere Remove any accumulations of dirt water ice or snow and wipe dry before moving to indoor storage To avoid sweating of metal parts allow cold parts to reach room temperature To dry parts an...

Page 3: ...ual components of a system have matching identification tags which should be used to identify and assemble the complete system Assembling systems with different identification tags can cause reductions in the fan s performance Prior to fully assembling and installing the Vektor H or Vektor HS fans inspect bypass air plenums and the fan assembly to make sure they are in working order Pre Installati...

Page 4: ...re lifting be sure that all shipping materials have been removed from the unit 2 Use standard lifting and rigging practices 3 All lifting brackets on each unit must be utilized at the same time 4 Fan to be kept level during lifting and installation 5 Spreader bars must span the unit to prevent damage to the unit by the lifting cables 6 Always test lift the unit to check for proper balance and rigg...

Page 5: ...OTHERS SEE NOTE ABOVE Continuous weld or stitch weld Minimum 6 inch 152 4 mm stitch weld by 3 25 inch 82 5 mm spacing minimum Minimum 6 inch 152 4 mm weld on each corner OR Install 5 16 inch 7 9375 mm 24 Dril Flex Self Drilling Tapping Screws 3 16 inch 4 7625 mm minimum thread engagement into A36 steel centered in flange 4 5 inch 114 3 mm spacing 5 8 inch 15 875 mm minimum edge distance ALL HARDWA...

Page 6: ...r is present in the roof curb the duct is located between the roof curb and the damper adapter tray Duct Connection to Curb Side or End Duct Connection Vektor H or Vektor HS With bypass air plenum NOTE Plenum is provided with removable side or end panels allowing the proper duct connection Duct to Bypass Air Plenum Bypass Air Plenum Weatherhood Duct flange and gasketing by others Roof Curb Option ...

Page 7: ...ozzle subassemblies as shown in the submittal drawing Align flange bolt holes and fasten sections using the 3 8 inch 316 stainless steel bolts washers and lock washers provided 6 Follow electrical connection and pre start up checks as listed on pages 10 and 11 System Assembly NOTE When installing each section be certain to rig each section separately using the lifting lugs provided Stack Extension...

Page 8: ... of air velocity through the fan is maintained per NFPA 96 clause 8 2 1 1 2008 edition and UL 762 Issue 5 December 19 2003 clause 6 2 Grease Trap A grease trap is an aluminum trap designed to collect grease residue to avoid drainage onto roof surface It contains a built in water separating baffle Instructions 1 Apply cover to grease trap Install clip nuts to trap over holes provided Attach cover w...

Page 9: ...y occur Drain connections are 1 2 inch NPT Installed piping to have a downward angle to allow for drainage Fill traps to recommended level before start up Note A conservative method of trap design is to set N total static pressure Fan Drain Connection Plenum Drain Connection H 1 in for each inch of maximum negative static pressure plus 1 in J 1 2 of H L H J Pipe diameter L H J Connect this end to ...

Page 10: ...ed to fan housing Optional transformer and isolation damper refer to CAPS file selection SINGLE PHASE LAYOUT THREE PHASE LAYOUT THREE PHASE WITH VFD LAYOUT Field Wiring Factory Wiring Field Wiring Factory Wiring Field Wiring Factory Wiring Three Phase with Variable Frequency Drives Layout LINE IN 115 208 230 277 volt single phase MOTOR DISCONNECT 115 208 230 277 volt Single phase TRANSFORMER 208 2...

Page 11: ... inlet For 3 phase installations fan rotation can be reversed by simply interchanging any two of the three electrical leads For single phase installations follow the wiring diagram located on the motor Radial Gap Overlap A Inlet Cone Wheel Vektor H Applications with Variable Frequency Drive VFD For Vektor systems with single point three phase wiring per blower the isolation damper actuator will be...

Page 12: ...rive Motor bearings are lubed for life with no maintenance required If motor or wheel needs to be serviced or replaced use the lifting lugs to pull assembly cartridge out Removal of Dust and Dirt Dirt clogs cooling openings on the motor housing contaminates bearing lubricant and collects on the impeller causing severe imbalance if left unchecked The exterior surface of the motor and impeller shoul...

Page 13: ... a gravity isolation damper remove the panel opposite the weatherhood on the bypass air plenum section and slide the damper straight out toward you When performing maintenance on an isolation damper with an actuator remove the bolted weatherhood and disconnect the actuator from damper Then remove the panel opposite the weatherhood on the bypass air plenum section and slide the isolation damper out...

Page 14: ...P PAINT REPAIR KIT CONTENTS One Zinc Clad Aerosol Can One pint recoat epoxy primer grey with one pint recoat epoxy primer catalyst One quart H S Polyurethane One Scotch Brite scratch pad Two 1 1 2 inch wide paint brushes Four pint sized empty cans for mixing One quart sized empty can for mixing Zinc repair instructions MSDS sheets NOTE While the manufacturer provides heavy duty quality products fo...

Page 15: ...RAME BOTTOM BAR 2 5 FRAME TOP BAR 2 6 FRAME WELD 2 7 BLADE WELD 2 8 ACTUATOR MOUNT 2 9 LIFT LUG 4 10 ACTUATOR COVER 2 11 BLADE SEAL RIGHT 2 12 BLADE SEAL LEFT 6 13 FLEX BACKING 4 14 VEKTOR BACKING 2 15 ACTUATOR 2 16 ELECTRICAL BOX 1 17 BEARING 4 18 BLADE SEAL 4 19 FLEX SEAL 2 20 1 2 3 4 5 6 7 8 9 10 11 12 13 14 15 16 17 18 19 20 Quantity 1 for sizes 9 thru 13 Quantity 2 for sizes 16 thru 36 Item Q...

Page 16: ...AM PM Notes ____________________________________________ _________________________________________________ _________________________________________________ _________________________________________________ _________________________________________________ Date____________________Time______________ AM PM Notes ____________________________________________ ___________________________________________...

Reviews: