6
7
www.bikefriday.com
800-777-0258 • +1-541-687-0487
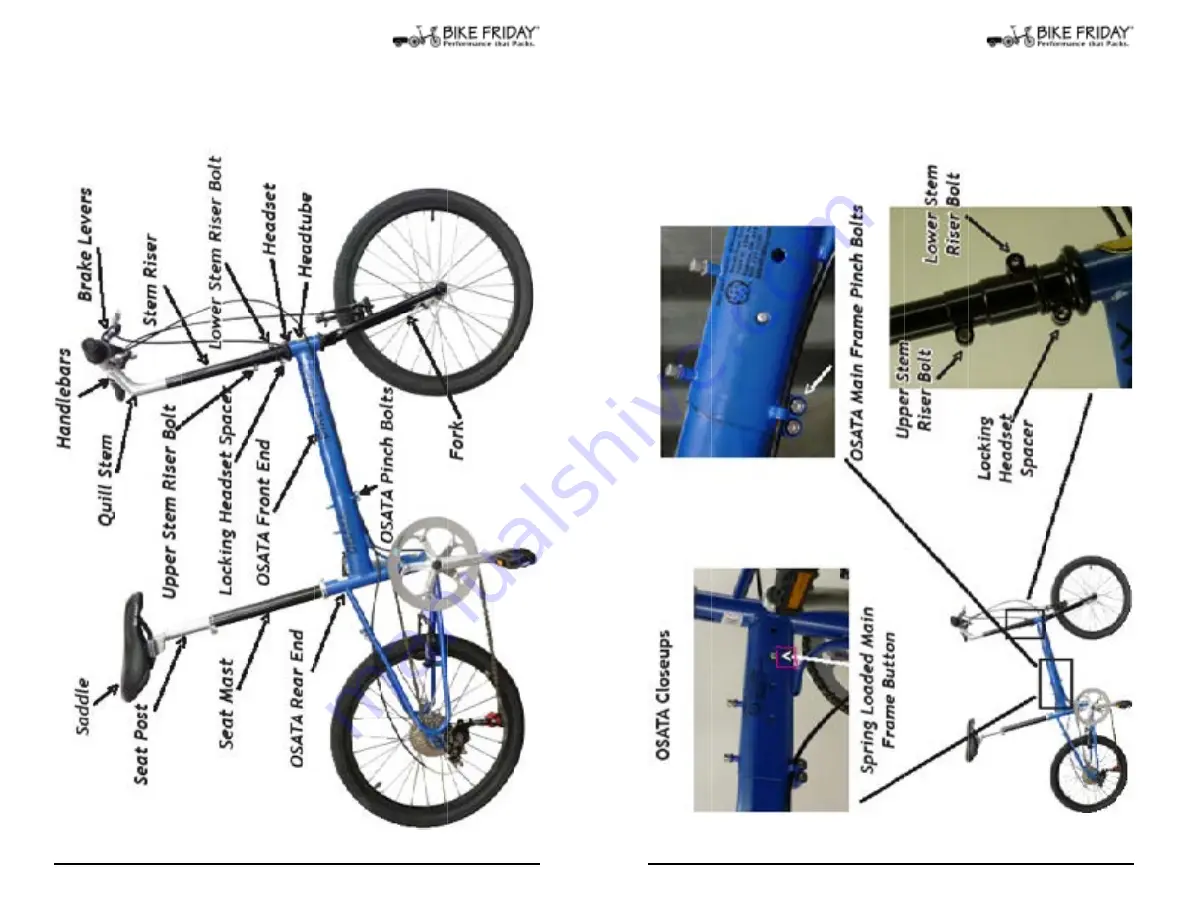
Anatomy of an OSATA
Anatomy of a OSATA: Closeups
Page 1: ... 777 0258 1 541 687 0487 Using Your Bike Friday OSATA Green Gear Cycling Inc 3364 W 11th Ave Eugene OR 97402 800 777 0258 USA Canada 1 541 687 0487 Int l 1 541 687 0403 Fax www bikefriday com info bikefriday com version 3 4 14 ...
Page 2: ...tall Pedals 18 Double Check Your Bike Friday 19 Adjusting your OSATA Frame Size 20 Saddle Height 20 Handlebar Height 21 22 Quill Stem Handlebars 22 Main Frame Archer Technique 23 24 Main Frame Gravity Technique 24 25 Main Frame Two Person Technique 25 26 Adjusting Headset 26 29 Packing in TravelCase 30 Remove Accessories 30 Remove Pedals 30 Separate Main Frame 30 Remove Seatmast Seatpost 31 Open F...
Page 3: ...ikes to a class of middle schoolers of various sizes and shapes those two ideas came together Thus the birth of the OSATA OSATA stands for One Size Adjusts to All Types Families can share bikes Rental fleets don t have to be so large And school kids can learn on a bike that fits I hope you enjoy your ride Alan Scholz A Safe Routes to School class in Eugene riding a fleet of 40 Bike Friday OSATAs F...
Page 4: ...6 7 www bikefriday com www bikefriday com 800 777 0258 1 541 687 0487 800 777 0258 1 541 687 0487 Anatomy of an OSATA Anatomy of a OSATA Closeups ...
Page 5: ... or venturing into foreign lands we have the gear you need Call us for information on spare tires tubes replacement parts fenders racks bags or other items to complete your Travel System You can purchase these products from our online store www store bikefriday com Congratulations You have just purchased the finest travel bicycle available today Your bike has been carefully designed and con struct...
Page 6: ...Depending on the components you have purchased with your Bike Friday your specific model may require other tools for adjustments Open the box or TravelCase and remove the bike from the container Remove the bubble wrap or felt covers and lay the disassembled bike out on front of you Connect Front and Rear Frame Sections With a hand holding the front and rear sections respec tively insert the front ...
Page 7: ... Premio della Vittoria a tired and numb Tullio Campagnolo struggled with the frozen wing nuts on his rear wheel while trying to change gears In a moment of frustration and inspiration Campagnolo envisioned the modern quick release The bicycle world was transformed The quick release is one of those simple but great inventions that really makes life better However if used incorrectly you can potenti...
Page 8: ...y firm resistance when the quick release is properly adjusted the lever may even leave a light imprint in the palm of your hand Fig 7 Setting quick release tightness Assembling your OSATA Reconnect Linear Pull Brakes V Brakes To close the V brake to the riding position while fac ing the brake with your left hand index finger and thumb grab the noodle carrier and with your right hand grab the noodl...
Page 9: ...hidden under the clamping collar This pin must engage the slot in the back of the fork s steerer tube the unpainted tube sticking up from the frame s headtube Additionally the stem should be fully seated onto the fork steerer tube Mount the Stem Riser Slide the bottom of the stem riser onto the fork steerer tube keeping the stem riser s lower clamp forward so the hidden stem pin will engage the sl...
Page 10: ...m crank threads Your bicycle may have shipped with a set of pedal washers For some cranks the use of the washer in between the pedal and the crank arm creates a more solid and secure base or foundation for the pedal to contact the crank arm with If included use them Assembly Pedals Double Check Your Friday Double Check Your Bike Friday At this point your bike should be ready to ride However before...
Page 11: ...ng you can purchase a shim and seatpost from Bike Friday so the seat post is usable directly inserted into the mainframe without the use of the seatmast Fig 19 Lower Seatmast shim Fig 20 Lower Seatmast no seatpost Handlebar Height This is a subjective preference Handle bar height can be classified into three general categories 1 bars below saddle 2 bars level with saddle 3 bars higher than saddle ...
Page 12: ...and a piece of wood to prevent any deformation of the bolt head strike the bolt head in a downward motion toward the fork This will unseat the wedge allowing you to adjust or remove the stem Fig 23 Quill Stem adjustment Fig 24 Quill Stem unwedge Adjusting OSATA Main Frame Adjusting the Main Frame Sizing Adjusting the main frame size can be done by one person but is easier with two If you are encou...
Page 13: ...g difficulty sizing the bike this technique may be easier some bikes this seems to work better on than others Fig 29 Main Frame Pinch Bolts Main Frame Pinch Bolts Spring Loaded Button Adjusting OSATA Main Frame Fig 30 Gravity Technique Make Frame Larger cont Lift the front wheel so it is close to being directly above the rear wheel With one hand on the stem riser and one hand on the fork lift the ...
Page 14: ...ack wheel very lightly turn the stem to one side and see if the stem wheels returns to the forward position smoothly If the stem wheel s movement is notchy and not smooth the headset bearings are too tight Just right No play and rotates smoothly Adjusting OSATA Headset Tap Adjust Method Using Improvised Tools Remove the seatpost from the seatmast and the seatmast from the bike and the collar from ...
Page 15: ... headset fixed clamp OSATA Headset Press Tool available from Bike Friday with specialized tools Adjusting OSATA Headset From the bottom move the washer onto the rod and thread the nut onto the rod With a 10mm wrench or adjustable wrench hold in place the nut while tighten ing the bolt head with a hex wrench creating bearing pre load It is helpful to evaluate the headset adjustment with the tool st...
Page 16: ...acking Into a TravelCase Packing your OSATA into a TravelCase Remove your Accessories Set your Derailleur Before disassembling and packing your Bike Friday OSATA remove all extra accessories including racks and water bottle cages Items that may remain on the bike include your cycle computer mount or pump Shift the rear derailluer to its smallest cog hardest gear Fig 42 Pedal tightening drive side ...
Page 17: ... Install the Rear Wheel Dropout Spreader Secure with the rear wheel quick release lever or in the case of a Dual Drive hub you can use a zip tie Packing Front Wheel Remove the Rear Wheel After removing the rear wheel close the brake again Remove the quick release from the axle by undoing the knurled nut Be careful not to lose the small cone shaped springs Remove Stem Riser Loosen the stem riser lo...
Page 18: ...of the bike in with the rear derail leur at the Southwest corner of the case The rear end will fit somewhat diagonally into the case Please make sure the non drive crank arm is not striking the fork Point it to ward the headset Figure 52 Place the handlebars in the center of the case bars to ward the North stem riser pointing South Figure 53 Mechanics Tip If you need more slack to arrange the hand...
Page 19: ...ace the rear wheel cog up onto the case toward the East Avoid the rear wheel axle resting directly on the chainring Rotate the crank arm as nec essary to let the wheel sit as low as possible Figure 57 Packing OSATA in TravelCase Packing OSATA in TravelCase Fig 58 Fig 59 Place the front wheel in overlapping the rear You may need to offset it to the West a bit You will likely need to nest the rear c...
Page 20: ...Thumb Nuts Remove the parts out of the felt bags and remove the thumb nuts and one of the washers from each of the three threaded bolts leaving one washer over each stud post Fig 61 Trailer thumb nuts Install the Trailer Tongue Turn the TravelCase upside down while closed Slip the hollow end of the tongue over the end of the T piece Take the trailer tongue and insert its bolt through the correspon...
Page 21: ... the Rear Wheel Install the rear wheel into the rear frame dropouts and bolt into place With a small flat head screwdriver screw the shift rod into the drive side end of axle Depress the button on the click bock and move the click box onto the end of the rear hub axle Removing the Rear Wheel To remove a Dual Drive hub shift into gear one low push the button on the click box and pull the click box ...
Page 22: ...hose who plan ahead we can gen erally offer the quickest repair turn around during the winter months Bike Friday Service New Bicycle Tips and Maintenance Recommendations Unlike other new bicycles purchased from a shop your Bike Friday OSATA has been disassembled partly and placed in a suitcase or box Then it was shipped across town the country or the world As with any new bicycle your Bike Friday ...
Page 23: ...ent procedure For cartridge bearings make sure they are properly adjusted to ensure a long life CONTINUED ON PAGE 44 Overhauling the Bearings CONTINUED To increase their lifespan before replacement cartridges cn be serviced Using a thin knife you can peel back the rubber plastic metal in the case of Chris King seal clean out the old grease as much as possible pack in new grease and reassemble Unde...
Page 24: ...unds Luggage which exceeds these limitations may be charged an excess baggage fee Check with the airlines for regulation updates Warranty Information Bike Friday Guarantee We at Green Gear Cycling Inc Bike Friday want you the customer to be happy with your new bicycle For direct orders shipped from the factory if your bike does not meet your expec tations you may return the bicycle to us for a ful...
Page 25: ...ITY and the WAR RANTY of FITNESS FOR A PARTICULAR PURPOSE whether EX PRESSED or IMPLIED Electric Assist Product Warranty First we expect to deliver a fully functional product to you We warrant our electric assist components motor controller throttle charger and displays against defects in workmanship and materials for 1 year Batteries come with a one month warranty The most likely issues arise whe...
Page 26: ...wned bicycle If the bike does not meet your expectations you may return the bicycle to us for a full refund less shipping charges This applies to the purchases of pre owned bicycles In all cases the return shipping charges are your responsibility To take advantage of this guarantee you must notify our service department 800 777 0258 service bikefriday com within 30 calendar days of you originally ...