


40
Air to Water Heat Pump
Service Manual- Versati II Series
INSTALLATION
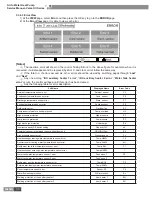
Models
SXVD200LCJ/A-K
SXVD200LCJ2/A-K
SXVD300LCJ/A-K
SXVD300LCJ2/A-K
SXVD200LCJ/A-M
SXVD200LCJ2/A-M
SXVD300LCJ/A-M
SXVD300LCJ2/A-M
SXVD200LCJ/A-H
SXVD200LCJ2/A-H
SXVD300LCJ/A-H
SXVD300LCJ2/A-H
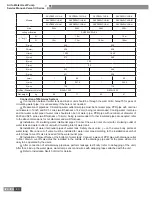
Litre
200L
200L
300L
300L
coil specification
SUS304 Ф22×0.8
coil length
M
\
10m
\
10m
N
13m
13m
18.5m
18.5m
D(mm)
540
620
D1(mm)
438
528
H(mm)
1595
1620
A(mm)
272
280
B(mm)
105
C(mm)
112
E(mm)
432
464
F(mm)
431
399
I(mm)
\
80
\
95
J(mm)
\
247.5
\
202.5
K(mm)
739
718
Outline (Diameter×H) (mm)
Φ540×1595
Φ620×1620
Net weight
kg
68
71
82
87
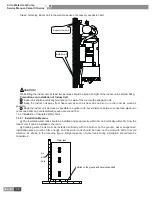
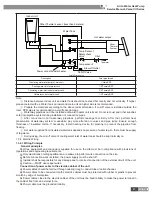
Connection of Waterway System
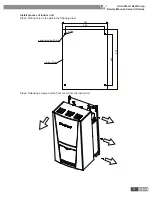
If connection between water tank and indoor unit should be through the wall, drill a holeφ70 for pass of
circulating water pipe. It is unnecessary if the hole is not needed.
Preparation of pipelines: Circulating water outlet/inlet pipe must be hot water pipe, PPR pipe with nominal
out diameter of dn25 and S2.5 series (wall thickness of 4.2mm) being recommended. Cooling water inlet pipe
and hot water outlet pipe of water tank should also be hot water pipe, PPR pipe with nominal out diameter of
dn20 and S2.5 series (wall thickness of 3.4mm) being recommended. If other insulated pipes are adopted, refer
to the above dimensions for out diameter and wall thickness.
Installation of circulating water inlet/outlet pipes: Connect the water inlet of unit with circulating outlet of
water tank and water outlet of unit with circulating inlet of water tank.
Installation of water inlet/outlet pipes of water tank: Safety check valve (→ on the valve body points at
water tank), filter and cut-off valve must be installed for water inlet pipe according to the installation sketch of
unit. At least a cut-off valve is needed for the water outlet pipe.
Installation of blow-off pipe at the bottom of water tank: Connect a piece of PPR pipe with drainage outlet
to floor drain. A cut-off valve must be installed in the middle of the drainage pipe and at the place where it is
easy to be operated by the users.
After connection of all waterway pipelines, perform leakage test firstly (refer to debugging of the unit).
After that, bind up the water pipes, water temp sensor and wires with wrapping tapes attached with the unit.
Refer to Installation Sketch of Unit for details.
Summary of Contents for Versati II
Page 1: ...AIR TO WATER HEAT PUMP SERVICE MANUAL Versati T1 R410A 50Hz GC201308 II ...
Page 4: ...1 Air to Water Heat Pump Service Manual Versati II Series PRODUCT PRODUCT ...
Page 13: ...10 Air to Water Heat Pump Service Manual Versati II Series CONTROL CONTROL ...
Page 37: ...34 Air to Water Heat Pump Service Manual Versati II Series INSTALLATION INSTALLATION ...
Page 62: ...59 Air to Water Heat Pump Service Manual Versati II Series MAINTENANCE MAINTENANCE ...
Page 81: ...78 Air to Water Heat Pump Service Manual Versati II Series MAINTENANCE Fig 14 ...
Page 97: ...JF00301971 ...