❏
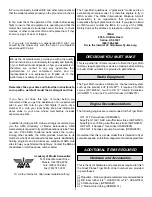
5. Install the muffler on your engine. Cut holes in the cowl
where necessary for items such as the engine exhaust,
needle valve, glow plug igniter, or fuel filler valve. For this
particular application the use of an
O.S. Exhaust Header
Pipe
(OSMG2625) allows the positioning of the muffler in a
perfect location under the model as shown in the photo above.
❏
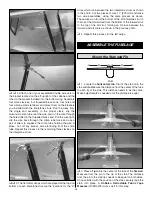
1. Assemble the
stopper
and
tubes
as shown in the
photo, then insert them into the
tank
. Tighten the screw to
expand the stopper, thus sealing the tank. Be certain the
fuel line weight
(clunk) at the end of the fuel line inside the
tank does not contact the rear of the tank. Otherwise, the
line may become stuck above the fuel level and stop the fuel
flow. Remember (or use a felt-tip pen to mark) which tube is
the fuel pick-up tube and which tube is the vent.
❏
2. Install the tank into the fuse. Fit the neck through the hole
in the firewall. Be certain the vent tube inside the tank is pointing
upward. Glue the tank into place with epoxy or silicone.
❏
3. In order to mount the optional
Great Planes Easy-
Fueler for glow fuel
(GPMQ4160) used on this model,
make a mount from 1/8" [3mm] plywood (not included with
this kit) or use the
filler valve mount
from a
Great Planes
Handy Mounts
set (GPMQ6000). Use epoxy to securely
glue the filler valve mount to the firewall in a location where
the filler valve will be accessible outside the cowl when it is
time to fuel the engine.
❏
4. You will notice that the firewall has been fuel proofed
but it is necessary to use epoxy or fuelproof paint to coat the
fuel filler mount. Make the necessary hole in the cowl to
access the filler valve.
❏
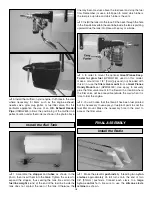
1. Make the elevator
pushrods
by threading two
nylon
clevises
approximately 25 full turns onto the end of two
36" [914mm] pushrods. Connect each clevis to a
large
nylon control
horn. Be sure to use the
silicone clevis
retainer
as shown.
Install the Radio
FINAL ASSEMBLY
Install the Fuel Tank
16


