background image

2

TABLE OF CONTENTS

INTRODUCTION

 ............................................................... 2

SAFETY PRECAUTIONS

 ................................................. 3

DECISIONS YOU MUST MAKE

 ........................................ 3

 Radio 

Equipment 

....................................................... 3


Power System Recommendations ............................. 3


Propeller ..................................................................... 4


Batteries and Charger ................................................ 4

ADDITIONAL ITEMS REQUIRED

 .................................... 4


Required Hardware and Accessories ........................ 4


Adhesives and Building Supplies ............................... 4


Optional Supplies and Tools ....................................... 4

 Building 

Stand 

............................................................ 5

IMPORTANT BUILDING NOTES

 ...................................... 5

ORDERING REPLACEMENT PARTS

 .............................. 5

KIT INSPECTION

 .............................................................. 6

PREPARATIONS

 ............................................................... 7

ASSEMBLE THE WINGS

 .................................................. 7

ASSEMBLE THE TAIL  SECTION

 ..................................... 9

INSTALL THE TAIL SERVOS AND PUSHRODS

 ............ 12

ASSEMBLE & INSTALL THE MAIN LANDING GEAR

 .. 13

INSTALL THE POWER SYSTEM

 .................................... 15


Glow Engine Installation .......................................... 15


Brushless Motor Installation ..................................... 18

FINISH THE  MODEL

 ....................................................... 21

APPLY THE  DECALS

 ..................................................... 23

GET THE MODEL READY TO FLY 

 ................................ 23


Install and Operate the Motor Battery ...................... 23


Check the Control Directions ................................... 24


Set the Control Throws ............................................ 25


Balance the Model (C.G.)......................................... 25


Balance the Model Laterally ..................................... 26

PREFLIGHT

 .................................................................... 26

 Identify 

Your 

Model 

................................................... 26


Charge the Batteries ................................................ 26

 Balance 

Propellers 

................................................... 26

 Ground 

Check 

.......................................................... 26

 Range 

Check 

........................................................... 26

ENGINE SAFETY PRECAUTIONS

 ................................. 27

LITHIUM BATTERY HANDLING AND USAGE

 .............. 27

AMA SAFETY CODE

 ...................................................... 27

CHECK LIST

 ................................................................... 28

FLYING

 ............................................................................ 28


Fuel Mixture Adjustments ........................................ 29

 Takeoff 

..................................................................... 29

 Flight 

........................................................................ 29

 Landing 

.................................................................... 29

INTRODUCTION

Congratulations on your purchase of the Great Planes 
Shoestring .46 ARF! This beautiful, fi berglass fuselage 
model follows on the success of Great Planes’ larger, 
.60-sized version. Much of the typical ARF building work has 
been completed at the factory, leaving only the fi nal steps 
needed to get you airborne quickly. Even a pilot comes 
already installed!

You‘ll enjoy sport performance with a .46-size engine, or 
experience scale-like speeds that recall the Cleveland Air 
Races with a .55. Accommodations have also been made 
for installing a brushless power system. A magnetic canopy 
hatch makes radio access and battery changes a breeze! 
The two-piece wing with a lightweight, carbon wing tube 
allows for easy transport.

For the latest technical updates or manual corrections to the 
Shoestring .46 ARF visit the Great Planes web site at www.
greatplanes.com. Open the “Airplanes” link, then select the 
Shoestring .46 ARF. If there is new technical information or 
changes to this model a “tech notice” box will appear in the 
upper left corner of the page.

AMA

If you are not already a member of the AMA, please join! 
The AMA is the governing body of model aviation and 
membership provides liability insurance coverage, protects 
modelers’ rights and interests and is required to fl y at most 
R/C sites.


Academy of Model Aeronautics

5151 East Memorial Drive

Muncie, IN 47302

Tele: (800) 435-9262

Fax (765) 741-0057

Or via the Internet at:

http://www.modelaircraft.org

IMPORTANT!!! 

Two of the most important things you can do 

to preserve the radio controlled aircraft hobby are to avoid 
fl ying near full-scale aircraft and avoid fl ying near or over 
groups of people.

Summary of Contents for Shoestring

Page 1: ...By the act of using the user assembled product the user accepts all resulting liability If the buyer is not prepared to accept the liability associated with the use of this product the buyer is advis...

Page 2: ...f Great Planes larger 60 sized version Much of the typical ARF building work has been completed at the factory leaving only the nal steps needed to get you airborne quickly Even a pilot comes already...

Page 3: ...e mask and rubber gloves when grinding drilling and sanding berglass parts Vacuum the parts and the work area thoroughly after working with berglass parts We as the kit manufacturer provide you with a...

Page 4: ...GPMQ4131 glow engine only Adhesives and Building Supplies This is the list of Adhesives and Building Supplies that are required to finish the Shoestring 46 ARF 1 2 oz 15g Thin Pro CA GPMR6001 1 2 oz...

Page 5: ...Technical Data Due to manufacturing tolerances which will have little or no effect on the way your model will y please expect slight deviations between your model and the published values ORDERING RE...

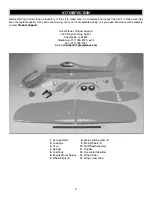
Page 6: ...h assembly contact Product Support Great Planes Product Support 3002 N Apollo Drive Suite 1 Champaign IL 61822 Telephone 217 398 8970 ext 5 Fax 217 398 7721 E mail airsupport greatplanes com 1 Canopy...

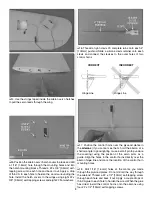
Page 7: ...ut three arms from a four armed servo arm for each aileron servo Enlarge the outer hole of each remaining arm with a 5 64 2mm drill bit 2 Attach a 6 152mm servo extension to each aileron servo and sec...

Page 8: ...evises to the outer holes of two control horns Hinge Line Hinge Line CORRECT INCORRECT Hi 7 Position the control horns over the plywood plates in the ailerons if you cannot see them hold the aileron a...

Page 9: ...s to the servo arms using nylon FasLinks Thread the clevises up or down on the pushrods as necessary to center the ailerons with the servo arms centered When satis ed slide the silicone clevis retaine...

Page 10: ...he stab into the fuse However it will make a stronger glue joint Slide the stab into the fuse center it left and right and align it with the wing panels Use denatured alcohol to clean up any excess ep...

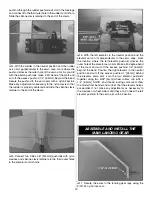
Page 11: ...ith the tail wheel assembly installed in the orientation shown Make any adjustments necessary so the nylon tab on the tail wheel wire ts all the way into the slot in the fuse 10 Roughen the portion of...

Page 12: ...ll a control horn onto the right side of the rudder in the same manner 3 Install the elevator and rudder servos onto the servo tray in the direction and positions shown using the hardware supplied wit...

Page 13: ...retainers to the third outer holes in the elevator control horns 6 With the left elevator in the neutral position and the elevator servo arm perpendicular to the servo case mark the location where th...

Page 14: ...hread a 6 32x1 4 6 4mm socket head cap screw into each wheel collar and tighten the screws against the at spots on the axles using threadlocking compound Be sure that the wheel rotates freely on the a...

Page 15: ...uld extend out 1 2 13mm beyond the stopper and the vent line should be bent upwards and left uncut With the tubes installed in the stopper t the stopper plates loosely in place with the 3 x 25mm phill...

Page 16: ...so be used 7 Using four 6 32 x 3 4 19mm SHCS four 6 at washers four 6 lock washers and thread locking compound attach the engine mount side mounted to the rewall so that the engine head will be on the...

Page 17: ...g the fuel tank 13 Cut three arms from a four armed servo arm included with your throttle servo Install a screw lock pushrod connector into the outer hole in the remaining arm and secure it in place w...

Page 18: ...o Tighten the SHCS in the pushrod connector cut away the excess pushrod 1 4 6 4mm behind the pushrod connector and glue a plywood outer pushrod clip to the outer pushrod tube and fuel tank brace Use t...

Page 19: ...ead locking compound 3 Loosen the screws that hold the aluminum motor mount halves together and slide them apart as necessary so that the front of the prop adapter is 4 7 8 124mm from the rewall When...

Page 20: ...pieces to join LiPo packs together for a series con guration 8 Make a strap from the included non adhesive hook and loop material long enough to t your battery packs Feed the strap through the slots...

Page 21: ...to the battery and receiver being sure to secure the connection between switch and battery You can also install a charge jack receptacle However we chose to leave this out since the Shoestring has a m...

Page 22: ...ugh the hole but the included fuel line plug will t snugly into the hole holding it securely in place during ight If you have installed a brushless power system make a cooling hole cutout near the bot...

Page 23: ...he decal Apply the rest of the decals the same way GET THE MODEL READY TO FLY Install and Operate the Motor Battery Brushless Only IMPORTANT If using multiple battery packs connected with an adapter n...

Page 24: ...transmitter and receiver and center the trims If necessary remove the servo arms from the servos and reposition them so they are centered Reinstall the screws that hold on the servo arms 2 With the tr...

Page 25: ...s model and wish to enjoy it for many ights DO NOT OVERLOOK THIS IMPORTANT PROCEDURE A model that is not properly balanced will be unstable and possibly un yable At this stage the model should be in r...

Page 26: ...ries Follow the battery charging instructions that came with your radio control system to charge the batteries You should alwayschargeyourtransmitterandreceiverbatteriesthenight before you go ying and...

Page 27: ...body part to try to stop the engine To stop a gasoline powered engine an on off switch should be connected to the engine coil Do not throw anything into the propeller of a running engine LITHIUM BATT...

Page 28: ...are set up according to the manual 10 Make sure there are silicone retainers on all the clevises and that all servo arms are secured to the servos with the screws included with your radio 11 Secure co...

Page 29: ...ght and execute practice landing approaches by reducing the throttle to see how the model handles at slower speeds Add power to see how the model climbs as well Continue to y around executing various...

Page 30: ...oz ft 73 80 g dm Length 46 in 1 160 mm Great Planes Escapade 40 70 GP EP ARF GPMA1200 The 59 span Revolver looks fast and its performance under glow or brushless electric power follows through with ex...

Page 31: ...Add ABL Advanced Bimetallic Liner durability a self leveling and aligning head design a tapered low speed needle to eliminate transition surge and the 46 AX still has more to offer There s a simple ro...

Page 32: ...AIR OUTLET HOLE IN BOTTOM OF COWL AIR INLET HOLE IN FRONT OF COWL BRUSHLESS COOLING HOLE TEMPLATES...

Reviews: