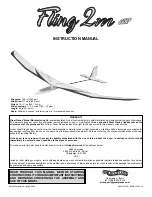
First of all, if you are flying with other flyers, check to
make sure they are not flying or testing on the same
frequency as your model. Try to find an experienced
pilot to help you with your first flights.
Although the Fling 2M ARF is very easy to fly, an experienced
pilot can save you a lot of time and possible aggravation by
helping you get your model in the air smoothly. Find a BIG,
OPEN field for your first flights – the bigger the better as you
won’t have to worry about where you need to land. Ground
based objects (trees, poles, buildings, etc.) seem to attract
model airplanes like a magnet.
It is a good idea to do a couple of trim flights before each
flying session to make sure the plane is still in trim and the
radio is working properly. The model will survive a hard
landing from 6 feet [2 m] much better than it will one from
several hundred feet. The first few trim flights should be
done over a grass field. The longer the grass, the better
(more cushion). Turn on the transmitter first and then the
receiver. Hold the Fling 2M ARF under the wing with the
nose pointed slightly down and directly into the wind. It is
very important that you launch the model with the wings
level and the nose pointing at a spot on the ground about 50
feet in front of you. Have a friend stand off to the side of you
and tell you whether the nose is pointing up or down. If the
sailplane is launched with the nose up or launched too hard
it will climb a few feet, stall and fall nose-first straight down.
With the nose pointed down slightly, the sailplane will
accelerate down until it picks up enough flying speed and
then level off and glide forward. The plane should be
launched with a gentle push forward. With a little practice
you will be able to launch it at just the right speed so it soars
straight ahead in a long and impressive glide path. Adjust
the trims on your transmitter to get the plane to fly straight
ahead in a smooth glide path. Once you get the hang of
launching, you can try turning the plane during the trim
flights by gently applying a “touch” of right or left rudder. You
can also try “flaring” the landings by slowly applying a touch
of up elevator (pull the stick back) as the plane nears the
ground. The Fling 2M ARF will continue to fly just a few
inches off the ground for a surprisingly long distance. It is
important you don’t “over-control” the model. Make any
control inputs slowly and smoothly rather than moving the
transmitter sticks abruptly.
Note: Remember that your radio control responds as if
you were sitting in the cockpit. When you push the
transmitter stick to the right, the rudder moves to the
plane’s right! This means that when the plane is flying
towards you it may seem like the rudder controls are
reversed (when you give “right” rudder the plane turns
to your left–which is the plane’s “right”).
It is sometimes easier to learn to fly the plane if you always face
your body in the direction the plane is flying and look over your
shoulder to watch the model. Don’t worry about accomplishing
very much on your first flights. Use these flights to get the “feel”
of the controls and the Fling’s flying characteristics. Try to keep
the plane upwind and just perform some gentle “S-turns”
(always turning into the wind) until it is time to set up for landing.
Have a helper adjust the trims on your transmitter (a little at a
time) until the plane will fly straight and level with the transmitter
sticks in their neutral positions. It can be very hard for a beginner
to fly a plane straight towards him as he would have to do if the
plane were downwind and every mistake took the plane a little
farther downwind. When it is time to land, just continue
performing the gentle “S-turns” upwind and let the plane glide
onto the ground. Don’t worry about where the plane lands–just
miss any trees, etc. Practice flying directly into the wind (upwind
of yourself) without letting the plane get off course, and then turn
and come downwind until the plane is even with you and try it
again. When you are comfortable with flying directly into the
wind, start letting the plane go behind you (downwind) a little
before you start back upwind. Continue this until you can fly
directly towards you from downwind without getting disoriented.
At this point you can start to establish a “landing pattern” and
bring the sailplane in for a landing from downwind. This enables
the plane to be flown as slowly (ground speed) as possible for
accurate landings.
A hi-start is the most popular way to launch your Fling 2M
ARF. It consists of rubber tubing and about 200' of string with
IMPORTANT! If you choose to utilize a winch for
launching the Fling 2M ARF, keep in mind this is a
lightweight model that will require a soft winch launch. A
hard launch from a winch could cause the wing to fail.
Your First Hi-Start Launch
First Flights
Trim Flights
Preparations
14


